# Branding
URL: /about/branding
These resources exist to help you use Mesh's assets.
***
title: "Branding"
description: "These resources exist to help you use Mesh's assets."
-------------------------------------------------------------------
import Link from "next/link";
import Image from "next/image";
## Logo \[!toc]
The Mesh logo is available in two color schemes: black and white. You can use the logo in either color scheme depending on your design needs. The logo is available in various sizes to suit different use cases.
# Project Catalyst
URL: /about/catalyst
Proposals that we have submitted to Project Catalyst and its progress.
***
title: "Project Catalyst"
description: "Proposals that we have submitted to Project Catalyst and its progress."
-------------------------------------------------------------------------------------
import { Status } from "@/components/ui/Status";
import { TaskList } from "@/components/ui/TaskList";
import Link from "fumadocs-core/link";
import { CatalystCard } from "@/components/ui/CatalystCard";
import { fund13, fund12, fund11, fund10 } from "@/data/catalyst";
# Feature complete Web3 SDK
URL: /about
Our enterprise-ready SDK is professionally designed, robust, and developer-friendly. With simple transaction builders, seamless wallet integrations, and reliable data services, building Web3 applications has never been this effortless.
***
title: "Feature complete Web3 SDK"
description: "Our enterprise-ready SDK is professionally designed, robust, and developer-friendly. With simple transaction builders, seamless wallet integrations, and reliable data services, building Web3 applications has never been this effortless."
----------------------------------------------------------------------------------------------------------------------------------------------------------------------------------------------------------------------------------------------------------
import Image from 'next/image';
import Link from 'fumadocs-core/link';
import {
SiDiscord,
SiX,
SiGithub
} from "@icons-pack/react-simple-icons";
import { GlobeAltIcon } from '@heroicons/react/24/outline';
import {team} from "@/data/team";
Our Team
{
team.map((member) => (
{member.name}
))
}
What are we working on?
Check out our GitHub milestones to see what we are currently working on.
Incorporation
MeshJS Pte. Ltd. is a company registered in Singapore since 2023, with the registration number (UEN): 202344120W.
Status
Stay up to date with our latest releases, tests and build status.
Published on NPM
Build status
Publish status
# Support Us
URL: /about/support-us
Thank you for your interest in Mesh, we appreciate any kind of support! Here are some ways you can support us.
***
title: "Support Us"
description: "Thank you for your interest in Mesh, we appreciate any kind of support! Here are some ways you can support us."
-----------------------------------------------------------------------------------------------------------------------------
import Link from 'fumadocs-core/link';
import Image from 'next/image';
import { cn } from '@/lib/cn';
import { buttonVariants } from '@/components/ui/button';
import { useTheme } from 'next-themes';
# Follow us on Twitter \[!toc]
Follow us on Twitter so you get updated with the latest development!
Follow us on Twitter
# Donate to Mesh \[!toc]
Your support for this open-source SDK will go a long way. So thank you!
Coming soon
{/* surprise svg has kinda padding which doesnt look when not able to right align */}
# Star Mesh GitHub Repo \[!toc]
Visit our GitHub and star it!
Star GitHub repo
# Add Mesh Badge in your Application \[!toc]
Add our beautiful Mesh Badge to give your users confidence knowing that your application is running on top of a solid SDK.
```tsx
import { MeshBadge } from '@meshsdk/react';
export default function Page() {
return (
<>
);
}
```
# Join our Discord Server \[!toc]
Come and talk to us in our Discord server.
Join Mesh's Discord server
# Mesh AI Features
URL: /ai
We've built AI tools to help you work with Mesh faster
***
title: "Mesh AI Features"
description: "We've built AI tools to help you work with Mesh faster"
---------------------------------------------------------------------
import Link from "fumadocs-core/link";
## Ask MeshAI
Ask MeshAI is the chatbot on the website which answers your queries instantly and accurately by utilizing the contextual retrieval built on top of traditional RAG.
### How it works:
MeshAI searches through all the vector embeddings of Mesh documentation, code examples and starter templates to find the right answer for your question. It uses contextual retrieval technique to pull closet vectors to your query and make an LLM call to produce accurate answer without making things up.
### Example Response:
In this demo, we create a transaction that transfers ADA back to the sender’s own address using MeshAI.
## LLMs.txt
Mesh provides llms.txt file that is easily understood by AI tools. This file contains everything from Mesh documentation and code examples. This file can be plugged into any AI code editors and will be instantly indexed to help you code with AI using up-to-date documentation from Mesh. Because the file follows a standardized AI-friendly format, code generation stays consistent across different tools. Since it's written in markdown text, it's just as easy for humans to browse as it is for machines to process. You can find llms.txt file here.
AI code editors like Cursor let you add and index documentation, so you can reference it directly in your chats. For example, you can bring Mesh docs into Cursor by typing @Docs → Add new doc. A modal will open where you can paste the link to the /llms.txt file. Once added, the doc becomes available as context, making it easier and faster to build apps with AI.
## Mesh MCP Setup
Use Mesh MCP to access Mesh docs and get coding/debugging help directly in VS Code, Cursor, or Claude Desktop.
### Add this to your MCP server settings:
```ts
{
"servers": {
"mesh-mcp": {
"name": "mesh-mcp-server",
"command": "npx",
"args": ["-y", "meshjs-mcp"],
"env": {
"API_KEY": "your-api-key",
"MODEL": "your-preferred-model"
}
}
}
}
```
### Setup notes
1. Replace your-api-key with your API key from the supported providers (OpenAI, Gemini, or Anthropic Claude).
2. Set MODEL to the model you want to use from respective provider.
3. Restart your editor after saving the config.
4. Start the server manually (restarting alone doesn't run it):
* VS Code: Open Command Palette (Cmd+Shift+P), search "MCP: List Servers", select "mesh-mcp", and choose "Run Server".
* Cursor: Similar to VS Code, use the MCP extension's list servers command to run it.
* Claude Desktop: The server should start automatically on launch if configured correctly in settings; check the MCP logs if issues arise.
5. Get help to code faster with Mesh MCP and AI editor
### Example
# Write a Smart Contract
URL: /aiken/first-script
Learn how to write your first Aiken script, with a simple redeemer
***
title: "Write a Smart Contract"
description: "Learn how to write your first Aiken script, with a simple redeemer"
---------------------------------------------------------------------------------
import Link from "fumadocs-core/link";
## Write your first smart contract in Aiken
In this section, we will walk you through the process of writing a simple smart contract in Aiken.
We will use the Visual Studio Code editor for this tutorial. You can use any other editor of your choice, but we recommend using Visual Studio Code for its rich feature set and support for Aiken.
First, we create a new Aiken project within this project folder:
```bash
$ aiken new meshjs/hello_world
$ cd hello_world
$ aiken check
```
Remember to check your Aiken project by running `aiken check` after creating a new project and as you develop the contract.
### Write the smart contract \[!toc]
Let's create file for our validator, `validators/hello_world.ak`:
```tsx
use aiken/hash.{Blake2b_224, Hash}
use aiken/list
use aiken/transaction.{ScriptContext}
use aiken/transaction/credential.{VerificationKey}
type Datum {
owner: Hash,
}
type Redeemer {
msg: ByteArray,
}
validator {
fn hello_world(datum: Datum, redeemer: Redeemer, context: ScriptContext) -> Bool {
let must_say_hello =
redeemer.msg == "Hello, World!"
let must_be_signed =
list.has(context.transaction.extra_signatories, datum.owner)
must_say_hello && must_be_signed
}
}
```
The validator checks for two conditions:
* The redeemer message is `Hello, World!`
* The transaction is signed by the owner
If both conditions are met, the validator returns `true`. Otherwise, it returns `false`.
## Compile and build
Let's compile the smart contract with the Aiken CLI:
```tsx
$ aiken build
```
This command will compile the smart contract and generate the `plutus.json` file in the root folder. This file is a CIP-0057 Plutus blueprint, blueprint describes your on-chain contract and its binary interface.
# Getting Started
URL: /aiken/getting-started
Setting up your system to compile Aiken smart contracts
***
title: "Getting Started"
description: "Setting up your system to compile Aiken smart contracts"
----------------------------------------------------------------------
import Link from "fumadocs-core/link";
## Installation Instructions
This section will guide you through the process of setting up your system compile Aiken smart contracts. You can skip this section if you have already set up your system or do not wish to compile the contract.
### Using aikup (on Linux & MacOS only) \[!toc]
If you are using Linux or MacOS, you can use the utility tool to download and manage Aiken's pre-compiled executables.
You can install the Aiken CLI by running the following command in your terminal:
```bash
$ curl -sSfL https://install.aiken-lang.org | bash
```
After installing the Aiken CLI, you can use the following command to installs the latest version available. `aikup` is a cross-platform utility tool to download and manage Aiken's across multiple versions and for seamless upgrades.
```tsx
$ aikup
```
### From sources (all platforms) \[!toc]
You will know you have successfully installed Rust and Cargo when you can run the following commands in your terminal:
```tsx
$ rustc --version
$ cargo --version
```
Next, you will need to install the Aiken CLI. You can install the Aiken CLI by running the following command in your terminal:
```tsx
$ cargo install aiken
```
### Check your installation \[!toc]
You will know you have successfully installed the Aiken CLI when you can run the following command in your terminal:
```tsx
$ aiken -V
```
If you face any issues, please check the installation instructions on the Aiken website for more information.
## Editor integrations
Aiken language support for Visual Studio Code is provided by the Aiken extension. This extension provides syntax highlighting, code snippets, and error checking for Aiken smart contracts. Download the extension from the Visual Studio Code Marketplace or search `aiken` in the extensions tab of Visual Studio Code.
## Useful commands
Here are some useful commands you can use to compile and test your scripts.
* `aiken build` - compiles the Aiken smart contract and generates a `plutus.json` file which contains type information, params, redeemer, datum, and the compiled code for each validator of your project and their corresponding hash digests to be used in addresses
* `aiken check` - type-check a project and run tests
* `aiken docs` - if you're writing a library, this generate documentation from you project
* `aiken blueprint` - provides utility functions to generate addresses, apply parameters and convert the build output to various formats
# Aiken
URL: /aiken
A programming language and toolkit for developing smart contracts
***
title: "Aiken"
description: "A programming language and toolkit for developing smart contracts"
icon: "icons/aiken.png"
-----------------------
Aiken is a functional programming language created for Cardano smart contract development. It prioritizes on-chain execution and offers a user-friendly approach for building secure and efficient smart contracts, making it a valuable choice for developers aiming to create robust on-chain applications.
import {linksAiken} from "@/data/links-aiken";
import Link from "next/link";
import {
Card,
CardDescription,
CardTitle,
} from "@/components/ui/card";
# Build Transactions
URL: /aiken/transactions
Build transactions to interact with smart contracts
***
title: "Build Transactions"
description: "Build transactions to interact with smart contracts"
------------------------------------------------------------------
import Link from "fumadocs-core/link";
## Create transaction to lock tokens
In this section, we will create a simple UI that allows users to lock assets on the Cardano blockchain.
First, we get initialze the `PlutusScript` and resolve the script address:
```tsx
function getScript() {
const scriptCbor = applyParamsToScript(compiledCode, []);
const script: PlutusScript = {
code: scriptCbor,
version: "V2",
};
const scriptAddress = resolvePlutusScriptAddress(script, 0);
return { script, scriptAddress };
}
```
```tsx
const { scriptAddress } = await getScript();
```
We are using the `resolvePlutusScriptAddress` function to resolve the script address.
You notice here we use the `applyParamsToScript`, which apply parameters to a script allows you to create a custom CIP-57 compliant script based on some inputs. For this script, we don't have any parameters to apply, but simply applied with double CBOR encoding to `scriptCbor`.
Next, we get the wallet address hash:
```tsx
async function getWalletAddress(wallet: BrowserWallet) {
const addresses = await wallet.getUsedAddresses();
const address = addresses[0];
if (!address) {
throw new Error("No address found");
}
const hash = resolvePaymentKeyHash(address);
return { address, hash };
}
```
```tsx
const { hash } = await getWalletAddress(wallet);
```
Here, we use the `resolvePaymentKeyHash` function to resolve the payment key hash of the wallet.
Then, we create the `Data` (datum) object containing the address hash:
```tsx
const datum: Data = {
alternative: 0,
fields: [hash],
};
```
Finally, we prepare the transaction to lock the assets on the Cardano blockchain.
```tsx
const tx = new Transaction({ initiator: wallet });
tx.sendLovelace(
{
address: scriptAddress,
datum: { value: datum },
},
"5000000",
);
const unsignedTx = await tx.build();
const signedTx = await wallet.signTx(unsignedTx);
const txHash = await wallet.submitTx(signedTx);
```
## Create transaction to redeem tokens
In this section, we will walk you through the process of creating a transaction to redeem tokens.
First, we need to get the script and script address. We can do this by calling the function we created in the previous section.
```tsx
const { script, scriptAddress } = await getScript();
```
Next, we need to get the wallet address and its hash. We can do this by calling the function we created in the previous section.
```tsx
const { address, hash } = await getWalletAddress(wallet);
```
As the contracts requires the owner's address in the datum field, we are creating a new datum with the owner's address. We create the `Data` (datum) object containing the address hash:
```tsx
const datum: Data = {
alternative: 0,
fields: [hash],
};
```
After that, we get the UTXO in the script based on the datum:
```tsx
async function getAssetUtxo({
scriptAddress,
asset,
datum,
}: {
scriptAddress: string;
asset: string;
datum: any;
}) {
const provider = getProvider();
const utxos = await provider.fetchAddressUTxOs(
scriptAddress,
asset,
);
const dataHash = resolveDataHash(datum);
let utxo = utxos.find((utxo: any) => {
return utxo.output.dataHash == dataHash;
});
return utxo;
}
```
```tsx
const assetUtxo = await getAssetUtxo({
scriptAddress: scriptAddress,
asset: "lovelace",
datum: datum,
});
```
Finally, we prepare the transaction to redeem the tokens:
```tsx
const redeemer = { data: { alternative: 0, fields: ["Hello, World!"] } };
const tx = new Transaction({ initiator: wallet })
.redeemValue({
value: assetUtxo,
script: script,
datum: datum,
redeemer: redeemer,
})
.sendValue(address, assetUtxo)
.setRequiredSigners([address]);
const unsignedTx = await tx.build();
const signedTx = await wallet.signTx(unsignedTx, true);
const txHash = await wallet.submitTx(signedTx);
```
Here you notice that in the `redeemer`. As the validator requires, here we specify `Hello, World!`, which is the message we need to provide to unlock the tokens.
For the transaction, we use the `redeemValue` function to redeem the locked assets, the `sendValue` function to send the assets to the owner's address, and the `setRequiredSigners` function to set the required signers.
# Mesh API
URL: /apis
From wallet integrations to transaction builders, Mesh makes Web3 development easy with reliable, scalable, and well-engineered APIs & developer tools.
***
title: "Mesh API"
description: "From wallet integrations to transaction builders, Mesh makes Web3 development easy with reliable, scalable, and well-engineered APIs & developer tools."
----------------------------------------------------------------------------------------------------------------------------------------------------------------------
import {
Card,
CardDescription,
CardTitle,
} from "@/components/ui/card";
import {linksApi} from "@/data/links-api";
import Link from "next/link";
# Hydra Instance
URL: /hydra/instance
The HydraInstance is a class interface for interacting with a Hydra head after initialization.
***
title: "Hydra Instance"
description: "The HydraInstance is a class interface for interacting with a Hydra head after initialization."
-------------------------------------------------------------------------------------------------------------
import Link from "fumadocs-core/link";
## Overview
The `HydraInstance` is intialized together with `HydraProvider`, for accessing other methods to interact with Hydra head after `HeadIsInitializing` phase.
## Get started:
```tsx
import { HydraInstance, HydraProvider } from "@meshsdk/hydra";
const provider = new HydraProvider({
httpUrl: "",
});
const instance = new HydraInstance({
provider: hydraProvider,
fetcher: "",
submitter: "",
});
```
### Commit Empty
If you don't want to commit any funds and only want to receive on layer 2, you can request an empty commit transaction
to open the head
```tsx
const commit = await instance.commitEmpty();
const submitTx = await wallet.submitTx(commit);
console.log("submitTx", submitTx);
```
### Commit Funds
Commits funds to the Hydra head by selecting specific UTxOs to make available on layer 2.
**Parameters:**
* `txHash`
* `outputIndex`
**Returns:** The transaction CBOR hex ready to be partially signed
```tsx
await instance.commitFunds(txHash: string, outputIndex: number)
```
```tsx
const txHash =
"00000000000000000000000000000000000000000000000000000000000000000";
const outputIndex = 0;
const commitTx = await instance.commitFunds(txHash, outputIndex);
const signedTx = await wallet.signTx(commitTx, true);
const commitTxHash = await wallet.submitTx(signedTx);
```
### Commit Blueprint
Commits a Cardano transaction blueprint to the Hydra head.
This is useful for advanced use cases such as commiting `scriptUTxOs`.
**Parameters:**
* `txHash`
* `outputIndex`
* `hydraTransaction`
```tsx
await instance.commitBlueprint("txHash", outputIndex, {
cborHex: "",
description: "commit tx",
type: "Tx ConwayEra",
});
```
```tsx
const commitTx = await instance.commitBlueprint(txHash, outputIndex, {
cborHex: "",
description: "commit tx",
type: "Tx ConwayEra",
});
const signedTx = await wallet.signTx(commitTx, true);
const commitTxHash = await wallet.submitTx(signedTx);
```
### Incremental Commit
Incremental commit methods allow you commit additional UTxOs to an open hydra head after the initial commit:
The time it takes for it top be added after commit depends on the `hydra-node` configuration parameter `--deposit-period`
To read more on incremental commit, see [the Hydra documentation](https://hydra.family/head-protocol/docs/how-to/incremental-commit).
### incrementalCommitFunds
```tsx
await instance.incrementalCommitFunds(txHash: string, outputIndex: number)
```
### incrementalBlueprintCommit
```tsx
await instance.incrementalBlueprintCommit(txHash, outputIndex, {
cborHex: "unsignedTx",
description: "commit tx",
type: "Tx ConwayEra",
});
```
## Basic Workflow
### commit Funds
```tsx
import { HydraInstance, HydraProvider } from "@meshsdk/hydra";
import { BlockfrostProvider } from "@meshsdk/core";
const provider = new HydraProvider({
httpUrl: "http://localhost:4001",
});
const instance = new HydraInstance({
provider: provider,
fetcher: "blockchainProvider",
submitter: "blockchainProvider",
});
await provider.connect();
await provider.init();
provider.onMessage((message) => {
const status =
message.tag === "Greetings"
? { headStatus: message.headStatus }
: { tag: message.tag };
if (
status.tag === "HeadIsInitializing" ||
status.headStatus === "Initializing"
) {
}
const commitTx = await instance.commitFunds(txHash, outputIndex);
const signedTx = await wallet.signTx(commitTx, true);
await wallet.submitTx(signedTx);
});
```
### Blueprint Commit
```tsx
provider.onMessage((message) => {
const status =
message.tag === "Greetings"
? { headStatus: message.headStatus }
: { tag: message.tag };
if (
status.tag === "HeadIsInitializing" ||
status.headStatus === "Initializing"
) {
const txBuilder = new MeshTxBuilder({
submitter: "",
fetcher: "",
verbose: true,
});
const unsignedTx = await txBuilder
.txIn(txHash, outputIndex)
.setFee("0")
.changeAddress(address)
.selectUtxosFrom(UTxOs)
.complete();
const commitTx = await instance.commitBlueprint(txHash, outputIndex, {
type: "Tx ConwayEra",
cborHex: unsignedTx,
description: "Commit Blueprint",
});
const signedTx = await wallet.signTx(commitTx);
const commitTxHash = await wallet.submitTx(signedTx);
console.log(commitTxHash);
}
});
```
# End-to-end Hydra Tutorial
URL: /hydra/tutorial
Open a layer 2 state channel between two participants, build transactions, and close the Hydra head
***
title: "End-to-end Hydra Tutorial"
description: "Open a layer 2 state channel between two participants, build transactions, and close the Hydra head"
------------------------------------------------------------------------------------------------------------------
import Link from "fumadocs-core/link";
This tutorial demonstrates how to use Hydra Head protocol on Cardano's preprod testing environment to open a layer 2 state channel between two participants using Mesh.
Hydra Head is a layer 2 scaling solution for Cardano that enables fast, low-cost transactions between participants.
This tutorial is adapted from the Hydra documentation.
### Initialize Hydra with Mesh \[!toc]
To initialize Hydra with Mesh, you need to set the `HydraProvider` with the Hydra API URL and then use it to initialize the `HydraInstance`. You can use one of the cardano providers, example: `blockfrostProvider`, or `maestroProvider`, to initialize the `HydraInstance`.
```tsx
import { HydraInstance, HydraProvider } from "@meshsdk/hydra";
const provider = new HydraProvider({
httpUrl: "",
});
const hydraInstance = new HydraInstance({
provider: provider,
fetcher: "",
submitter: "",
});
```
## Prerequisites
* A running cardano node is required to access `cardano-cli`
* A `Hydra-node`
* Another participant following this tutorial (recommended), or
* Access to two such machines
* 100 test ada per participant in a wallet on the `preprod` network
Hydra-node and cardano-node running, check Installation.
You could also set-up a Docker container for a `cardano-node` and `Hydra-node` to quickly follow this tutorial. Check the setup example/demo for a devnet here
## Step 1. Prepare keys and funding
In a Hydra head, each participant is authenticated using two sets of keys. The first set identifies a participant on the Cardano layer 1 and is used to hold ada for paying fees. Each hydra-node requires a `cardano-signing-key`, and you must provide the `cardano-verification-key` for each participant. First, generate Cardano key pairs and addresses for both participants with `cardano-cli` to identify the hydra-node and manage funds on layer 1.
Alice's keys:
```bash
mkdir -p credentials
cardano-cli address key-gen \
--verification-key-file credentials/alice-node.vk \
--signing-key-file credentials/alice-node.sk
cardano-cli address build \
--payment-verification-key-file credentials/alice-node.vk \
--out-file credentials/alice-node.addr \
--testnet-magic 1
cardano-cli address key-gen \
--verification-key-file credentials/alice-funds.vk \
--signing-key-file credentials/alice-funds.sk
cardano-cli address build \
--payment-verification-key-file credentials/alice-funds.vk \
--out-file credentials/alice-funds.addr \
--testnet-magic 1
```
Bob's keys:
```bash
mkdir -p credentials
cardano-cli address key-gen \
--verification-key-file credentials/bob-node.vk \
--signing-key-file credentials/bob-node.sk
cardano-cli address build \
--payment-verification-key-file credentials/bob-node.vk \
--out-file credentials/bob-node.addr \
--testnet-magic 1
cardano-cli address key-gen \
--verification-key-file credentials/bob-funds.vk \
--signing-key-file credentials/bob-funds.sk
cardano-cli address build \
--payment-verification-key-file credentials/bob-funds.vk \
--out-file credentials/bob-funds.addr \
--testnet-magic 1
```
After generating the addresses, make sure to fund both Alice's and Bob's addresses with test ADA. if you don't have testAda, you can use cardano-faucet to fund the generated addresses
* Send at least `30 tADA` to `alice-node.addr` and `bob-node.addr` addresses.
* Send any amount of `tADA` to `alice-funds.addr` and `bob-funds.addr` addresses.
Next, generate Hydra key pairs for use on layer 2. Use this Hydra-node command to generate the keys for alice and/or bob respectively:
```tsx
hydra-node gen-hydra-key --output-file credentials/alice-hydra
```
```tsx
hydra-node gen-hydra-key --output-file credentials/bob-hydra
```
The next step involves configuring the protocol parameters for the ledger within our Hydra head. For the purposes of this tutorial, we'll modify the default Cardano layer 1 parameters to eliminate transaction fees,
```tsx
cardano-cli query protocol-parameters --testnet-magic 1 --socket-path /"${socketPath}" --out-file protocol-parameters.json
```
Simplifying Hydra fees and environments, change the following parameters:
* `txFeeFixed` to 0
* `txFeePerByte` to 0
* `executionUnitPrices.priceMemory` to 0
* `executionUnitPrices.priceSteps` to 0
## Step 2. Configure Hydra nodes
Configure your Hydra nodes with the generated keys and network settings. Each participant needs to set up their hydra-node with the correct configuration.
Alice:
```tsx
hydra-node \
--node-id alice-node \
--api-host 0.0.0.0 \
--api-port 4001 \
--listen 172.16.239.10:5001 \
--monitoring-port 6001 \
--peer 172.16.239.20:5001 \
--hydra-scripts-tx-id c9c4d820d5575173cfa81ba2d2d1096fc40f84d16d8c17284da410a4fb5e64eb,ae4443b46f550289337fc5c2c52b24f1288dab36d1a229167a6e04f056a966fe,48bd29e43dd01d12ab464f75fe40eed80e4051c8d3409e1cb20b8c01120b425e \
--cardano-signing-key /credentials/alice-node.sk \
--cardano-verification-key /credentials/bob-node.vk \
--hydra-signing-key /keys/alice-hydra.sk \
--hydra-verification-key /keys/bob-hydra.vk \
--ledger-protocol-parameters ./testnet/protocol-parameters.json \
--testnet-magic 1 \
--node-socket /cardano-node/db/node.socket \
--contestation-period 300s
```
Bob:
```tsx
hydra-node \
--node-id bob-node \
--api-host 0.0.0.0 \
--api-port 4002 \
--listen 172.16.239.20:5001 \
--monitoring-port 6001 \
--peer 172.16.239.10:5001 \
--hydra-scripts-tx-id c9c4d820d5575173cfa81ba2d2d1096fc40f84d16d8c17284da410a4fb5e64eb,ae4443b46f550289337fc5c2c52b24f1288dab36d1a229167a6e04f056a966fe,48bd29e43dd01d12ab464f75fe40eed80e4051c8d3409e1cb20b8c01120b425e \
--cardano-signing-key /credentials/bob-node.sk \
--cardano-verification-key /credentials/alice-node.vk \
--hydra-signing-key /keys/bob-hydra.sk \
--hydra-verification-key /keys/alice-hydra.vk \
--ledger-protocol-parameters ./testnet/protocol-parameters.json \
--testnet-magic 1 \
--node-socket /cardano-node/db/node.socket \
--contestation-period 300s
```
Fields in the Hydra node configuration:
* `node-id`: Unique identifier for each Hydra node. This distinguishes Alice's node from Bob's node.
* `api-host`: as the API is not authenticated by default, the node is only binding to `0.0.0.0`.
* `api-port`: The port on which the API will listen.
* `listen`: The IP address and port on which the Hydra node will listen for incoming connections.
* `peer`: The IP address of another Hydra node to connect to. This is how nodes discover and communicate with each other.
* `monitoring-port`: The port on which the monitoring API will listen. This is used to monitor the Hydra node's performance.
* `cardano-signing-key`: These keys authenticate on-chain transactions and ensure that only authorized participants can control the head's lifecycle used to hold ada for paying fees
* `hydra-signing-key`: Used for multi-signing snapshots within a head. Although these keys may eventually support an aggregated multi-signature scheme, they currently use the Ed25519 format.
* `hydra-scripts-tx-id`: The hydra-node uses reference scripts to reduce transaction sizes driving the head's lifecycle. For public (test) networks, you can use the pre-published Hydra scripts with each new release, listing transaction IDs in the release notes and networks.json. Note: The value of above `--hydra-scripts-tx-id` comes from the hydra-node release 0.22.2.
* `ledger-protocol-parameters`: This defines the updatable protocol parameters to be used on L2 such as fees or transaction sizes. These parameters follow the same format as the `cardano-cli query protocol-parameters` output.
* `contestation-period`:This is an important protocol parameter, defined in seconds The contestation period is used to set the contestation deadline. That is, after `Close`, all participants have at minimum `CP` to submit a `Contest` transaction
More on hydra configuration.
Ensure both nodes can communicate with each other and change to your correct file paths in the above configuration. This configuration sets up Alice's node to listen to API connection on port 4001 Bob's node on port 4002.
## Step 3. Open a Hydra head
### Connect to the Hydra head \[!toc]
Now that both Hydra nodes are running and connected, we can start using the head API url and port together with Mesh `HydraProvider` in connecting to the Hydra head.
```tsx
await provider.connect();
```
### Initialize the Head \[!toc]
Send the initialization command to start the Hydra head:
```tsx
await provider.init();
```
### Commit Funds \[!toc]
After initialization, both participants need to commit funds to the head. In this tutorial we use the `commitFunds` function on `HydraInstance` by selecting specific UTxOs and make them available for layer 2 transactions:
```tsx
import { HydraInstance , HydraProvider} from "@meshsdk/hydra";
const provider = new HydraProvider({
httpUrl: "",
});
const hInstance = new HydraInstance({
provider: provider,
fetcher: "",
submitter: "",
});
const wallet = new MeshWallet({
networkId: 0, // 0: testnet
fetcher: "",
submitter: "",
key: {
type: 'cli',
payment: 'alice-funds.sk',
},
});
const outputIndex = 0;
const txHash = "00000000000000000000000000000000000000000000000000000000000000000";
const commitTx = await hInstance.commitFunds(txHash, outputIndex);
const signedTx = await wallet.signTx(commitTx, true);
const commitTxHash = await wallet.submitTx(signedTx);
console.log(commitTxHash);
```
The hydra-node will create a draft commit transaction for you to sign. Once signed and submitted to the Cardano network, you'll see a `Committed` message in your WebSocket connection.
When both parties have committed their funds, the Hydra head will open automatically. You'll see a `HeadIsOpen` message confirming the head is operational and ready for transactions.
### Hydra Head Status Flow \[!toc]
The head goes through these status changes:
* `HeadIsInitializing` - Head is being initialized
* `Committed` - Funds are committed to the head
* `HeadIsOpen` - Head is open and ready for transactions
## Step 4. Use the Hydra head
Now that the Hydra head is open, you can perform transactions within the layer 2 state channel. Hydra Head operates as an isomorphic protocol, meaning that functionalities available on Cardano layer 1 are also available on layer 2. This allows us to use Mesh SDK for transaction creation within the head.
### Fetch UTxOs \[!toc]
First, let's see what UTxOs are available in the Hydra head:
```tsx
const utxos = await provider.fetchUTxOs();
```
### Fetch Address UTxOs \[!toc]
Alternatively, you can fetch Head UTxOs for a specific address:
```tsx
const utxos = await provider.fetchAddressUTxOs("alice-funds.addr")
```
### Build and Submit Transaction \[!toc]
You can build transactions just like on layer 1 assuming you are sending from alice to bob:
```tsx
const pp = await provider.fetchProtocolParameters();
const utxos = await provider.fetchAddressUTxOs("address");
const txBuilder = new MeshTxBuilder({
fetcher: provider,
submitter: provider,
isHydra: true,
params: pp,
});
const unsignedTx = await txBuilder
.txOut(
"bob-funds.addr",
[{ unit: "lovelace", quantity: "3000000" }]
)
.changeAddress("alice-funds.addr")
.selectUtxosFrom(utxos)
.setNetwork("preprod")
.complete();
const signedTx = await wallet.signTx(unsignedTx);
const txHash = await provider.submitTx(signedTx);
console.log(txHash);
```
The transaction will be validated by both hydra-nodes and either result in a `TxValid` message or a `TxInvalid` message If valid, you'll see a `SnapshotConfirmedmessage` shortly after with the new UTxO set.
### Transaction Flow \[!toc]
The transaction goes through these steps:
* `NewTx` - Transaction submitted to head
* `TxValid` - Transaction validated by all nodes
* `SnapshotConfirmed` - New state confirmed
## Step 5. Close the Hydra head
You can close the head to return head utxos to layer 1. This process involves closing the head, waiting for the contestation period, and then fan out the final state.
### Close the Head \[!toc]
Any participant can initiate closing the Hydra head. Once closed, no more transactions can be submitted to the head. The head enters a contestation period where participants can challenge the closing snapshot.
```tsx
await provider.close()
```
### Contestation Period \[!toc]
After closing, there's a contestation period (configurable with `--contestation-period`). During this time:
* Participants can contest the closing snapshot
* If contested, a more recent snapshot can be used
* After the deadline, fanout becomes possible
### Fanout the Head \[!toc]
After the contestation period, the head participants can use the `fanout` to fully close the `hydra-head` and return the head utxos to layer one.
```tsx
await provider.fanout()
```
### Check Final Balances \[!toc]
After fanout, check the final balances on layer one:
```tsx
const aliceFundsBalance = await blockchainProvider.fetchAddressUTxOs("alice-funds.addr");
const bobFundsBalance = await blockchainProvider.fetchAddressUTxOs("bob-funds.addr");
```
### Head Lifecycle \[!toc]
The complete head lifecycle:
* `INITIALIZE` - Initial state
* `COMMIT` - Committing to Hydra head
* `OPEN` - Head open for transactions
* `NEW TX` - New transaction submitted in Hydra head
* `CLOSE` - Ready to fanout
* `CONTEST` - Head closed, contestation period
* `FANOUT` - Head finalized on layer one
Congratulations! You've completed the full lifecycle of a Hydra head from initialization to finalization.
# Aiken Hello World
URL: /guides/aiken
undefined
***
title: "Aiken Hello World"
icon: "guides/aiken.png"
------------------------
import Link from "fumadocs-core/link";
Aiken is a functional programming language for Cardano smart contract development. It prioritizes on-chain execution and offers a user-friendly approach for building secure and efficient smart contracts.
This tutorial walks you through writing a smart contract in Aiken and creating two transactions to lock and unlock assets on the Cardano blockchain.
Try the live demo. View the code on the GitHub repository.
## System setup
Set up your system to compile Aiken smart contracts. Skip this section if you have already set up your system or do not wish to compile the contract.
Check the installation instructions on the Aiken website for more information.
### Using aikup (on Linux & MacOS only) \[!toc]
Linux and MacOS users can use the utility tool to download and manage Aiken's pre-compiled executables.
Install the Aiken CLI:
```tsx
$ curl -sSfL https://install.aiken-lang.org | bash
$ aikup
```
### From sources (all platforms) \[!toc]
Aiken is written in Rust. Install Rust and Cargo to compile the smart contract. Install Rust via the Rust website.
Install Cargo, the Rust package manager, via the Cargo website.
Verify installation:
```tsx
$ rustc --version
$ cargo --version
```
Install the Aiken CLI:
```tsx
$ cargo install aiken
```
### Check your installation \[!toc]
Verify the Aiken CLI installation:
```tsx
$ aiken -V
```
If issues arise, check the Aiken website.
## Writing a smart contract with Aiken
Write a smart contract in Aiken and create two transactions to lock and unlock assets.
Read more about this example on the Aiken website.
### Create a new project \[!toc]
Create a new project. Refer to this guide for creating a new Next.js project.
Create a new Aiken project within this project folder:
```tsx
$ aiken meshjs/hello_world
$ cd hello_world
$ aiken check
```
Run `aiken check` to verify your project.
### Write the smart contract \[!toc]
Create `validators/hello_world.ak`:
```tsx
use aiken/hash.{Blake2b_224, Hash}
use aiken/list
use aiken/transaction.{ScriptContext}
use aiken/transaction/credential.{VerificationKey}
type Datum {
owner: Hash,
}
type Redeemer {
msg: ByteArray,
}
validator {
fn hello_world(datum: Datum, redeemer: Redeemer, context: ScriptContext) -> Bool {
let must_say_hello =
redeemer.msg == "Hello, World!"
let must_be_signed =
list.has(context.transaction.extra_signatories, datum.owner)
must_say_hello && must_be_signed
}
}
```
This validator checks that the redeemer message is "Hello, World!" and that the transaction is signed by the datum owner. Returns `true` if both conditions are met; otherwise `false`.
Compile the smart contract:
```tsx
$ aiken build
```
This generates `plutus.json` in the root folder. This file is a CIP-0057 Plutus blueprint, describing your on-chain contract and its binary interface.
## Creating locking transaction
### Preparing the frontend \[!toc]
Prepare the frontend to allow users to lock and unlock assets.
Install `cbor`:
```tsx
$ npm install cbor
```
Create a `data` folder and copy `plutus.json` into it.
Open `pages/index.tsx` and import the packages:
```tsx
import {
resolvePlutusScriptAddress,
Transaction,
KoiosProvider,
resolveDataHash,
resolvePaymentKeyHash,
} from "@meshsdk/core";
import type { PlutusScript, Data } from "@meshsdk/core";
import { CardanoWallet, useWallet } from "@meshsdk/react";
import plutusScript from "../data/plutus.json";
import cbor from "cbor";
```
### Importing the contract \[!toc]
Import the contract:
```tsx
const script: PlutusScript = {
code: cbor
.encode(Buffer.from(plutusScript.validators[0].compiledCode, "hex"))
.toString("hex"),
version: "V2",
};
const scriptAddress = resolvePlutusScriptAddress(script, 0);
```
Use `plutus.json` to create the script and `resolvePlutusScriptAddress` to resolve the address.
We encode the compiled validator code with cbor because the validator uses a flat format, unlike the format expected by cardano-cli and the serialization library.
### Locking assets \[!toc]
Create the transaction to lock assets:
```tsx
const hash = resolvePaymentKeyHash((await wallet.getUsedAddresses())[0]);
const datum: Data = {
alternative: 0,
fields: [hash],
};
const tx = new Transaction({ initiator: wallet }).sendLovelace(
{
address: scriptAddress,
datum: { value: datum },
},
"5000000"
);
const unsignedTx = await tx.build();
const signedTx = await wallet.signTx(unsignedTx);
const txHash = await wallet.submitTx(signedTx);
```
This transaction locks assets. `resolvePaymentKeyHash` resolves the wallet's key hash. `sendLovelace` sends lovelace to the script address.
The contract requires the owner's address in the datum. We build, sign, and submit the transaction.
## Unlocking assets
Create the transaction to unlock assets.
Retrieve the UTXO of the locked assets:
```tsx
async function _getAssetUtxo({ scriptAddress, asset, datum }) {
const utxos = await koios.fetchAddressUTxOs(scriptAddress, asset);
const dataHash = resolveDataHash(datum);
let utxo = utxos.find((utxo: any) => {
return utxo.output.dataHash == dataHash;
});
return utxo;
}
```
Create the unlock transaction:
```tsx
const scriptAddress = resolvePlutusScriptAddress(script, 0);
const address = (await wallet.getUsedAddresses())[0];
const hash = resolvePaymentKeyHash(address);
const datum: Data = {
alternative: 0,
fields: [hash],
};
const assetUtxo = await _getAssetUtxo({
scriptAddress: scriptAddress,
asset: "lovelace",
datum: datum,
});
const redeemer = { data: { alternative: 0, fields: ['Hello, World!'] } };
// create the unlock asset transaction
const tx = new Transaction({ initiator: wallet })
.redeemValue({
value: assetUtxo,
script: script,
datum: datum,
redeemer: redeemer,
})
.sendValue(address, assetUtxo)
.setRequiredSigners([address]);
const unsignedTx = await tx.build();
const signedTx = await wallet.signTx(unsignedTx, true);
const txHash = await wallet.submitTx(signedTx);
```
This transaction unlocks assets. `resolvePlutusScriptAddress` resolves the script address. `resolvePaymentKeyHash` resolves the wallet's key hash.
`_getAssetUtxo` retrieves the locked asset UTXO. `redeemValue` redeems the assets. `sendValue` sends assets to the owner. `setRequiredSigners` sets the required signers.
The validator requires "Hello, World!" as the redeemer message. We build, sign, and submit the transaction.
Check the full code on GitHub.
# Implement Custom Provider
URL: /guides/custom-provider
undefined
***
title: "Implement Custom Provider"
icon: "guides/implement-custom-provider.png"
--------------------------------------------
import Link from "fumadocs-core/link";
Mesh offers options like Blockfrost or Koios (see Providers). These providers access the Cardano blockchain to retrieve data, such as smart contract UTXOs, or submit signed transactions.
Customize a provider to utilize GraphQL, cardano-cli, or websocket with Mesh SDK. Any query method works if the output conforms to the interface.
This guide demonstrates how to create a custom provider and integrate it with Mesh to work with the transaction builder.
## How it works
JavaScript interfaces define the application structure and syntax for classes. Classes based on an interface must abide by its structure.
Providers implement one or more interfaces. For example, the **KoiosProvider** Class implements **IFetcher** and **ISubmitter**. It must strictly conform to their structures.
**KoiosProvider** implements **IFetcher** and **ISubmitter** using the **implement** keyword:
```tsx
export class KoiosProvider implements IFetcher, ISubmitter {}
```
Visit the GitHub repo at packages/module/src/common/contracts for the latest interfaces.
Create a custom provider class by creating functions with the same name, input parameters, and return type as the defined methods for each interface. This ensures compatibility with Mesh functions.
IFetcher has 6 functions (see packages/module/src/common/contracts/fetcher.ts):
```tsx
import type { AccountInfo, AssetMetadata, Protocol, UTxO } from '@mesh/common/types';
export interface IFetcher {
fetchAccountInfo(address: string): Promise;
fetchAddressUTxOs(address: string, asset?: string): Promise;
fetchAssetAddresses(asset: string): Promise<{ address: string; quantity: string }[]>;
fetchAssetMetadata(asset: string): Promise;
fetchHandleAddress(handle: string): Promise;
fetchProtocolParameters(epoch: number): Promise;
}
```
**KoiosProvider** must implement these functions as defined in **IFetcher**.
## Implement your own provider
Review existing providers to get started. Visit packages/module/src/providers.
Use this codebase as a starting point:
```tsx
import { IFetcher, ISubmitter } from "@mesh/common/contracts";
import { parseHttpError } from "@mesh/common/utils";
import type {
AccountInfo,
AssetMetadata,
Protocol,
UTxO,
} from "@mesh/common/types";
export class NAMEProvider implements IFetcher, ISubmitter {
constructor(network: "") {
// init variables and other Javascript libraries needed
}
async fetchAccountInfo(address: string): Promise {
try {
// return {
// ...
// };
} catch (error) {
throw parseHttpError(error);
}
}
async fetchAddressUTxOs(address: string, asset?: string): Promise {
try {
// return [
// ...
// ];
} catch (error) {
throw parseHttpError(error);
}
}
async fetchAssetAddresses(
asset: string
): Promise<{ address: string; quantity: string }[]> {
try {
// return AssetAddresses;
} catch (error) {
throw parseHttpError(error);
}
}
async fetchAssetMetadata(asset: string): Promise {
try {
// return [
// ...
// ];
} catch (error) {
throw parseHttpError(error);
}
}
async fetchHandleAddress(handle: string): Promise {
try {
// return handleAddress;
} catch (error) {
throw parseHttpError(error);
}
}
async fetchProtocolParameters(epoch = Number.NaN): Promise {
try {
// return {
// ...
// };
} catch (error) {
throw parseHttpError(error);
}
}
async submitTx(tx: string): Promise {
try {
// if (status === 200)
// return txHash;
} catch (error) {
throw parseHttpError(error);
}
}
}
```
This code may change if the interface updates. Your provider may require different interfaces depending on its purpose.
## Implement constructor and functions
Define the constructor.
A constructor creates and initializes a class. It runs when creating an object using the **new** keyword.
Providers usually require basic information, such as the network or API key.
**KoiosProvider** requires **network** and **version** (optional):
```tsx
private readonly _axiosInstance: AxiosInstance;
constructor(network: 'api' | 'preview' | 'preprod' | 'guild', version = 0) {
this._axiosInstance = axios.create({
baseURL: `https://${network}.koios.rest/api/v${version}`,
});
}
```
This constructor initializes the Axios instance with user-provided parameters.
Define each function required by the interface. Understand the following:
* Query method for the blockchain provider.
* Interface input parameters.
* Blockchain provider input parameters.
* Expected interface outputs.
* Blockchain provider return values.
Map data correctly from the blockchain provider to the interface's required data type.
For example, **KoiosProvider** implements **fetchProtocolParameters()** to map Koios responses to the Protocol data type:
```tsx
async fetchProtocolParameters(epoch: number): Promise {
try {
const { data, status } = await this._axiosInstance.get(
`epoch_params?_epoch_no=${epoch}`,
);
if (status === 200)
return {
coinsPerUTxOSize: data[0].coins_per_utxo_size,
collateralPercent: data[0].collateral_percent,
decentralisation: data[0].decentralisation,
epoch: data[0].epoch_no,
keyDeposit: data[0].key_deposit,
maxBlockExMem: data[0].max_block_ex_mem.toString(),
maxBlockExSteps: data[0].max_block_ex_steps.toString(),
maxBlockHeaderSize: data[0].max_bh_size,
maxBlockSize: data[0].max_block_size,
maxCollateralInputs: data[0].max_collateral_inputs,
maxTxExMem: data[0].max_tx_ex_mem.toString(),
maxTxExSteps: data[0].max_tx_ex_steps.toString(),
maxTxSize: data[0].max_tx_size,
maxValSize: data[0].max_val_size.toString(),
minFeeA: data[0].min_fee_a,
minFeeB: data[0].min_fee_b,
minPoolCost: data[0].min_pool_cost,
poolDeposit: data[0].pool_deposit,
priceMem: data[0].price_mem,
priceStep: data[0].price_step,
};
throw parseHttpError(data);
} catch (error) {
throw parseHttpError(error);
}
}
```
Implement every function specified by the interface and test them.
Create a pull request if your provider benefits the Cardano developer community.
# Guides
URL: /guides
Guides for web developers and blockchain full-stack developers.
***
title: "Guides"
description: "Guides for web developers and blockchain full-stack developers."
icon: BookOpenIcon
------------------
import {linksGuides} from "@/data/links-guides";
import Link from "next/link";
import {
Card,
CardDescription,
CardTitle,
} from "@/components/ui/card";
# Minting Application
URL: /guides/minting-on-nodejs
undefined
***
title: "Minting Application"
icon: "guides/minting-application.png"
--------------------------------------
import Link from "fumadocs-core/link";
Mint assets with **MeshWallet** on Node.js.
## System setup
### 1. Visual Studio Code \[!toc]
Download and install Visual Studio Code.
### 2. Node.js \[!toc]
Install the Long-Term Support (LTS) version of Node.js.
## Project setup
Create a new folder and initialize a Node.js project:
```tsx
npm init
```
Install **typescript** and **Mesh**:
```tsx
npm install --dev typescript && npm install @meshsdk/core
```
Initialize TypeScript:
```tsx
npx tsc --init
```
Open **tsconfig.json** and define the configurations:
```tsx
{
...
"target": "ESNext",
"module": "ESNext",
"moduleResolution": "Node",
"outDir": "dist",
...
}
```
Open **package.json** and add the configurations:
```tsx
{
...
"type": "module",
"scripts": {
"start": "tsc && node ./dist/main.js"
}
...
}
```
## Build the minting transaction
### 1. Create list of NFT's metadata \[!toc]
Create `metadata.ts` and define the NFT metadata:
```tsx
export const metadata: { [assetName: string]: any } = {
MeshToken01: {
name: "Mesh Token 1",
image: "ipfs://QmRzicpReutwCkM6aotuKjErFCUD213DpwPq6ByuzMJaua",
mediaType: "image/jpg",
description: "Just a purple coin.",
artist: "This NFT was minted by Mesh (https://meshjs.dev/).",
},
MeshToken02: {
name: "Mesh Token 2",
image: "ipfs://QmRzicpReutwCkM6aotuKjErFCUD213DpwPq6ByuzMJaua",
mediaType: "image/jpg",
description: "This is suppose to be a gold coin.",
artist: "This NFT was minted by Mesh (https://meshjs.dev/).",
},
MeshToken03: {
name: "Mesh Token 3",
image: "ipfs://QmRzicpReutwCkM6aotuKjErFCUD213DpwPq6ByuzMJaua",
mediaType: "image/jpg",
description: "A coin with a M on it.",
artist: "This NFT was minted by Mesh (https://meshjs.dev/).",
},
};
```
### 2. Create a list of recipients \[!toc]
Create `recipients.ts` and specify the recipients:
```tsx
export const recipients: { [recipient: string]: string } = {
addr_test1vpvx0sacufuypa2k4sngk7q40zc5c4npl337uusdh64kv0c7e4cxr:
"MeshToken01",
addr_test1qqlcxawu4gxarenqvdqyw0tqyjy69mrgsmfqhm6h65jwm4vvldqg2n2p8y4kyjm8sqfyg0tpq9042atz0fr8c3grjmyscxry4r:
"MeshToken02",
addr_test1qq5tay78z9l77vkxvrvtrv70nvjdk0fyvxmqzs57jg0vq6wk3w9pfppagj5rc4wsmlfyvc8xs7ytkumazu9xq49z94pqzl95zt:
"MeshToken03",
};
```
### 3. Create main.ts and import the packages: \[!toc]
Create `main.ts` and import the required packages and files:
```tsx
import {
MeshWallet,
Transaction,
ForgeScript,
BlockfrostProvider,
resolveTxHash,
} from '@meshsdk/core';
import type { Mint, AssetMetadata } from '@meshsdk/core';
import { metadata } from './metadata.js';
import { recipients } from './recipients.js';
```
### 4. Define variables \[!toc]
Define minting variables. Use your own wallet to mint your own collection. This example uses:
```tsx
const demoCLIKey = {
paymentSkey:
'5820aaca553a7b95b38b5d9b82a5daa7a27ac8e34f3cf27152a978f4576520dd6503',
stakeSkey:
'582097c458f19a3111c3b965220b1bef7d548fd75bc140a7f0a4f080e03cce604f0e',
};
const networkId = 0;
const blockfrostKey = 'BLOCKFROST_KEY_HERE';
```
### 5. Build the minting transaction \[!toc]
This guide builds a minting transaction, but the process applies to any transaction. Learn more about Transaction.
Initialize a blockchain provider. This guide uses **BlockfrostProvider**:
```tsx
const provider = new BlockfrostProvider(blockfrostKey);
```
Initialize **MeshWallet** and its forging script. This example uses CLI generated keys, but you can load your wallet with a private key or mnemonic phrase. Learn more about MeshWallet.
```tsx
const wallet = new MeshWallet({
networkId: networkId,
fetcher: provider,
submitter: provider,
key: {
type: 'cli',
payment: demoCLIKey.paymentSkey,
stake: demoCLIKey.stakeSkey,
},
});
const walletAddress = wallet.getPaymentAddress();
const forgingScript = ForgeScript.withOneSignature(walletAddress);
```
Create a new Transaction, loop through each recipient, and mint assets with **mintAsset** (Learn more about minting transactions):
```tsx
const tx = new Transaction({ initiator: wallet });
for (let recipient in recipients) {
const recipientAddress = recipient;
const assetName = recipients[recipient];
const assetMetadata: AssetMetadata = metadata[assetName];
const asset: Mint = {
assetName: assetName,
assetQuantity: '1',
metadata: assetMetadata,
label: '721',
recipient: recipientAddress
};
tx.mintAsset(forgingScript, asset);
}
```
Sign and submit the transaction:
```tsx
const unsignedTx = await tx.build();
const signedTx = await wallet.signTx(unsignedTx, false);
const txHash = await wallet.submitTx(signedTx);
```
Execute the script:
```tsx
npm start
```
A successful transaction returns a transaction hash, mints multiple assets, and sends them to multiple recipients.
# Multi-Signatures Transaction
URL: /guides/multisig-minting
undefined
***
title: "Multi-Signatures Transaction"
icon: "guides/multi-signatures-transaction.png"
-----------------------------------------------
import Link from "fumadocs-core/link";
Multi-signature (multi-sig) transactions require more than one signature before broadcasting. Include two or more signers, such as wallets (Browser Wallet or Mesh Wallet) or Plutus scripts.
Build a multi-sig transaction for minting. Two wallets are involved:
1. Client wallet (user buying the asset)
2. Application wallet (holds the forging script)
Connect to the user's CIP30 wallet (`BrowserWallet`) to request a minting transaction. The backend application wallet (`MeshWallet`) builds the transaction, and the user signs it. Check out the code here.
## Connect wallet (client)
Connect the client's wallet and obtain their address and UTXOs.
Connect with `BrowserWallet`:
```tsx
import { BrowserWallet } from '@meshsdk/core';
const wallet = await BrowserWallet.enable(walletName);
```
Or use the `CardanoWallet` component:
```tsx
import { CardanoWallet, useWallet } from "@meshsdk/react";
export default function Page() {
const { wallet, connected } = useWallet();
return
}
```
Get the client's address and UTXOs:
```tsx
const recipientAddress = await wallet.getChangeAddress();
const utxos = await wallet.getUtxos();
```
The change address receives the minted NFTs and change. The client's UTXOs are needed to build the transaction.
Select required UTXOs using `experimentalSelectUtxos`:
```tsx
const assetMap = new Map();
assetMap.set("lovelace", mintingFee);
const selectedUtxos = experimentalSelectUtxos(assetMap, utxos, "5000000");
```
`experimentalSelectUtxos` returns required UTXOs. `mintingFee` is the minting cost; `5000000` buffers the transaction fee.
Send `selectedUtxos` and `recipientAddress` to the backend.
## Build transaction (application)
Build the minting transaction.
This guide assumes a backend server (e.g., Vercel API, NestJS, ExpressJS).
Initialize a blockchain provider and Mesh Wallet.
```tsx
const provider = new BlockfrostProvider(
''
);
const meshWallet = new MeshWallet({
networkId: 0,
fetcher: provider,
submitter: provider,
key: {
type: 'mnemonic',
words: yourMnemonic,
},
});
```
Define the forging script:
```tsx
const meshWalletAddress = meshWallet.getChangeAddress();
const forgingScript = ForgeScript.withOneSignature(meshWalletAddress);
```
Define `AssetMetadata`:
```tsx
const assetName = 'MeshToken';
const assetMetadata: AssetMetadata = {
name: 'Mesh Token',
image: 'ipfs://QmRzicpReutwCkM6aotuKjErFCUD213DpwPq6ByuzMJaua',
mediaType: 'image/jpg',
description: 'This NFT was minted by Mesh (https://meshjs.dev/).',
};
```
Create the `Mint` object:
```tsx
const asset: Mint = {
assetName: assetName,
assetQuantity: '1',
metadata: assetMetadata,
label: '721',
recipient: recipientAddress,
};
```
Create the transaction. Set inputs, mint asset, send lovelace, set change address, and build:
```tsx
const tx = new Transaction({ initiator: meshWallet });
tx.setTxInputs(userUtxos);
tx.mintAsset(forgingScript, asset);
tx.sendLovelace(bankWalletAddress, mintingFee);
tx.setChangeAddress(recipientAddress);
const unsignedTx = await tx.build();
```
Optionally, mask metadata:
```tsx
originalMetadata = Transaction.readMetadata(unsignedTx);
```
Store `originalMetadata` to merge after user signature.
Send the transaction to the client.
## Sign transaction (client)
Obtain the client's signature. The wallet prompts for a password. Set partial sign to `true`.
```tsx
const signedTx = await wallet.signTx(unsignedTx, true);
```
## Sign transaction (application)
The backend signs with the application wallet:
```tsx
const meshWalletSignedTx = await systemWallet.signTx(unsignedTx, true);
```
Merge masked metadata if applicable:
```tsx
const signedOriginalTx = Transaction.writeMetadata(
unsignedTx,
originalMetadata,
);
const meshWalletSignedTx = await systemWallet.signTx(
signedOriginalTx,
true,
);
```
## Submit transaction (application)
Submit the transaction:
```tsx
const txHash = await wallet.submitTx(signedTx);
```
You can now build multi-sig transactions.
Check out the code here.
# Develop your first Web3 App
URL: /guides/nextjs
undefined
***
title: "Develop your first Web3 App"
icon: "guides/develop-first-web-app.png"
----------------------------------------
import Link from "fumadocs-core/link";
Set up a Next.js application and connect it to the Cardano blockchain using Mesh. Create a simple application that allows users to connect their wallets and view assets.
This guide focuses on Next.js, but Mesh works with Remix, React, Vue, and Svelte.
Follow this guide or use the Mesh CLI to scaffold a new project.
```tsx
npx meshjs your-app-name
```
## Setup Next.js
### 1. Create project folder and open Visual Studio Code \[!toc]
Create a new folder. Open Visual Studio Code and drag the folder into it.
### 2. Create Next.js app \[!toc]
Open the **Terminal** and create a new Next.js application:
```tsx
npx create-next-app@latest --typescript .
```
```tsx
Need to install the following packages:
Ok to proceed? (y)
✔ Would you like to use ESLint? … Yes
✔ Would you like to use Tailwind CSS? … Yes
✔ Would you like your code inside a `src/` directory? … Yes
✔ Would you like to use App Router? … No
✔ Would you like to use Turbopack for next dev? … No
✔ Would you like to customize the import alias (@/* by default)? … No
```
### 3. Start development server \[!toc]
Start the development server:
```tsx
npm run dev
```
Visit [http://localhost:3000](http://localhost:3000) to view your application. `CTRL+C` to stop.
## Setup Mesh
Install Mesh:
```tsx
npm install @meshsdk/core @meshsdk/react
```
Your application is ready to connect wallets and transact.
## Connect wallet and view assets
### 1. Add MeshProvider \[!toc]
Open **pages/\_app.tsx**, import and include MeshProvider:
```tsx
import "../styles/globals.css";
import "@meshsdk/react/styles.css";
import type { AppProps } from "next/app";
import { MeshProvider } from "@meshsdk/react";
function MyApp({ Component, pageProps }: AppProps) {
return (
);
}
export default MyApp;
```
### 2. Add connect wallet component and check wallet's assets \[!toc]
Add the connect wallet component. Link components to allow users to connect and query assets.
Replace **pages/index.tsx** with:
```tsx
import { useState } from "react";
import type { NextPage } from "next";
import { useWallet } from '@meshsdk/react';
import { CardanoWallet } from '@meshsdk/react';
const Home: NextPage = () => {
const { connected, wallet } = useWallet();
const [assets, setAssets] = useState(null);
const [loading, setLoading] = useState(false);
async function getAssets() {
if (wallet) {
setLoading(true);
const _assets = await wallet.getAssets();
setAssets(_assets);
setLoading(false);
}
}
return (
Connect Wallet
{connected && (
<>
Get Wallet Assets
{assets ? (
{JSON.stringify(assets, null, 2)}
) : (
)}
)}
);
};
export default Home;
```
Start the development server:
```tsx
npm run dev
```
Visit [http://localhost:3000](http://localhost:3000) to connect available wallets and view assets.
Receive test ADA (tADA) from the official faucet.
New to Cardano? Download a wallet. Tall Nupinks' Cardano Wallets 101 guide covers the fundamentals.
### 3. Try on your own \[!toc]
Implement a component to display the wallet address and lovelace amount. See the wallet page.
# Mint an NFT Collection
URL: /guides/nft-collection
undefined
***
title: "Mint an NFT Collection"
icon: "guides/mint-nft-collection.png"
--------------------------------------
import Youtube from "@/components/ui/Youtube";
### Course Materials: \[!toc]
1. Install Bun ([https://bun.sh/docs/installation](https://bun.sh/docs/installation))
2. Fund Your Preprod Wallet ([https://docs.cardano.org/cardano-testnets/tools/faucet](https://docs.cardano.org/cardano-testnets/tools/faucet))
3. Create a Blockfrost Preprod Project ([https://blockfrost.io/dashboard](https://blockfrost.io/dashboard))
4. CIP-20 Definition ([https://cips.cardano.org/cip/CIP-20](https://cips.cardano.org/cip/CIP-20))
Learn how to mint native assets on the Cardano blockchain. You will:
1. Understand tokens on Cardano.
2. Build simple minting transactions.
3. Understand community standards for NFTs.
## Project Setup
Install Bun (see course material #1).
Initialize a new directory and run:
```tsx
bun init
bun install @meshsdk/core
```
Generate and fund a Cardano wallet. Create `/scripts/brew.ts` and use MeshSDK to generate a wallet and log information.
```tsx
import { MeshWallet } from "@meshsdk/core";
const words = MeshWallet.brew() as string[];
const mnemonicString = words.join(" ");
console.log("mnemonic:", mnemonicString);
const wallet = new MeshWallet({
key: { type: "mnemonic", words },
networkId: 0,
});
console.log("Public Change Address:", await wallet.getChangeAddress());
```
Run the script:
```tsx
bun run scripts/brew.ts
```
Copy your public address and fund the wallet (course material #2). Obtain a Blockfrost Preprod project (course material #3).
Copy your mnemonic and Blockfrost key into a `.env` file.
## Mint Your Collection
In `index.ts`, use Mesh building blocks to interact with the blockchain.
```tsx
import {
MeshTxBuilder,
MeshWallet,
BlockfrostProvider
} from "@meshsdk/core"
const provider = new BlockfrostProvider(process.env.BLOCKFROST_KEY!);
const words = process.env.MNEMONIC!.split(" ");
const wallet = new MeshWallet({
key: { type: "mnemonic", words },
networkId: 0,
fetcher: provider,
submitter: provider,
});
const txBuilder = new MeshTxBuilder({ fetcher: provider });
const address = await wallet.getChangeAddress();
const utxos = await wallet.getUtxos();
const { pubKeyHash } = deserializeAddress(address);
```
Create a minting ruleset using a native script to derive the policy ID.
```tsx
const nativeScript: NativeScript = {
type: "all",
scripts: [
{
type: "before",
slot: "90000000", // Any value beyond the current preprod absolute slot. When you read this, it's possible this slot has passed.
},
{ type: "sig", keyHash: pubKeyHash },
],
};
const forgeScript = ForgeScript.fromNativeScript(nativeScript);
const policyId = resolveScriptHash(forgeScript);
```
Write a function to generate on-chain metadata for image and attributes.
```tsx
type AssetMetadata = {
files: {
mediaType: string;
name: string;
src: string;
}[];
image: string;
mediaType: string;
name: string;
};
function get721Metadata(
name: string,
attributes?: Record
): AssetMetadata {
return {
...attributes,
files: [
{
mediaType: "image/png",
name,
src: "ipfs://QmPS4PBvpGc2z6Dd6JdYqfHrKnURjtRGPTJWdhnAXNA8bQ",
},
],
image: "ipfs://QmPS4PBvpGc2z6Dd6JdYqfHrKnURjtRGPTJWdhnAXNA8bQ",
mediaType: "image/png",
name,
};
}
```
Loop to create 9 unique tokens using the forge script. Commit, sign, and submit the transaction.
```tsx
const metadata: {
[policyId: string]: {
[assetName: string]: AssetMetadata;
};
} = { [policyId]: {} };
for (let i = 1; i < 10; i++) {
const tokenName = "Asset #" + i;
const tokenHex = stringToHex(tokenName);
txBuilder.mint("1", policyId, tokenHex).mintingScript(forgeScript);
metadata[policyId]![tokenName] = get721Metadata(tokenName, { Attribute: i });
}
const unsignedTx = await txBuilder
.metadataValue(721, metadata)
.changeAddress(address)
.invalidHereafter(90000000)
.selectUtxosFrom(utxos)
.complete();
const signedTx = await wallet.signTx(unsignedTx);
const txHash = await wallet.submitTx(signedTx);
console.log("Submitted TX Hash:", txHash);
```
Read the transaction hash and view the transaction on a chain explorer.
# Resolve Node-Specific Imports Errors
URL: /guides/node-specific-imports
undefined
***
title: "Resolve Node-Specific Imports Errors"
icon: "guides/node-specific-imports.png"
----------------------------------------
import Link from "fumadocs-core/link";
Resolve Node-Specific Imports Errors (e.g., Buffer, TextEncoder) in Browser-Based Projects.
Web-based projects (React, Vue, Svelte, Angular) may encounter errors like:
```bash
Uncaught ReferenceError: Buffer is not defined
```
or
```bash
Module not found: Can't resolve 'buffer'
```
or
```bash
ReferenceError: TextEncoder is not defined
```
These errors occur when code relies on Node.js-specific modules unavailable in browsers. Common examples:
* `Buffer`
* `TextEncoder` / `TextDecoder`
* `crypto`
* `process`
* Node’s built-in modules (`fs`, `path`, `stream`)
Modern bundlers (Webpack 5, Vite, Next.js) do **not** automatically include Node polyfills. Use these guidelines to fix errors.
## 1. General Concepts \[!toc]
1. **Polyfill**: Implements missing functionality (e.g., `buffer` package).
2. **Fallback configuration**: Replaces Node modules with browser-friendly versions.
3. **npm dependencies**: Install equivalents:
```tsx
npm install buffer process stream-browserify crypto-browserify --save
```
4. **ES Modules vs CommonJS**: Ensure imports match bundler expectations.
## 2. Webpack \[!toc]
### 2.1 Webpack 5 and Above \[!toc]
Webpack 5 excludes Node polyfills. Two approaches exist:
**Approach A: Use NodePolyfillPlugin**
Install the plugin:
```tsx
npm install node-polyfill-webpack-plugin --save-dev
```
Add to `webpack.config.js`:
```tsx
const NodePolyfillPlugin = require('node-polyfill-webpack-plugin');
module.exports = {
// ...your existing config
plugins: [
new NodePolyfillPlugin(),
// ...other plugins
],
};
```
This plugin injects common polyfills.
**Approach B: Use `resolve.fallback`**
For granular control, configure fallbacks manually:
Install polyfills:
```tsx
npm install buffer process stream-browserify --save
```
Edit `webpack.config.js`:
```tsx
module.exports = {
// ...
resolve: {
fallback: {
buffer: require.resolve('buffer/'), // or 'buffer'
process: require.resolve('process/browser'),
stream: require.resolve('stream-browserify'),
// ...add more if needed
},
},
};
```
Import polyfills if needed:
```tsx
import { Buffer } from 'buffer';
global.Buffer = global.Buffer || Buffer;
```
## 3. Vite
Vite uses Rollup, which lacks automatic Node polyfills. Use a Rollup plugin.
Install the plugin:
```tsx
npm install rollup-plugin-polyfill-node --save-dev
```
Add to `vite.config.js`:
```tsx
import { defineConfig } from 'vite'
import vue from '@vitejs/plugin-vue' // or react, svelte, etc.
import rollupNodePolyFill from 'rollup-plugin-polyfill-node'
export default defineConfig({
plugins: [
vue(),
// any other plugins
],
build: {
rollupOptions: {
plugins: [
rollupNodePolyFill()
],
},
},
resolve: {
alias: {
// Optionally, if you want the polyfill for `buffer` and `process` as top-level
buffer: 'rollup-plugin-polyfill-node/polyfills/buffer-es6',
process: 'rollup-plugin-polyfill-node/polyfills/process-es6',
// Add more if needed
},
},
})
```
Use the polyfilled global if necessary:
```tsx
import { Buffer } from 'buffer';
globalThis.Buffer = globalThis.Buffer || Buffer;
```
## 4. Next.js
Next.js uses Webpack. Use `node-polyfill-webpack-plugin` or configure `resolve.fallback`.
Example with `node-polyfill-webpack-plugin`:
```tsx
// next.config.js
const NodePolyfillPlugin = require('node-polyfill-webpack-plugin')
module.exports = {
webpack: (config, { isServer }) => {
if (!isServer) {
config.plugins.push(new NodePolyfillPlugin())
}
return config
},
}
```
Node modules like `Buffer` or `process` are now polyfilled.
## 5. Create React App (CRA)
Create React App **v5** uses Webpack 5. Use `react-app-rewired` or `craco` to override config.
### 5.1 Example with craco \[!toc]
Install craco:
```tsx
npm install @craco/craco --save-dev
```
Update `package.json` scripts:
```tsx
{
"scripts": {
"start": "craco start",
"build": "craco build",
"test": "craco test"
}
}
```
Create `craco.config.js`:
```tsx
const NodePolyfillPlugin = require('node-polyfill-webpack-plugin');
module.exports = {
webpack: {
plugins: {
add: [
new NodePolyfillPlugin()
],
},
configure: (webpackConfig) => {
// Optionally, if you want to set fallback manually:
webpackConfig.resolve.fallback = {
...webpackConfig.resolve.fallback,
buffer: require.resolve('buffer'),
process: require.resolve('process/browser'),
}
return webpackConfig;
}
},
};
```
Use polyfills:
```tsx
import { Buffer } from 'buffer';
global.Buffer = global.Buffer || Buffer;
```
## 6. Angular
Angular CLI uses Webpack. Polyfill Node modules:
Install polyfills:
```tsx
npm install buffer process stream-browserify --save
```
Edit `angular.json` or use `ngx-build-plus`.
Example with `ngx-build-plus`:
```tsx
npm install ngx-build-plus --save-dev
```
In `angular.json`:
```tsx
{
"projects": {
"my-app": {
"architect": {
"build": {
"builder": "ngx-build-plus:browser",
"options": {
// ...
},
"configurations": {
"production": {
// ...
}
}
},
"serve": {
"builder": "ngx-build-plus:dev-server",
"options": {
// ...
}
}
}
}
}
}
```
Create or update `webpack.config.js`:
```tsx
const NodePolyfillPlugin = require('node-polyfill-webpack-plugin');
module.exports = {
plugins: [
new NodePolyfillPlugin(),
],
resolve: {
fallback: {
buffer: require.resolve('buffer'),
process: require.resolve('process/browser'),
// ...
},
},
};
```
Run Angular commands via `ng build --extra-webpack-config webpack.config.js --output-hashing=none`.
## 7. Svelte
SvelteKit uses Vite or Rollup. Use Vite instructions (Section 3) or add the plugin to Rollup config:
```tsx
// rollup.config.js
import nodePolyfills from 'rollup-plugin-polyfill-node'
export default {
plugins: [
nodePolyfills(),
// ...
],
// ...
}
```
# Prove Wallet Ownership
URL: /guides/prove-wallet-ownership
undefined
***
title: "Prove Wallet Ownership"
icon: "guides/cryptographically-prove-wallet-ownership.png"
-----------------------------------------------------------
import Link from "fumadocs-core/link";
Cryptographically prove account ownership by signing data with a private key. Use the public address as an identifier and build authentication based on message signing.
Use JSON Web Tokens (JWT) to pass authenticated user identity.
Example uses:
* **Authenticate sign-in**: Prove account ownership.
* **Authenticate actions**: Authorize off-chain actions.
* **Off-chain data**: Display user-specific off-chain data.
## How it works
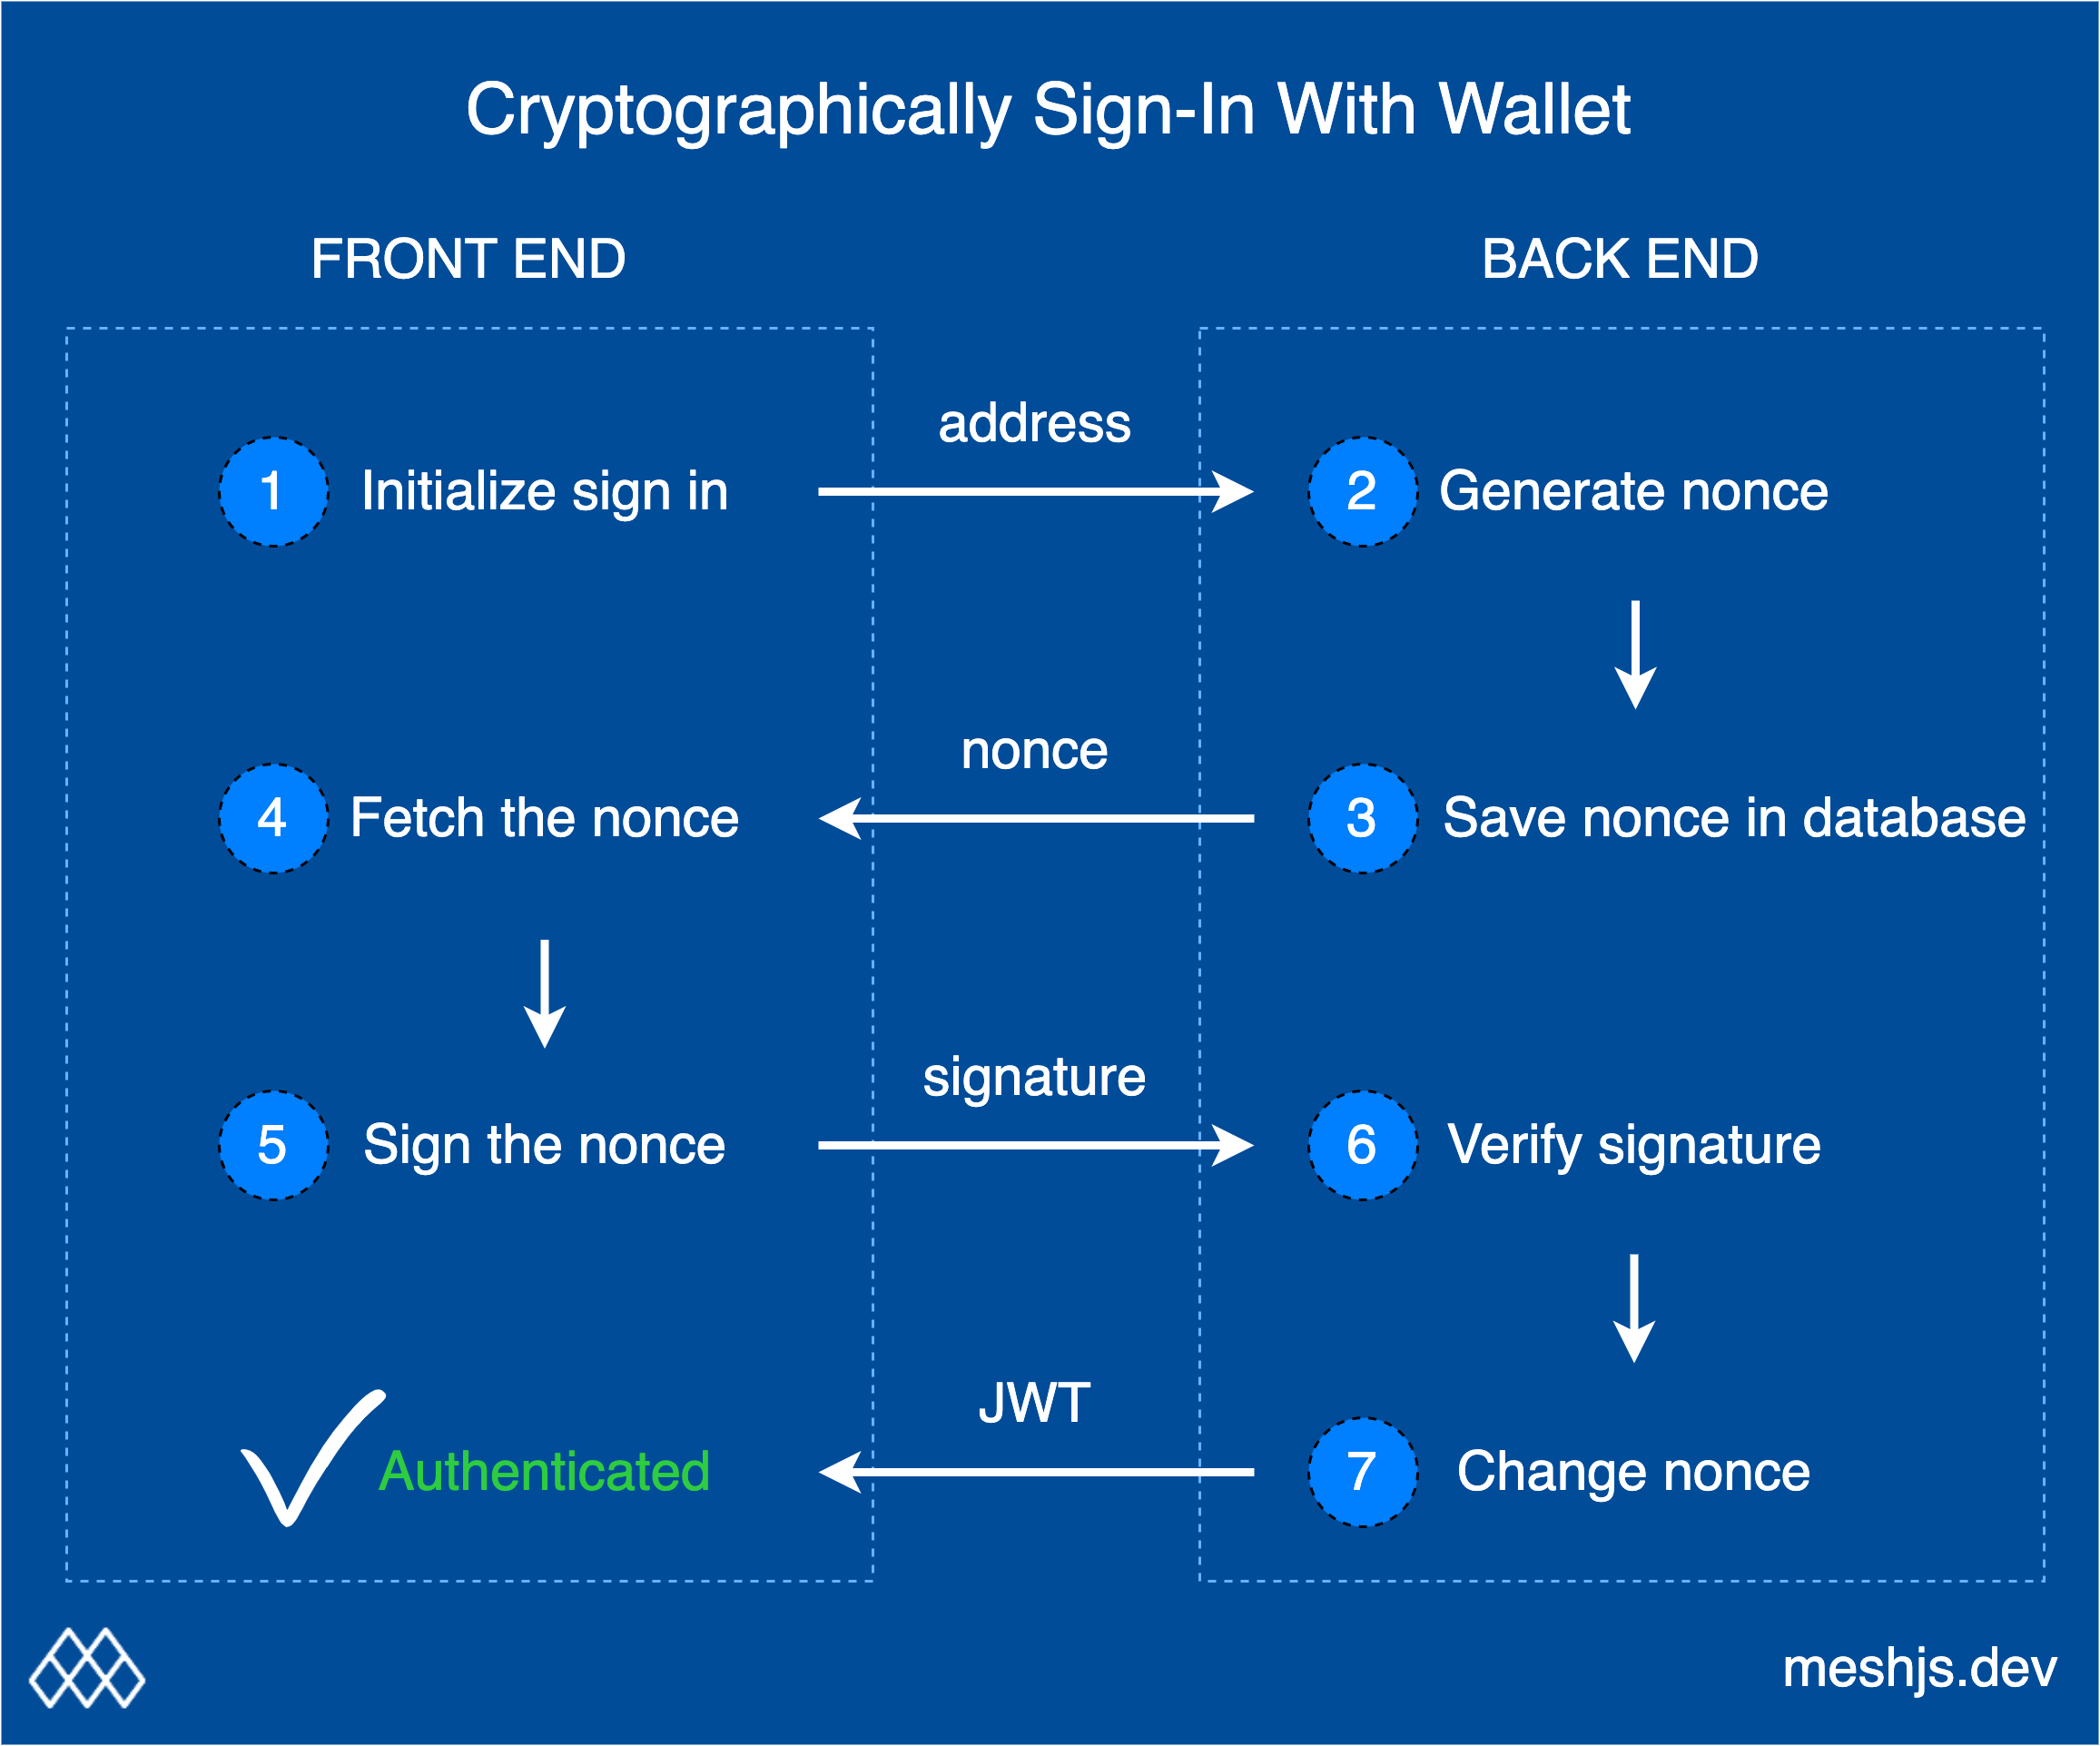
Signing a message affirms control of the wallet address.
Four ingredients are required:
* User wallet address
* Private key
* Public key
* Message to sign
To verify ownership, provide a message for the user to sign. Validate the signature using the public key.
## Client: Connect Wallet and Get Staking Address
The backend User model requires `public address` and `nonce` fields. The address must be unique.
On Cardano, use the wallet's staking address as the identifier. Retrieve it using `wallet.getUsedAddresses()`.
Get the user's staking address and send it to the backend:
```tsx
const { wallet, connected } = useWallet();
async function frontendStartLoginProcess() {
if (connected) {
const userAddress = (await wallet.getUsedAddresses())[0];
// do: send request with 'userAddress' to the backend
}
}
```
## Server: Generate Nonce and Store in Database
Generate a random nonce in the backend to create a unique authentication message. Use `generateNonce()` from Mesh.
Check the database for the `userAddress`. Create a new entry for new users. Store the new nonce for existing users.
```tsx
import { generateNonce } from '@meshsdk/core';
async function backendGetNonce(userAddress) {
// do: if new user, create new user model in the database
const nonce = generateNonce('I agree to the term and conditions of the Mesh: ');
// do: store 'nonce' in user model in the database
// do: return 'nonce'
}
```
Return the `nonce` for signing.
## Client: Verify ownership by signing the nonce
Sign the nonce using the wallet's private key with `wallet.signData(nonce, userAddress)` (CIP-8).
Request authorization. The app processes the generated signature.
```tsx
async function frontendSignMessage(nonce) {
try {
const userAddress = (await wallet.getUsedAddresses())[0];
const signature = await wallet.signData(nonce, userAddress);
// do: send request with 'signature' and 'userAddress' to the backend
} catch (error) {
// catch error if user refuse to sign
}
}
```
## Server: Verify Signature
The backend retrieves the user and nonce from the database.
Verify the signature using `checkSignature`.
If verified, issue a JWT or session identifier.
Prevent replay attacks by regenerating the nonce after verification.
```tsx
import { checkSignature } from '@meshsdk/core';
async function backendVerifySignature(userAddress, signature) {
// do: get 'nonce' from user (database) using 'userAddress'
const result = checkSignature(nonce, signature, userAddress);
// do: update 'nonce' in the database with another random string
// do: do whatever you need to do, once the user has proven ownership
// it could be creating a valid JSON Web Token (JWT) or session
// it could be doing something offchain
// it could just be updating something in the database
}
```
## Putting It All Together
Frontend implementation:
```tsx
import { CardanoWallet, useWallet } from '@meshsdk/react';
export default function Page() {
const { wallet, connected } = useWallet();
async function frontendStartLoginProcess() {
if (connected) {
const userAddress = (await wallet.getUsedAddresses())[0];
const nonce = await backendGetNonce(userAddress);
await frontendSignMessage(nonce);
}
}
async function frontendSignMessage(nonce) {
try {
const userAddress = (await wallet.getUsedAddresses())[0];
const signature = await wallet.signData(nonce, userAddress);
await backendVerifySignature(userAddress, signature);
} catch (error) {
setState(0);
}
}
return (
<>
frontendStartLoginProcess()}
/>
);
}
```
Server-side implementation:
```tsx
import { checkSignature, generateNonce } from '@meshsdk/core';
async function backendGetNonce(userAddress) {
const nonce = generateNonce('I agree to the term and conditions of the Mesh: ');
return nonce;
}
async function backendVerifySignature(userAddress, signature) {
// do: get 'nonce' from database
const result = checkSignature(nonce, signature, userAddress);
if(result){
// create JWT or approve certain process
}
else{
// prompt user that signature is not correct
}
}
```
This technique authenticates sign-ins or any user action.
# Smart Contract Transactions
URL: /guides/smart-contract-transactions
undefined
***
title: "Smart Contract Transactions"
icon: "guides/smart-contract-transactions.png"
----------------------------------------------
import Link from "fumadocs-core/link";
Build a marketplace where users list assets for sale and purchase listed assets. Sellers can update or cancel listings.
## Initialize the Plutus script
Initialize the Plutus script. The compiled Plutus smart contract script CBOR is:
```tsx
const scriptCbor = '59079559079201000033232323232323232323232323232332232323232323232222232325335333006300800530070043333573466e1cd55cea80124000466442466002006004646464646464646464646464646666ae68cdc39aab9d500c480008cccccccccccc88888888888848cccccccccccc00403403002c02802402001c01801401000c008cd4060064d5d0a80619a80c00c9aba1500b33501801a35742a014666aa038eb9406cd5d0a804999aa80e3ae501b35742a01066a0300466ae85401cccd54070091d69aba150063232323333573466e1cd55cea801240004664424660020060046464646666ae68cdc39aab9d5002480008cc8848cc00400c008cd40b9d69aba15002302f357426ae8940088c98c80c8cd5ce01981901809aab9e5001137540026ae854008c8c8c8cccd5cd19b8735573aa004900011991091980080180119a8173ad35742a004605e6ae84d5d1280111931901919ab9c033032030135573ca00226ea8004d5d09aba2500223263202e33573805e05c05826aae7940044dd50009aba1500533501875c6ae854010ccd540700808004d5d0a801999aa80e3ae200135742a00460446ae84d5d1280111931901519ab9c02b02a028135744a00226ae8940044d5d1280089aba25001135744a00226ae8940044d5d1280089aba25001135744a00226ae8940044d55cf280089baa00135742a00460246ae84d5d1280111931900e19ab9c01d01c01a101b13263201b3357389201035054350001b135573ca00226ea80054049404448c88c008dd6000990009aa80a911999aab9f0012500a233500930043574200460066ae880080548c8c8cccd5cd19b8735573aa004900011991091980080180118061aba150023005357426ae8940088c98c8054cd5ce00b00a80989aab9e5001137540024646464646666ae68cdc39aab9d5004480008cccc888848cccc00401401000c008c8c8c8cccd5cd19b8735573aa0049000119910919800801801180a9aba1500233500f014357426ae8940088c98c8068cd5ce00d80d00c09aab9e5001137540026ae854010ccd54021d728039aba150033232323333573466e1d4005200423212223002004357426aae79400c8cccd5cd19b875002480088c84888c004010dd71aba135573ca00846666ae68cdc3a801a400042444006464c6403866ae700740700680640604d55cea80089baa00135742a00466a016eb8d5d09aba2500223263201633573802e02c02826ae8940044d5d1280089aab9e500113754002266aa002eb9d6889119118011bab00132001355012223233335573e0044a010466a00e66442466002006004600c6aae754008c014d55cf280118021aba200301313574200222440042442446600200800624464646666ae68cdc3a800a40004642446004006600a6ae84d55cf280191999ab9a3370ea0049001109100091931900899ab9c01201100f00e135573aa00226ea80048c8c8cccd5cd19b875001480188c848888c010014c01cd5d09aab9e500323333573466e1d400920042321222230020053009357426aae7940108cccd5cd19b875003480088c848888c004014c01cd5d09aab9e500523333573466e1d40112000232122223003005375c6ae84d55cf280311931900899ab9c01201100f00e00d00c135573aa00226ea80048c8c8cccd5cd19b8735573aa004900011991091980080180118029aba15002375a6ae84d5d1280111931900699ab9c00e00d00b135573ca00226ea80048c8cccd5cd19b8735573aa002900011bae357426aae7940088c98c802ccd5ce00600580489baa001232323232323333573466e1d4005200c21222222200323333573466e1d4009200a21222222200423333573466e1d400d2008233221222222233001009008375c6ae854014dd69aba135744a00a46666ae68cdc3a8022400c4664424444444660040120106eb8d5d0a8039bae357426ae89401c8cccd5cd19b875005480108cc8848888888cc018024020c030d5d0a8049bae357426ae8940248cccd5cd19b875006480088c848888888c01c020c034d5d09aab9e500b23333573466e1d401d2000232122222223005008300e357426aae7940308c98c8050cd5ce00a80a00900880800780700680609aab9d5004135573ca00626aae7940084d55cf280089baa0012323232323333573466e1d400520022333222122333001005004003375a6ae854010dd69aba15003375a6ae84d5d1280191999ab9a3370ea0049000119091180100198041aba135573ca00c464c6401a66ae7003803402c0284d55cea80189aba25001135573ca00226ea80048c8c8cccd5cd19b875001480088c8488c00400cdd71aba135573ca00646666ae68cdc3a8012400046424460040066eb8d5d09aab9e500423263200a33573801601401000e26aae7540044dd500089119191999ab9a3370ea00290021091100091999ab9a3370ea00490011190911180180218031aba135573ca00846666ae68cdc3a801a400042444004464c6401666ae7003002c02402001c4d55cea80089baa0012323333573466e1d40052002212200223333573466e1d40092000212200123263200733573801000e00a00826aae74dd5000891999ab9a3370e6aae74dd5000a40004008464c6400866ae700140100092612001490103505431001123230010012233003300200200122212200201';
```
Initialize the Plutus script:
```tsx
const script: PlutusScript = {
code: scriptCbor,
version: 'V2',
};
```
Resolve the Plutus script address using `resolvePlutusScriptAddress`. Input the `PlutusScript` and `network` (0 for testnet):
```tsx
const scriptAddress = resolvePlutusScriptAddress(script, 0);
```
## Listing Asset for Sale
Get the seller's address from the connected wallet:
```tsx
const addr = (await wallet.getUsedAddresses())[0];
```
Create the datum schema:
```tsx
const datumConstr: Data = {
alternative: 0,
fields: [
resolvePaymentKeyHash(addr), // seller address as pubkeyhash
listPriceInLovelace, // price
policyId, // policy ID of token
assetId, // asset name of token in hex
],
};
```
Create a transaction using `sendAssets()` to send the asset to the script address with the defined datum. `policyId + assetId` is the asset name in hex. Build, sign, and submit the transaction.
```tsx
const tx = new Transaction({ initiator: wallet })
.sendAssets(
{
address: scriptAddress,
datum: {
value: datumConstr,
},
},
[
{
unit: policyId + assetId,
quantity: '1',
},
]
);
const unsignedTx = await tx.build();
const signedTx = await wallet.signTx(unsignedTx);
const txHash = await wallet.submitTx(signedTx);
```
Implement your own marketplace. Note: A database may be required to store listing information.
Full code for listing an asset:
```tsx
const addr = (await wallet.getUsedAddresses())[0];
const datumConstr: Data = {
alternative: 0,
fields: [
resolvePaymentKeyHash(addr),
listPriceInLovelace,
policyId,
assetId,
],
};
const tx = new Transaction({ initiator: wallet })
.sendAssets(
{
address: scriptAddress,
datum: {
value: datumConstr,
},
},
[
{
unit: policyId + assetId,
quantity: '1',
},
]
);
const unsignedTx = await tx.build();
const signedTx = await wallet.signTx(unsignedTx);
const txHash = await wallet.submitTx(signedTx);
```
## Cancel the Listing
Cancel the listing. Only the seller can cancel. Define the datum:
```tsx
const datumConstr: Data = {
alternative: 0,
fields: [
resolvePaymentKeyHash(addr), // seller address as pubkeyhash
listPriceInLovelace, // price
policyId, // policy ID of token
assetId, // asset name of token in hex
],
};
```
Cancel, update, and purchase endpoints require the UTxO in the script address. Use `fetchAddressUTxOs()` to query UTxOs containing the asset. Filter by datum hash using `resolveDataHash()` (see resolvers).
Implementation for `_getAssetUtxo()`:
```tsx
async function _getAssetUtxo({ scriptAddress, asset, datum }) {
const utxos = await blockchainFetcher.fetchAddressUTxOs(
scriptAddress,
asset
);
if (utxos.length == 0) {
throw 'No listing found.';
}
const dataHash = resolveDataHash(datum);
let utxo = utxos.find((utxo: any) => {
return utxo.output.dataHash == dataHash;
});
return utxo;
}
```
Define the redeemer for cancellation:
```tsx
const redeemer = { data: { alternative: 1, fields: [] } };
```
Build the transaction. Use `redeemValue()` to redeem the UTxO and send the value back to the seller. Set required signers to the seller's address.
```tsx
const tx = new Transaction({ initiator: wallet })
.redeemValue({
value: assetUtxo,
script: script,
datum: datumConstr,
redeemer: redeemer,
})
.sendValue(addr, assetUtxo)
.setRequiredSigners([addr]);
const unsignedTx = await tx.build();
const signedTx = await wallet.signTx(unsignedTx, true);
const txHash = await wallet.submitTx(signedTx);
```
Full code for cancellation:
```tsx
const addr = (await wallet.getUsedAddresses())[0];
const datumConstr: Data = {
alternative: 0,
fields: [
resolvePaymentKeyHash(addr),
listPriceInLovelace,
policyId,
assetId,
],
};
const assetUtxo = await _getAssetUtxo({
scriptAddress: scriptAddress,
asset: 'd9312da562da182b02322fd8acb536f37eb9d29fba7c49dc172555274d657368546f6b656e',
datum: datumConstr,
});
if (assetUtxo === undefined) {
throw 'No listing found.';
}
const redeemer = { data: { alternative: 1, fields: [] } };
const tx = new Transaction({ initiator: wallet })
.redeemValue({
value: assetUtxo,
script: script,
datum: datumConstr,
redeemer: redeemer,
})
.sendValue(addr, assetUtxo)
.setRequiredSigners([addr]);
const unsignedTx = await tx.build();
const signedTx = await wallet.signTx(unsignedTx, true);
const txHash = await wallet.submitTx(signedTx);
```
## Purchase the Listed Asset
Purchase the listed asset. The endpoint requires the asset, price, and seller address to create the validator datum. Successful purchase transfers the asset to the buyer and price to the seller.
Get the buyer's address:
```tsx
const addr = (await wallet.getUsedAddresses())[0]; // buyer's address
```
Create the validator datum using the seller's address:
```tsx
const datumConstr: Data = {
alternative: 0,
fields: [
resolvePaymentKeyHash(sellerAddr), // seller address as pubkeyhash
listPriceInLovelace, // price
policyId, // policy ID of token
assetId, // asset name of token in hex
],
};
```
Define the redeemer:
```tsx
const redeemer = { data: { alternative: 0, fields: [] } };
```
Build and submit the transaction. Use `redeemValue()` to redeem the asset, `sendValue()` to transfer to the buyer, and `sendLovelace()` to pay the seller:
```tsx
const tx = new Transaction({ initiator: wallet })
.redeemValue({
value: assetUtxo,
script: script,
datum: datumConstr,
redeemer: redeemer,
})
.sendValue(addr, assetUtxo)
.sendLovelace(sellerAddr, listPriceInLovelace.toString())
.setRequiredSigners([addr]);
const unsignedTx = await tx.build();
const signedTx = await wallet.signTx(unsignedTx, true);
const txHash = await wallet.submitTx(signedTx);
```
Full code for purchase:
```tsx
const addr = (await wallet.getUsedAddresses())[0]; // buyer's address
const datumConstr: Data = {
alternative: 0,
fields: [
resolvePaymentKeyHash(sellerAddr),
listPriceInLovelace,
policyId,
assetId,
],
};
const assetUtxo = await _getAssetUtxo({
scriptAddress: scriptAddress,
asset: 'd9312da562da182b02322fd8acb536f37eb9d29fba7c49dc172555274d657368546f6b656e',
datum: datumConstr,
});
const redeemer = { data: { alternative: 0, fields: [] } };
const tx = new Transaction({ initiator: wallet })
.redeemValue({
value: assetUtxo,
script: script,
datum: datumConstr,
redeemer: redeemer,
})
.sendValue(addr, assetUtxo)
.sendLovelace(sellerAddr, listPriceInLovelace.toString())
.setRequiredSigners([addr]);
const unsignedTx = await tx.build();
const signedTx = await wallet.signTx(unsignedTx, true);
const txHash = await wallet.submitTx(signedTx);
```
## Update the Listing
Update the listing. Only the seller can update. Define the original datum:
```tsx
const datumConstr: Data = {
alternative: 0,
fields: [
resolvePaymentKeyHash(addr), // seller address as pubkeyhash
listPriceInLovelace, // listed price
policyId, // policy ID of token
assetId, // asset name of token in hex
],
};
```
Create the updated datum with the new price:
```tsx
const datumConstrNew: Data = {
alternative: 0,
fields: [
resolvePaymentKeyHash(addr), // seller address as pubkeyhash
updatedPriceInLovelace, // updated price
policyId, // policy ID of token
assetId, // asset name of token in hex
],
};
```
Define the redeemer for update:
```tsx
const redeemer = { data: { alternative: 1, fields: [] } };
```
Build the transaction. Redeem the UTxO with the original datum and send the NFT to the script address with the new datum using `sendAssets()`.
```tsx
const tx = new Transaction({ initiator: wallet })
.redeemValue({
value: assetUtxo,
script: script,
datum: datumConstr,
redeemer: redeemer,
})
.setRequiredSigners([addr])
.sendAssets(
{
address: scriptAddress,
datum: {
value: datumConstrNew,
},
},
[
{
unit: 'd9312da562da182b02322fd8acb536f37eb9d29fba7c49dc172555274d657368546f6b656e',
quantity: '1',
},
]
);
const unsignedTx = await tx.build();
const signedTx = await wallet.signTx(unsignedTx, true);
const txHash = await wallet.submitTx(signedTx);
```
Full code for update:
```tsx
const addr = (await wallet.getUsedAddresses())[0];
const datumConstr: Data = {
alternative: 0,
fields: [
resolvePaymentKeyHash(addr),
listPriceInLovelace,
policyId,
assetId,
],
};
const datumConstrNew: Data = {
alternative: 0,
fields: [
resolvePaymentKeyHash(addr),
updatedPriceInLovelace,
policyId,
assetId,
],
};
const assetUtxo = await _getAssetUtxo({
scriptAddress: scriptAddress,
asset: 'd9312da562da182b02322fd8acb536f37eb9d29fba7c49dc172555274d657368546f6b656e',
datum: datumConstr,
});
const redeemer = { data: { alternative: 1, fields: [] } };
const tx = new Transaction({ initiator: wallet })
.redeemValue({
value: assetUtxo,
script: script,
datum: datumConstr,
redeemer: redeemer,
})
.setRequiredSigners([addr])
.sendAssets(
{
address: scriptAddress,
datum: {
value: datumConstrNew,
},
},
[
{
unit: 'd9312da562da182b02322fd8acb536f37eb9d29fba7c49dc172555274d657368546f6b656e',
quantity: '1',
},
]
);
const unsignedTx = await tx.build();
const signedTx = await wallet.signTx(unsignedTx, true);
const txHash = await wallet.submitTx(signedTx);
```
This serves as a starting point for building apps with smart contracts.
# Executing a standalone script
URL: /guides/standalone
undefined
***
title: "Executing a standalone script"
icon: "guides/standalone.png"
-----------------------------
import Link from "fumadocs-core/link";
Run JavaScript/TypeScript files directly to interact with the blockchain using the `tsx` package.
Set up a simple project using MeshSDK. Create a wallet, build and sign transactions, and submit them to the blockchain.
This tutorial covers:
* Creating a `package.json` file.
* Installing MeshSDK and dependencies.
* Writing a script to create a wallet and send a transaction.
* Running the project.
## System Setup
### Create `package.json` \[!toc]
Create `package.json` in the project root:
```tsx
{
"type": "module",
"dependencies": {},
"scripts": {
"dev": "tsx index.ts"
}
}
```
### Install Packages \[!toc]
Install required packages:
```tsx
npm install
npm install tsx @meshsdk/core
```
`package.json` should look like this:
```tsx
{
"type": "module",
"dependencies": {
"@meshsdk/core": "^1.5.18",
"tsx": "^4.9.4"
},
"scripts": {
"dev": "tsx index.ts"
}
}
```
* `@meshsdk/core`: Core functionality.
* `tsx`: Runs TypeScript files directly.
## Make a Simple Transaction
### Create `index.ts` \[!toc]
Create `index.ts` and add the following code:
```tsx
import { BlockfrostProvider, MeshWallet, Transaction } from "@meshsdk/core";
// Set up the blockchain provider with your key
const provider = new BlockfrostProvider("YOUR_KEY_HERE");
// Initialize the wallet with a mnemonic key
const wallet = new MeshWallet({
networkId: 0,
fetcher: provider,
submitter: provider,
key: {
type: "mnemonic",
words: [
"your", "mnemonic", "...", "here",
],
},
});
// Create and send a transaction
const tx = new Transaction({ initiator: wallet }).sendLovelace(
"addr_test1qp2k7wnshzngpqw0xmy33hvexw4aeg60yr79x3yeeqt3s2uvldqg2n2p8y4kyjm8sqfyg0tpq9042atz0fr8c3grjmysdp6yv3",
"1000000"
);
const unsignedTx = await tx.build();
const signedTx = await wallet.signTx(unsignedTx);
const txHash = await wallet.submitTx(signedTx);
```
### Run Application \[!toc]
Replace `YOUR_KEY_HERE` with a valid Blockfrost key and the mnemonic words with your own. Get a key from Blockfrost and generate a mnemonic from Mesh.
Start the application:
```tsx
npm run dev
```
The transaction hash will log to the console.
View the complete code in the Mesh GitHub repo.
# Vesting Script End-to-End
URL: /guides/vesting
undefined
***
title: "Vesting Script End-to-End"
icon: "guides/vesting.png"
--------------------------
import Link from "fumadocs-core/link";
A vesting contract locks funds and allows beneficiary withdrawal after a lockup period.
Organizations use vesting contracts to incentivize retention. Funds deposited are accessible to employees after a predetermined period.
## On-Chain Code
Define the datum shape to configure vesting parameters.
```tsx
pub type VestingDatum {
/// POSIX time in milliseconds, e.g. 1672843961000
lock_until: Int,
/// Owner's credentials
owner: ByteArray,
/// Beneficiary's credentials
beneficiary: ByteArray,
}
```
The `VestingDatum` contains:
* `lock_until`: POSIX timestamp (ms) for lock expiration.
* `owner`: Owner credentials (public key hash).
* `beneficiary`: Beneficiary credentials (public key hash).
Source: `aiken-vesting/aiken-workspace/lib/vesting/types.ak`.
Define the spend validator:
```tsx
use aiken/transaction.{ScriptContext, Spend}
use vesting/types.{VestingDatum}
use vodka_extra_signatories.{key_signed}
use vodka_validity_range.{valid_after}
validator {
pub fn vesting(datum: VestingDatum, _redeemer: Data, ctx: ScriptContext) {
// In principle, scripts can be used for different purpose (e.g. minting
// assets). Here we make sure it's only used when 'spending' from a eUTxO
when ctx.purpose is {
Spend(_) -> or {
key_signed(ctx.transaction.extra_signatories, datum.owner),
and {
key_signed(ctx.transaction.extra_signatories, datum.beneficiary),
valid_after(ctx.transaction.validity_range, datum.lock_until),
},
}
_ -> False
}
}
}
```
The `vesting` validator ensures:
* The transaction is signed by the owner.
* OR:
* The transaction is signed by the beneficiary AND valid after the lockup period.
Source: `aiken-vesting/aiken-workspace/validators/vesting.ak`.
### How It Works \[!toc]
The owner deposits funds, locked until the period expires.
Transactions include validity intervals. The ledger verifies these bounds before script execution. This incorporates time while maintaining determinism.
Since the upper bound is uncontrolled, execution can occur long after the delay. This is acceptable.
The beneficiary (potentially different from the owner) withdraws funds after expiration.
## Testing
Run comprehensive tests with `aiken check`.
Test cases include:
* Success unlocking.
* Success unlocking with only owner signature.
* Success unlocking with beneficiary signature and time passed.
* Fail unlocking with only beneficiary signature.
* Fail unlocking with only time passed.
See `aiken-vesting/aiken-workspace/validators/tests/vesting.ak`.
## Compile and Build Script
Compile the script:
```tsx
aiken build
```
Generates a CIP-0057 Plutus blueprint in `aiken-vesting/aiken-workspace/plutus.json`.
## Off-Chain Code
### Deposit Funds \[!toc]
The owner deposits funds, specifying the lockup period and beneficiary.
```tsx
const assets: Asset[] = [
{
unit: "lovelace",
quantity: "10000000",
},
];
const lockUntilTimeStamp = new Date();
lockUntilTimeStamp.setMinutes(lockUntilTimeStamp.getMinutes() + 1);
const beneficiary =
"addr_test1qpvx0sacufuypa2k4sngk7q40zc5c4npl337uusdh64kv0uafhxhu32dys6pvn6wlw8dav6cmp4pmtv7cc3yel9uu0nq93swx9";
```
Deposit 10 ADA, locked for 1 minute.
Prepare transaction variables: wallet address, UTXOs, script address, and public key hashes.
```tsx
const { utxos, walletAddress } = await getWalletInfoForTx();
const { scriptAddr } = getScript();
const { pubKeyHash: ownerPubKeyHash } = deserializeAddress(walletAddress);
const { pubKeyHash: beneficiaryPubKeyHash } = deserializeAddress(beneficiary);
```
Construct the deposit transaction. Specify script address, amount, lockup period, owner, and beneficiary.
```tsx
const txBuilder = new MeshTxBuilder({
fetcher: provider,
submitter: provider,
});
await txBuilder
.txOut(scriptAddr, amount)
.txOutInlineDatumValue(
mConStr0([lockUntilTimeStampMs, ownerPubKeyHash, beneficiaryPubKeyHash])
)
.changeAddress(walletAddress)
.selectUtxosFrom(utxos)
.complete();
const unsignedTx = txBuilder.txHex;
```
Sign and submit.
```tsx
const signedTx = await wallet.signTx(unsignedTx);
const txHash = await wallet.submitTx(signedTx);
```
Ensure the Blockfrost key is in `.env` and mnemonic in `aiken-vesting/src/configs.ts`.
Run the deposit code:
```tsx
npm run deposit
```
Save the returned transaction hash for withdrawal.
See successful deposit transaction.
### Withdraw Funds \[!toc]
Beneficiaries (or owners) withdraw funds after expiration.
Fetch UTxOs containing locked funds using the deposit transaction hash.
```tsx
const txHashFromDesposit =
"ede9f8176fe41f0c84cfc9802b693dedb5500c0cbe4377b7bb0d57cf0435200b";
const utxos = await provider.fetchUTxOs(txHash);
const vestingUtxo = utxos[0];
```
Prepare transaction variables.
```tsx
const { utxos, walletAddress, collateral } = await getWalletInfoForTx();
const { input: collateralInput, output: collateralOutput } = collateral;
const { scriptAddr, scriptCbor } = getScript();
const { pubKeyHash } = deserializeAddress(walletAddress);
```
Prepare the datum and validity interval slot. Set the valid interval to start after the lockup period.
```tsx
const datum = deserializeDatum(vestingUtxo.output.plutusData!);
const invalidBefore =
unixTimeToEnclosingSlot(
Math.min(datum.fields[0].int as number, Date.now() - 15000),
SLOT_CONFIG_NETWORK.preprod
) + 1;
```
Construct the withdrawal transaction. Specify the UTxO, script address, recipient address, and validity interval.
```tsx
const txBuilder = new MeshTxBuilder({
fetcher: provider,
submitter: provider,
});
await txBuilder
.spendingPlutusScriptV2()
.txIn(
vestingUtxo.input.txHash,
vestingUtxo.input.outputIndex,
vestingUtxo.output.amount,
scriptAddr
)
.spendingReferenceTxInInlineDatumPresent()
.spendingReferenceTxInRedeemerValue("")
.txInScript(scriptCbor)
.txOut(walletAddress, [])
.txInCollateral(
collateralInput.txHash,
collateralInput.outputIndex,
collateralOutput.amount,
collateralOutput.address
)
.invalidBefore(invalidBefore)
.requiredSignerHash(pubKeyHash)
.changeAddress(walletAddress)
.selectUtxosFrom(utxos)
.complete();
const unsignedTx = txBuilder.txHex;
```
Sign and submit. Enable partial signing (`true`) for validator unlocking.
```tsx
const signedTx = await wallet.signTx(unsignedTx, true);
const txHash = await wallet.submitTx(signedTx);
```
Update `aiken-vesting/src/withdraw-fund.ts` with the deposit transaction hash.
Run:
```tsx
npm run withdraw
```
See successful withdraw transaction.
# Midnight
URL: /midnight
Zero-knowledge privacy network for Cardano
***
title: "Midnight"
description: "Zero-knowledge privacy network for Cardano"
icon: "icons/midnight.svg"
--------------------------
import {linksMidnight} from "@/data/links-midnight";
import Link from "next/link";
import {
Card,
CardDescription,
CardTitle,
} from "@/components/ui/card";
# Blockfrost Provider
URL: /providers/blockfrost
Featuring over 100 APIs tailored for easy access to Cardano blockchain
***
title: "Blockfrost Provider"
description: "Featuring over 100 APIs tailored for easy access to Cardano blockchain"
-------------------------------------------------------------------------------------
import Link from "fumadocs-core/link";
Blockfrost provides restful APIs which allows your app to access information stored on the blockchain.
Get started:
```tsx
import { BlockfrostProvider } from "@meshsdk/core";
const provider = new BlockfrostProvider('');
```
If you are using a privately hosted Blockfrost instance, you can set the URL in the parameter:
```tsx
const provider = new BlockfrostProvider('');
```
### Get data from URL
You can fetch any data from the blockchain by providing the URL path.
```tsx
await provider.get('/addresses/addr_test1qpvx0sacufuypa2k4sngk7q40zc5c4npl337uusdh64kv0uafhxhu32dys6pvn6wlw8dav6cmp4pmtv7cc3yel9uu0nq93swx9/transactions')
```
## Fetch Account Info
Obtain information about a specific stake account.
```tsx
await provider.fetchAccountInfo('stake_test1uzw5mnt7g4xjgdqkfa80hrk7kdvds6sa4k0vvgjvlj7w8eskffj2n')
```
## Fetch Address Assets
Fetch assets from an address.
```tsx
await provider.fetchAddressAssets('addr_test1qpvx0sacufuypa2k4sngk7q40zc5c4npl337uusdh64kv0uafhxhu32dys6pvn6wlw8dav6cmp4pmtv7cc3yel9uu0nq93swx9')
```
### Fetch Address UTxOs \[!toc]
Fetch UTxOs from address
**Address**
```bash
addr_test1qpvx0sacufuypa2k4sngk7q40zc5c4npl337uusdh64kv0uafhxhu32dys6pvn6wlw8dav6cmp4pmtv7cc3yel9uu0nq93swx9
```
```tsx
await provider.fetchAddressAssets(
'addr_test1qpvx0sacufuypa2k4sngk7q40zc5c4npl337uusdh64kv0uafhxhu32dys6pvn6wlw8dav6cmp4pmtv7cc3yel9uu0nq93swx9'
);
```
### Fetch assets from address \[!toc]
Fetch assets given an address
**Address**
```bash
addr_test1qpvx0sacufuypa2k4sngk7q40zc5c4npl337uusdh64kv0uafhxhu32dys6pvn6wlw8dav6cmp4pmtv7cc3yel9uu0nq93swx9
```
```tsx
await provider.fetchAddressAssets(
'addr_test1qpvx0sacufuypa2k4sngk7q40zc5c4npl337uusdh64kv0uafhxhu32dys6pvn6wlw8dav6cmp4pmtv7cc3yel9uu0nq93swx9'
);
```
## Fetch Address UTxOs
Fetch UTxOs controlled by an address.
```tsx
await provider.fetchAddressUTxOs('addr_test1qpvx0sacufuypa2k4sngk7q40zc5c4npl337uusdh64kv0uafhxhu32dys6pvn6wlw8dav6cmp4pmtv7cc3yel9uu0nq93swx9')
```
Optionally, you can filter UTXOs containing a particular `asset` by providing asset, where it is the concatenation of policy ID and asset.
```tsx
await fetchAddressUTxOs(address: string, asset?: string)
```
### Fetch Address UTxOs \[!toc]
Fetch UTxOs from address
**Address**
```bash
addr_test1qpvx0sacufuypa2k4sngk7q40zc5c4npl337uusdh64kv0uafhxhu32dys6pvn6wlw8dav6cmp4pmtv7cc3yel9uu0nq93swx9
```
```tsx
await provider.fetchAddressUTxOs(
'addr_test1qpvx0sacufuypa2k4sngk7q40zc5c4npl337uusdh64kv0uafhxhu32dys6pvn6wlw8dav6cmp4pmtv7cc3yel9uu0nq93swx9'
);
```
### Fetch UTxOs with Asset \[!toc]
Fetch UTxOs from address with asset
**Address**
```bash
addr_test1qpvx0sacufuypa2k4sngk7q40zc5c4npl337uusdh64kv0uafhxhu32dys6pvn6wlw8dav6cmp4pmtv7cc3yel9uu0nq93swx9
```
**Asset**:
`d9312da562da182b02322fd8acb536f37eb9d29fba7c49dc172555274d657368546f6b656e`
```tsx
await provider.fetchAddressUTxOs(
'addr_test1qpvx0sacufuypa2k4sngk7q40zc5c4npl337uusdh64kv0uafhxhu32dys6pvn6wlw8dav6cmp4pmtv7cc3yel9uu0nq93swx9'
);
```
## Fetch Asset Addresses
Fetch a list of a addresses containing a specific `asset` where it is the concatenation of policy ID and asset.
```tsx
await provider.fetchAssetAddresses('d9312da562da182b02322fd8acb536f37eb9d29fba7c49dc172555274d657368546f6b656e')
```
### Fetch Asset Addresses \[!toc]
Fetch list of addresses containing a specific asset
**Asset Unit**:
`d9312da562da182b02322fd8acb536f37eb9d29fba7c49dc172555274d657368546f6b656e`
```tsx
await provider.fetchAssetAddresses(
'd9312da562da182b02322fd8acb536f37eb9d29fba7c49dc172555274d657368546f6b656e'
);
```
## Fetch Asset Metadata
Fetch the asset metadata by providing asset's `unit`, which is the concatenation of policy ID and asset name in hex.
```tsx
// Asset Unit: `d9312da562da182b02322fd8acb536f37eb9d29fba7c49dc172555274d657368546f6b656e`
await provider.fetchAssetMetadata('d9312da562da182b02322fd8acb536f37eb9d29fba7c49dc172555274d657368546f6b656e')
```
## Fetch Block Info
Fetch block infomation. You can get the hash from `fetchTxInfo()`.
```tsx
// Block hash: `79f60880b097ec7dabb81f75f0b52fedf5e922d4f779a11c0c432dcf22c56089`
await provider.fetchBlockInfo('79f60880b097ec7dabb81f75f0b52fedf5e922d4f779a11c0c432dcf22c56089')
```
## Fetch Collection Assets
Fetch a list of assets belonging to a collection by providing its Policy ID.
```tsx
await provider.fetchCollectionAssets('d9312da562da182b02322fd8acb536f37eb9d29fba7c49dc17255527')
```
The API will return a list of `assets` and a cursor `next`. If the cursor is not null, you can use it to fetch the next page of results.
Here is an example of the response.
```tsx
{
"assets": [
{
"unit": "d9312da562da182b02322fd8acb536f37eb9d29fba7c49dc17255527",
"quantity": "1"
},
],
"next": 2
}
```
The `fetchCollectionAssets` function also accepts an optional `cursor` parameter to fetch the next page of results. The default value is `1`.
```tsx
await fetchCollectionAssets(
policyId: string,
cursor = 1
)
```
## Fetch Handle Address
ADA Handle allows users to use a human-readable "Handle" to associate an address.
Each Handle is a unique NFT, minted and issued on the Cardano blockchain. These NFTs act as unique identifiers for the UTXO that they reside in.
We can resolve the handle's address with `fetchHandleAddress`.
```tsx
// Handle: `meshsdk`
await provider.fetchHandleAddress('meshsdk')
```
## Fetch Handle
ADA Handle allows users to use a human-readable "Handle" to associate an address.
Each Handle is a unique NFT, minted and issued on the Cardano blockchain. These NFTs act as unique identifiers for the UTXO that they reside in.
ADA Handle also released a CIP68 handle and this function will fetch the metadata of the handle.
```tsx
// Handle: `meshsdk`
await provider.fetchHandle('meshsdk')
```
## Fetch Protocol Parameters
Fetch the latest protocol parameters.
```tsx
await provider.fetchProtocolParameters()
```
Optionally, you can provide an epoch number to fetch the protocol parameters of that epoch.
## Fetch Transaction Info
Fetch transaction infomation. Only confirmed transaction can be retrieved.
```tsx
// Transaction hash: `f4ec9833a3bf95403d395f699bc564938f3419537e7fb5084425d3838a4b6159`
await provider.fetchTxInfo('f4ec9833a3bf95403d395f699bc564938f3419537e7fb5084425d3838a4b6159')
```
## Fetch UTxOs
Get UTxOs for a given hash.
```tsx
await provider.fetchUTxOs('dfd2a2616e6154a092807b1ceebb9ddcadc0f22cf5c8e0e6b0757815083ccb70')
```
Optionally, you can specify the index of the index output.
```tsx
await provider.fetchUTxOs('hash_here', 0)
```
## Fetch Proposal Info
Get information for a given governance proposal, identified by the txHash and proposal index
```tsx
await provider.fetchGovernanceProposal('372d688faa77e146798b581b322c0f2981a9023764736ade5d12e0e4e796af8c', 0)
```
## Evaluate Transaction
`evaluateTx()` accepts an unsigned transaction (`unsignedTx`) and it evaluates the resources required to execute the transaction. Note that, this is only valid for transaction interacting with redeemer (smart contract). By knowing the budget required, you can use this to adjust the redeemer's budget so you don't spend more than you need to execute transactions for this smart contract.
```tsx
const unsignedTx = await tx.build();
const evaluateTx = await provider.evaluateTx(unsignedTx);
```
Example responses from unlocking assets from the always succeed smart contract.
```tsx
[
{
"index": 0,
"tag": "SPEND",
"budget": {
"mem": 1700,
"steps": 368100
}
}
]
```
With the `mem` and `steps`, you can refine the budget for the redeemer. For example:
```tsx
const redeemer = {
data: { alternative: 0, fields: [...] },
budget: {
mem: 1700,
steps: 368100,
},
};
```
## Submit Transaction
Submit a serialized transaction to the network.
```tsx
await provider.submitTx(signedTx);
```
## On Transaction Confirmed
Allow you to listen to a transaction confirmation. Upon confirmation, the callback will be called.
```tsx
const tx = new Transaction({ initiator: wallet });
tx.sendLovelace('addr_test1vpvx0sacufuypa2k4sngk7q40zc5c4npl337uusdh64kv0c7e4cxr', '5000000');
const unsignedTx = await tx.build();
const signedTx = await wallet.signTx(unsignedTx);
const txHash = await wallet.submitTx(signedTx);
provider.onTxConfirmed(txHash, () => {
// Transaction confirmed
});
```
# Hydra Provider (beta)
URL: /providers/hydra
Layer 2 scaling solution for Cardano that increases transaction throughput and ensures cost efficiency while maintaining security.
***
title: "Hydra Provider (beta)"
description: "Layer 2 scaling solution for Cardano that increases transaction throughput and ensures cost efficiency while maintaining security."
-------------------------------------------------------------------------------------------------------------------------------------------------
import Link from "fumadocs-core/link";
The Hydra Head protocol is a layer 2 scaling solution for Cardano rooted in peer-reviewed research that increases transaction throughput and ensures cost efficiency while maintaining rigorous security.
Get started:
```tsx
import { HydraProvider } from "@meshsdk/hydra";
// Hydra Head URL and PORT: e.g. http://123.45.67.890:4001
const provider = new HydraProvider({
httpUrl:
});
```
## connect
Establishes a connection to a Hydra Head. This is typically managed through the HydraProvider..
```tsx
await provider.connect();
```
## hydra-head messages
Listens to messages from hydra-head
```tsx
provider.onMessage((message) =>
console.log("messages received from hydra", message)
);
```
can be used together with connect to Receive Messages after connect
```tsx
await provider.connect();
provider.onMessage((message) =>
console.log("messages received from hydra", message)
);
```
## disconnect
Closes the active connection to a Hydra Head. This is typically managed through the HydraProvider.
Parameter (Optional)
* timeout: Specifies the timeout duration in milliseconds. The default timeout is 5 minutes (300,000 ms).
```tsx
// Disconnect with default timeout (5 minutes)
await provider.disconnect();
// Disconnect with custom timeout (e.g., 10 minutes)
await provider.disconnect(10 * 60 * 1000);
```
## Hydra commands APIs
### Initialize
Initializes a new Head. This command is a no-op when a Head is already open and the server will
output an `CommandFailed` message should this happen.
```tsx
await provider.init();
```
### Abort
Aborts a head before it is opened. This can only be done before all participants have committed.
Once opened, the head can't be aborted anymore but it can be closed using: `Close`.
```tsx
await provider.abort();
```
### Commit
Commit a particular UTxO to the head. This will make the UTxO available on the layer 2.
This is used together with the [`HydraInstance`](../hydra/instance) (see the Hydra Instance page for details).
```tsx
await instance.commitFunds(txHash, outputIndex);
```
### New Transaction
Submit a transaction through the head. Note that the transaction is only broadcast if well-formed and valid.
The `newTx` method accepts the following arguments:
**parameters**
* cborHex: This is the transaction in hex format usually the unsigned transaction.
* type: Any transaction is tried to decode as a 'ConwayEra' transaction, which mostly is backward compatible to previous eras.
* description(optional): transaction description
**returns**
* txId(transaction Hash)
```tsx
async provider.newTx({
cborHex: "",
description: "commit tx",
type: "Tx ConwayEra",
})
```
Here is an example of how to create a transaction using the Hydra provider, Mesh wallet and Mesh transaction builder:
```tsx
async function makeTx() {
const walletA = {
addr: "addr_test1vpsthwvxgfkkm2lm8ggy0c5345u6vrfctmug6tdyx4rf4mqn2xcyw",
key: "58201aae63d93899640e91b51c5e8bd542262df3ecf3246c3854f39c40f4eb83557d",
};
const wallet = new MeshWallet({
networkId: 0,
key: {
type: "cli",
payment: walletA.key,
},
fetcher: provider,
submitter: provider,
});
const pp = await provider.fetchProtocolParameters();
const utxos = await wallet.getUtxos("enterprise");
const changeAddress = walletA.addr;
const txBuilder = new MeshTxBuilder({
fetcher: provider,
params: pp,
verbose: true,
});
const unsignedTx = await txBuilder
.txOut("addr_test1vpd5axpq4qsh8sxvzny49cp22gc5tqx0djf6wmjv5cx7q5qyrzuw8", [
{ unit: "lovelace", quantity: "3000000" },
])
.changeAddress(changeAddress)
.selectUtxosFrom(utxos)
.complete();
const signedTx = await wallet.signTx(unsignedTx);
const txHash = await wallet.submitTx(signedTx);
console.log("txHash", txHash);
}
```
### Decommit
Request to decommit a UTxO from a Head by providing a decommit tx. Upon reaching consensus, this will eventually result in corresponding transaction outputs becoming available on the layer 1.
The decommit method accepts the following arguments:
```tsx
async decommit({
cborHex: "",
description: "commit tx",
type: "Tx ConwayEra"
})
```
### Close
Terminate a head with the latest known snapshot. This effectively moves the head from the Open state to the Close state where the contestation phase begin. As a result of closing a head, no more transactions can be submitted via NewTx.
```tsx
await provider.close();
```
### Contest
Challenge the latest snapshot announced as a result of a head closure from another participant.
Note that this necessarily contest with the latest snapshot known of your local Hydra node. Participants can only contest once.
```tsx
await provider.contest();
```
### Fanout
Finalize a head UTxOs to L1 after the contestation period passed.
```tsx
await provider.fanout();
```
## Hydra Query APIs
### Fetch UTxOs
Get UTxOs for a given hash.
Optionally, you can specify the index of the index output.
```tsx
await provider.fetchUTxOs("txHash");
```
### Fetch Address UTxOs
Fetch UTxOs controlled by an address.
Optionally, you can filter UTXOs containing a particular asset by providing `asset`, where it is the concatenation of policy ID and assetname.
```tsx
await provider.fetchAddressUTxOs(address: string, asset?: string)
```
### Fetch Asset Addresses
Fetches the addresses and quantities for a given Cardano asset.
```tsx
await provider.fetchAssetAddresses(asset: string):
```
### Fetch collection Assest
Fetches the list of assets for a given policy ID.
```tsx
await provider.fetchCollectionAssets(policyId: string)
```
### Fetch Protocol Parameters
Fetch the latest protocol parameters.
```tsx
await provider.fetchProtocolParameters();
```
Optionally, you can provide an epoch number to fetch the protocol parameters of that epoch.\`
### Listens for new messages from Hydra node
Listens for new messages from Hydra node. The callback function will be called with the message as the only argument. Check all events emitted by the Hydra node.
```tsx
provider.onMessage((message) => {
if (message.tag === "Greetings") {
console.log("message.snapshotUtxo", message.snapshotUtxo);
}
});
```
### Submit Transaction
Submit a serialized transaction to the network.
```tsx
const txHash = await provider.submitTx(signedTx);
console.log("txHash", txHash);
```
# Providers
URL: /providers
Data providers for connecting to the blockchain
***
title: "Providers"
description: "Data providers for connecting to the blockchain"
icon: CloudIcon
---------------
import {linksProviders} from "@/data/links-providers";
import Link from "next/link";
import {
Card,
CardDescription,
CardTitle,
} from "@/components/ui/card";
# Koios Provider
URL: /providers/koios
Distributed & open-source public API query layer for Cardano
***
title: "Koios Provider"
description: "Distributed & open-source public API query layer for Cardano"
---------------------------------------------------------------------------
import Link from "fumadocs-core/link";
import Youtube from "@/components/ui/Youtube";
Koios provides a query layer which allows your app to access information stored on the blockchain.
Get started:
```tsx
import { KoiosProvider } from "@meshsdk/core";
const provider = new KoiosProvider(
'preprod', // "api" | "preview" | "preprod" | "guild"
'',
);
```
Get your API key from Koios User Profile page.
## Get data from URL
You can fetch any data from the blockchain by providing the URL path.
```tsx
await provider.get('/addresses/addr_test1qpvx0sacufuypa2k4sngk7q40zc5c4npl337uusdh64kv0uafhxhu32dys6pvn6wlw8dav6cmp4pmtv7cc3yel9uu0nq93swx9/transactions')
```
## Fetch Account Info
Obtain information about a specific stake account.
```tsx
await provider.fetchAccountInfo('stake_test1uzw5mnt7g4xjgdqkfa80hrk7kdvds6sa4k0vvgjvlj7w8eskffj2n')
```
## Fetch Address Assets
Fetch assets from an address.
```tsx
await provider.fetchAddressAssets(
'addr_test1qpvx0sacufuypa2k4sngk7q40zc5c4npl337uusdh64kv0uafhxhu32dys6pvn6wlw8dav6cmp4pmtv7cc3yel9uu0nq93swx9'
);
```
### Fetch Address UTxOs \[!toc]
Fetch UTxOs from address
```tsx
await provider.fetchAddressAssets(
'addr_test1qpvx0sacufuypa2k4sngk7q40zc5c4npl337uusdh64kv0uafhxhu32dys6pvn6wlw8dav6cmp4pmtv7cc3yel9uu0nq93swx9'
);
```
### Fetch assets from address \[!toc]
Fetch assets given an address
```tsx
await provider.fetchAddressAssets(
'addr_test1qpvx0sacufuypa2k4sngk7q40zc5c4npl337uusdh64kv0uafhxhu32dys6pvn6wlw8dav6cmp4pmtv7cc3yel9uu0nq93swx9',
);
```
## Fetch Address UTxOs
Fetch UTxOs controlled by an address.
```tsx
await provider.fetchAddressUTxOs('addr_test1qpvx0sacufuypa2k4sngk7q40zc5c4npl337uusdh64kv0uafhxhu32dys6pvn6wlw8dav6cmp4pmtv7cc3yel9uu0nq93swx9')
```
Optionally, you can filter UTXOs containing a particular `asset` by providing asset, where it is the concatenation of policy ID and asset.
```tsx
await fetchAddressUTxOs(address: string, asset?: string)
```
## Fetch Asset Addresses
Fetch a list of a addresses containing a specific `asset` where it is the concatenation of policy ID and asset.
```tsx
await provider.fetchAssetAddresses('d9312da562da182b02322fd8acb536f37eb9d29fba7c49dc172555274d657368546f6b656e')
```
## Fetch Asset Metadata
Fetch the asset metadata by providing asset's `unit`, which is the concatenation of policy ID and asset name in hex.
```tsx
await provider.fetchAssetMetadata('d9312da562da182b02322fd8acb536f37eb9d29fba7c49dc172555274d657368546f6b656e')
```
## Fetch Block Info
Fetch block infomation. You can get the hash from `fetchTxInfo()`.
```tsx
await provider.fetchBlockInfo('79f60880b097ec7dabb81f75f0b52fedf5e922d4f779a11c0c432dcf22c56089')
```
## Fetch Collection Assets
Fetch a list of assets belonging to a collection by providing its Policy ID.
```tsx
await provider.fetchCollectionAssets('d9312da562da182b02322fd8acb536f37eb9d29fba7c49dc17255527')
```
The API will return a list of `assets` and a cursor `next`. If the cursor is not null, you can use it to fetch the next page of results. Here is an example of the response.
```tsx
{
"assets": [
{
"unit": "d9312da562da182b02322fd8acb536f37eb9d29fba7c49dc17255527",
"quantity": "1"
},
],
"next": 2
}
```
The `fetchCollectionAssets` function also accepts an optional `cursor` parameter to fetch the next page of results. The default value is `1`.
```tsx
await fetchCollectionAssets(
policyId: string,
cursor = 1
)
```
## Fetch Handle Address
ADA Handle allows users to use a human-readable "Handle" to associate an address.
Each Handle is a unique NFT, minted and issued on the Cardano blockchain. These NFTs act as unique identifiers for the UTXO that they reside in.
We can resolve the handle's address with `fetchHandleAddress`.
```tsx
// Handle: `meshsdk`
await provider.fetchHandleAddress('meshsdk')
```
## Fetch Handle
ADA Handle allows users to use a human-readable "Handle" to associate an address.
Each Handle is a unique NFT, minted and issued on the Cardano blockchain. These NFTs act as unique identifiers for the UTXO that they reside in.
ADA Handle also released a CIP68 handle and this function will fetch the metadata of the handle.
```tsx
// Handle: `meshsdk`
await provider.fetchHandle('meshsdk')
```
## Fetch Protocol Parameters
Fetch the latest protocol parameters.
```tsx
await provider.fetchProtocolParameters()
```
Optionally, you can provide an epoch number to fetch the protocol parameters of that epoch.
## Fetch Transaction Info
Fetch transaction infomation. Only confirmed transaction can be retrieved.
```tsx
await provider.fetchTxInfo('f4ec9833a3bf95403d395f699bc564938f3419537e7fb5084425d3838a4b6159')
```
## Fetch UTxOs
Get UTxOs for a given hash.
```tsx
await provider.fetchUTxOs('dfd2a2616e6154a092807b1ceebb9ddcadc0f22cf5c8e0e6b0757815083ccb70')
```
Optionally, you can specify the index of the index output.
```tsx
await provider.fetchUTxOs('hash_here', 0)
```
## Fetch Proposal Info
Get information for a given governance proposal, identified by the txHash and proposal index
```tsx
await provider.fetchGovernanceProposal('372d688faa77e146798b581b322c0f2981a9023764736ade5d12e0e4e796af8c', 0)
```
## Submit Transaction
Submit a serialized transaction to the network.
```tsx
await provider.submitTx(signedTx);
```
## On Transaction Confirmed
Allow you to listen to a transaction confirmation. Upon confirmation, the callback will be called.
```tsx
const tx = new Transaction({ initiator: wallet });
tx.sendLovelace('addr_test1vpvx0sacufuypa2k4sngk7q40zc5c4npl337uusdh64kv0c7e4cxr', '5000000');
const unsignedTx = await tx.build();
const signedTx = await wallet.signTx(unsignedTx);
const txHash = await wallet.submitTx(signedTx);
provider.onTxConfirmed(txHash, () => {
// Transaction confirmed
});
```
# Maestro Provider
URL: /providers/maestro
Advanced UTxO-indexing data layer to supercharge Defi on Bitcoin, Cardano & Dogecoin
***
title: "Maestro Provider"
description: "Advanced UTxO-indexing data layer to supercharge Defi on Bitcoin, Cardano & Dogecoin"
---------------------------------------------------------------------------------------------------
import Link from "fumadocs-core/link";
Maestro is the complete Web3 stack for Cardano which provides among others:-
* ⛓️ Enterprise-grade onchain data access.
* ⚡️ Transaction monitoring system with submission retires, rollback notifications and accelerated tranaction finality.
* 💰 High-fidelity smart contract data feeds from top Cardano DeFi protocols.
* 📝 Fully managed smart contract APIs and ready-to-go UI plugins.
Get started:
```tsx
import { MaestroProvider } from "@meshsdk/core";
const provider = new MaestroProvider({
network: 'Preprod', // Mainnet / Preprod / Preview
apiKey: '', // Get key at https://docs.gomaestro.org/
turboSubmit: false // Read about paid turbo transaction submission feature at https://docs.gomaestro.org
});
```
## Get data from URL
You can fetch any data from the blockchain by providing the URL path.
```tsx
await provider.get('/addresses/addr_test1qpvx0sacufuypa2k4sngk7q40zc5c4npl337uusdh64kv0uafhxhu32dys6pvn6wlw8dav6cmp4pmtv7cc3yel9uu0nq93swx9/transactions')
```
## Fetch Account Info
Obtain information about a specific stake account.
```tsx
await provider.fetchAccountInfo('stake_test1uzw5mnt7g4xjgdqkfa80hrk7kdvds6sa4k0vvgjvlj7w8eskffj2n')
```
## Fetch Address Assets
Fetch assets from an address.
```tsx
await provider.fetchAddressAssets(
'addr_test1qpvx0sacufuypa2k4sngk7q40zc5c4npl337uusdh64kv0uafhxhu32dys6pvn6wlw8dav6cmp4pmtv7cc3yel9uu0nq93swx9'
);
```
## Fetch Address UTxOs
Fetch UTxOs from address
```tsx
await provider.fetchAddressAssets(
'addr_test1qpvx0sacufuypa2k4sngk7q40zc5c4npl337uusdh64kv0uafhxhu32dys6pvn6wlw8dav6cmp4pmtv7cc3yel9uu0nq93swx9'
);
```
## Fetch assets from address
Fetch assets given an address
```tsx
await provider.fetchAddressAssets(
'addr_test1qpvx0sacufuypa2k4sngk7q40zc5c4npl337uusdh64kv0uafhxhu32dys6pvn6wlw8dav6cmp4pmtv7cc3yel9uu0nq93swx9',
);
```
## Fetch Address UTxOs
Fetch UTxOs controlled by an address.
```tsx
await provider.fetchAddressUTxOs('addr_test1qpvx0sacufuypa2k4sngk7q40zc5c4npl337uusdh64kv0uafhxhu32dys6pvn6wlw8dav6cmp4pmtv7cc3yel9uu0nq93swx9')
```
Optionally, you can filter UTXOs containing a particular asset by providing `asset`, where it is the concatenation of policy ID and asset.
```tsx
await provider.fetchAddressUTxOs(
'addr_test1qpvx0sacufuypa2k4sngk7q40zc5c4npl337uusdh64kv0uafhxhu32dys6pvn6wlw8dav6cmp4pmtv7cc3yel9uu0nq93swx9',
'd9312da562da182b02322fd8acb536f37eb9d29fba7c49dc172555274d657368546f6b656e'
);
```
## Fetch Asset Addresses
Fetch a list of a addresses containing a specific `asset` where it is the concatenation of policy ID and asset.
```tsx
await provider.fetchAssetAddresses('d9312da562da182b02322fd8acb536f37eb9d29fba7c49dc172555274d657368546f6b656e')
```
## Fetch Asset Metadata
Fetch the asset metadata by providing asset's `unit`, which is the concatenation of policy ID and asset name in hex.
```tsx
await provider.fetchAssetMetadata('d9312da562da182b02322fd8acb536f37eb9d29fba7c49dc172555274d657368546f6b656e')
```
## Fetch Block Info
Fetch block infomation. You can get the hash from `fetchTxInfo()`.
```tsx
await provider.fetchBlockInfo('79f60880b097ec7dabb81f75f0b52fedf5e922d4f779a11c0c432dcf22c56089')
```
## Fetch Collection Assets
Fetch a list of assets belonging to a collection by providing its Policy ID.
```tsx
await provider.fetchCollectionAssets('d9312da562da182b02322fd8acb536f37eb9d29fba7c49dc17255527')
```
The API will return a list of `assets` and a cursor `next`. If the cursor is not null, you can use it to fetch the next page of results. Here is an example of the response.
```tsx
{
"assets": [
{
"unit": "d9312da562da182b02322fd8acb536f37eb9d29fba7c49dc17255527",
"quantity": "1"
},
],
"next": 2
}
```
The `fetchCollectionAssets` function also accepts an optional `cursor` parameter to fetch the next page of results. The default value is `1`.
```tsx
await fetchCollectionAssets(
policyId: string,
cursor = 1
)
```
## Fetch Handle Address
ADA Handle allows users to use a human-readable "Handle" to associate an address.
Each Handle is a unique NFT, minted and issued on the Cardano blockchain. These NFTs act as unique identifiers for the UTXO that they reside in.
We can resolve the handle's address with `fetchHandleAddress`.
```tsx
// Handle: `meshsdk`
await provider.fetchHandleAddress('meshsdk')
```
## Fetch Handle
ADA Handle allows users to use a human-readable "Handle" to associate an address.
Each Handle is a unique NFT, minted and issued on the Cardano blockchain. These NFTs act as unique identifiers for the UTXO that they reside in.
ADA Handle also released a CIP68 handle and this function will fetch the metadata of the handle.
```tsx
// Handle: `meshsdk`
await provider.fetchHandle('meshsdk')
```
## Fetch Protocol Parameters
Fetch the latest protocol parameters.
```tsx
await provider.fetchProtocolParameters()
```
Optionally, you can provide an epoch number to fetch the protocol parameters of that epoch.
## Fetch Transaction Info
Fetch transaction infomation. Only confirmed transaction can be retrieved.
```tsx
// Transaction hash f.e. f4ec9833a3bf95403d395f699bc564938f3419537e7fb5084425d3838a4b6159
await provider.fetchTxInfo('f4ec9833a3bf95403d395f699bc564938f3419537e7fb5084425d3838a4b6159')
```
## Fetch UTxOs
Get UTxOs for a given hash.
```tsx
await provider.fetchUTxOs('dfd2a2616e6154a092807b1ceebb9ddcadc0f22cf5c8e0e6b0757815083ccb70')
```
Optionally, you can specify the index of the index output.
```tsx
await provider.fetchUTxOs('hash_here', 0)
```
## Fetch Proposal Info
Get information for a given governance proposal, identified by the txHash and proposal index
```tsx
// Params: TxHash, CertIndex
await provider.fetchGovernanceProposal('372d688faa77e146798b581b322c0f2981a9023764736ade5d12e0e4e796af8c', 0)
```
## Evaluate Transaction
`evaluateTx()` accepts an unsigned transaction (`unsignedTx`) and it evaluates the resources required to execute the transaction. Note that, this is only valid for transaction interacting with redeemer (smart contract). By knowing the budget required, you can use this to adjust the redeemer's budget so you don't spend more than you need to execute transactions for this smart contract.
```tsx
const unsignedTx = await tx.build();
const evaluateTx = await provider.evaluateTx(unsignedTx);
```
Example responses from unlocking assets from the always succeed smart contract.
```tsx
[
{
"index": 0,
"tag": "SPEND",
"budget": {
"mem": 1700,
"steps": 368100
}
}
]
```
With the `mem` and `steps`, you can refine the budget for the redeemer. For example:
```tsx
const redeemer = {
data: { alternative: 0, fields: [...] },
budget: {
mem: 1700,
steps: 368100,
},
};
```
## Submit Transaction
Submit a serialized transaction to the network.
```tsx
await provider.submitTx(signedTx);
```
## On Transaction Confirmed
Allow you to listen to a transaction confirmation. Upon confirmation, the callback will be called.
```tsx
const tx = new Transaction({ initiator: wallet });
tx.sendLovelace('addr_test1vpvx0sacufuypa2k4sngk7q40zc5c4npl337uusdh64kv0c7e4cxr', '5000000');
const unsignedTx = await tx.build();
const signedTx = await wallet.signTx(unsignedTx);
const txHash = await wallet.submitTx(signedTx);
provider.onTxConfirmed(txHash, () => {
// Transaction confirmed
});
```
# Offline Evaluator
URL: /providers/offline-evaluator
An offline Plutus script evaluator for testing and validation.
***
title: "Offline Evaluator"
description: "An offline Plutus script evaluator for testing and validation."
-----------------------------------------------------------------------------
import Link from "fumadocs-core/link";
The OfflineEvaluator calculates execution costs (memory and CPU steps) for Plutus scripts in transactions without requiring network connectivity. It works with an OfflineFetcher to resolve the UTXOs needed for script validation. This is also compatible with any other fetchers to provide online data fetching.
Get started:
```tsx
import { OfflineEvaluator } from "@meshsdk/core-csl";
import { OfflineFetcher } from "@meshsdk/core";
// Create fetcher for resolving UTXOs
const fetcher = new OfflineFetcher();
// Add UTXOs required for script evaluation
fetcher.addUTxOs([
{
input: {
txHash: "5de23a2...",
outputIndex: 0
},
output: {
address: "addr1...",
amount: [{ unit: "lovelace", quantity: "1000000" }],
scriptHash: "32b7e3d..." // For script UTXOs
}
}
]);
// Create evaluator for the desired network
const evaluator = new OfflineEvaluator(fetcher, "preprod");
```
Once initialized, you can evaluate Plutus scripts in transactions:
```tsx
// Evaluate Plutus scripts in a transaction
try {
const actions = await evaluator.evaluateTx(transactionCbor);
// Example result:
// [{
// index: 0,
// tag: "MINT",
// budget: {
// mem: 508703, // Memory units used
// steps: 164980381 // CPU steps used
// }
// }]
} catch (error) {
console.error('Script evaluation failed:', error);
}
```
The evaluator is particularly useful for testing Plutus scripts, ensuring they execute within memory and CPU limits:
```tsx
// In your test file
describe("Plutus Script Tests", () => {
let evaluator: OfflineEvaluator;
let fetcher: OfflineFetcher;
beforeEach(() => {
fetcher = new OfflineFetcher();
evaluator = new OfflineEvaluator(fetcher, "preprod");
// Add test UTXOs
fetcher.addUTxOs([...]);
});
it("should evaluate minting policy", async () => {
const result = await evaluator.evaluateTx(txCbor);
expect(result[0].tag).toBe("MINT");
expect(result[0].budget.mem).toBeLessThan(600000);
});
});
```
The evaluation results include memory units and CPU steps required for each script execution, helping you optimize your scripts and ensure they meet protocol constraints.
## Evaluate Transaction
`evaluateTx()` accepts an unsigned transaction (`unsignedTx`) and it evaluates the resources required to execute the transaction. Note that, this is only valid for transaction interacting with redeemer (smart contract). By knowing the budget required, you can use this to adjust the redeemer's budget so you don't spend more than you need to execute transactions for this smart contract.
```tsx
const unsignedTx = await tx.build();
const evaluateTx = await provider.evaluateTx(unsignedTx);
```
Example responses from unlocking assets from the always succeed smart contract.
```tsx
[
{
"index": 0,
"tag": "SPEND",
"budget": {
"mem": 1700,
"steps": 368100
}
}
]
```
With the `mem` and `steps`, you can refine the budget for the redeemer. For example:
```tsx
const redeemer = {
data: { alternative: 0, fields: [...] },
budget: {
mem: 1700,
steps: 368100,
},
};
```
# OfflineFetcher
URL: /providers/offline-fetcher
An offline blockchain data provider for testing, development and offline scenarios.
***
title: "OfflineFetcher"
description: "An offline blockchain data provider for testing, development and offline scenarios."
--------------------------------------------------------------------------------------------------
import Link from "fumadocs-core/link";
The OfflineFetcher provides access to blockchain data without requiring network connectivity. It's ideal for testing, development, and scenarios where you need to work with pre-loaded blockchain data offline.
Initialize the fetcher:
```tsx
import { OfflineFetcher } from "@meshsdk/core";
// Create a new instance
const fetcher = new OfflineFetcher();
// Create with specified network
const fetcherWithNetwork = new OfflineFetcher("mainnet");
```
Before you can fetch data, you need to add it to the fetcher. Here are examples of adding different types of blockchain data:
```tsx
// Add account information
fetcher.addAccount("addr1...", {
balance: "1000000",
rewards: "500000",
withdrawals: "100000",
poolId: "pool1..." // optional
});
// Add UTXOs
fetcher.addUTxOs([
{
input: {
txHash: "1234...",
outputIndex: 0
},
output: {
address: "addr1...",
amount: [{ unit: "lovelace", quantity: "1000000" }],
// Optional fields for script UTXOs:
scriptHash: "abcd...",
dataHash: "ef12...",
plutusData: "...",
scriptRef: "..."
}
}
]);
// Add asset addresses
fetcher.addAssetAddresses("policyID.assetName", [
{ address: "addr1...", quantity: "1" }
]);
// Add asset metadata
fetcher.addAssetMetadata("policyID.assetName", {
name: "Asset Name",
image: "ipfs://...",
// Any other metadata attributes
});
// Add protocol parameters
fetcher.addProtocolParameters({
epoch: 290,
minFeeA: 44,
minFeeB: 155381,
maxBlockSize: 73728,
maxTxSize: 16384,
maxBlockHeaderSize: 1100,
keyDeposit: 2000000,
poolDeposit: 500000000,
minPoolCost: "340000000",
// Other parameters...
});
// Add serilized transaction
fetcher.addSerializedTransaction("txHash");
```
The fetcher's state can be saved and loaded, making it easy to persist data between sessions:
```tsx
// Save state
const state = fetcher.toJSON();
localStorage.setItem('fetcher-state', state);
// Load state
const savedState = localStorage.getItem('fetcher-state');
const fetcher = OfflineFetcher.fromJSON(savedState);
```
Once data is added, you can use the fetch\* methods just like with other providers such as BlockfrostProvider. This makes OfflineFetcher a drop-in replacement for testing and offline scenarios.
## Get data from URL
You can fetch any data from the blockchain by providing the URL path.
```tsx
// Params: URL
await provider.get('/addresses/addr_test1qpvx0sacufuypa2k4sngk7q40zc5c4npl337uusdh64kv0uafhxhu32dys6pvn6wlw8dav6cmp4pmtv7cc3yel9uu0nq93swx9/transactions')
```
## Fetch Account Info
Obtain information about a specific stake account.
```tsx
// Params: Stake Address
await provider.fetchAccountInfo('stake_test1uzw5mnt7g4xjgdqkfa80hrk7kdvds6sa4k0vvgjvlj7w8eskffj2n')
```
## Fetch Address Assets
Fetch assets from an address.
```tsx
// Params: Address
await provider.fetchAddressAssets('addr_test1qpvx0sacufuypa2k4sngk7q40zc5c4npl337uusdh64kv0uafhxhu32dys6pvn6wlw8dav6cmp4pmtv7cc3yel9uu0nq93swx9')
```
### Fetch Address UTxOs \[!toc]
Fetch UTxOs from address
```tsx
await provider.fetchAddressAssets(
'addr_test1qpvx0sacufuypa2k4sngk7q40zc5c4npl337uusdh64kv0uafhxhu32dys6pvn6wlw8dav6cmp4pmtv7cc3yel9uu0nq93swx9'
);
```
### Fetch assets from address \[!toc]
Fetch assets given an address
```tsx
await provider.fetchAddressAssets(
'addr_test1qpvx0sacufuypa2k4sngk7q40zc5c4npl337uusdh64kv0uafhxhu32dys6pvn6wlw8dav6cmp4pmtv7cc3yel9uu0nq93swx9',
);
```
## Fetch Address UTxOs
Fetch UTxOs controlled by an address.
```tsx
// Params: Address
await provider.fetchAddressUTxOs('addr_test1qpvx0sacufuypa2k4sngk7q40zc5c4npl337uusdh64kv0uafhxhu32dys6pvn6wlw8dav6cmp4pmtv7cc3yel9uu0nq93swx9')
```
Optionally, you can filter UTXOs containing a particular asset by providing `asset`, where it is the concatenation of policy ID and asset.
```tsx
await fetchAddressUTxOs(address: string, asset?: string)
```
### Fetch Address UTxOs \[!toc]
Fetch UTxOs from address
```tsx
await provider.fetchAddressUTxOs(
'addr_test1qpvx0sacufuypa2k4sngk7q40zc5c4npl337uusdh64kv0uafhxhu32dys6pvn6wlw8dav6cmp4pmtv7cc3yel9uu0nq93swx9'
);
```
### Fetch UTxOs with Asset \[!toc]
Fetch UTxOs from address with asset
```tsx
await provider.fetchAddressUTxOs(
'addr_test1qpvx0sacufuypa2k4sngk7q40zc5c4npl337uusdh64kv0uafhxhu32dys6pvn6wlw8dav6cmp4pmtv7cc3yel9uu0nq93swx9',
'd9312da562da182b02322fd8acb536f37eb9d29fba7c49dc172555274d657368546f6b656e'
);
```
## Fetch Asset Addresses
Fetch a list of a addresses containing a specific asset where it is the concatenation of policy ID and asset.
```tsx
// Params: Asset Unit
await provider.fetchAssetAddresses('d9312da562da182b02322fd8acb536f37eb9d29fba7c49dc172555274d657368546f6b656e')
```
## Fetch Asset Metadata
Fetch the asset metadata by providing asset's `unit`, which is the concatenation of policy ID and asset name in hex.
```tsx
// Params: Asset Unit
await provider.fetchAssetMetadata('d9312da562da182b02322fd8acb536f37eb9d29fba7c49dc172555274d657368546f6b656e')
```
## Fetch Block Info
Fetch block infomation. You can get the hash from `fetchTxInfo()`.
```tsx
// Params: Block hash
await provider.fetchBlockInfo('79f60880b097ec7dabb81f75f0b52fedf5e922d4f779a11c0c432dcf22c56089')
```
## Fetch Collection Assets
Fetch a list of assets belonging to a collection by providing its Policy ID.
```tsx
await provider.fetchCollectionAssets('d9312da562da182b02322fd8acb536f37eb9d29fba7c49dc17255527')
```
The API will return a list of `assets` and a cursor `next`. If the cursor is not null, you can use it to fetch the next page of results. Here is an example of the response.
```tsx
{
"assets": [
{
"unit": "d9312da562da182b02322fd8acb536f37eb9d29fba7c49dc17255527",
"quantity": "1"
},
],
"next": 2
}
```
The `fetchCollectionAssets` function also accepts an optional `cursor` parameter to fetch the next page of results. The default value is `1`.
```tsx
await fetchCollectionAssets(
policyId: string,
cursor = 1
)
```
## Fetch Handle Address
ADA Handle allows users to use a human-readable "Handle" to associate an address.
Each Handle is a unique NFT, minted and issued on the Cardano blockchain. These NFTs act as unique identifiers for the UTXO that they reside in.
We can resolve the handle's address with `fetchHandleAddress`.
```tsx
// Params: Handle
await provider.fetchHandleAddress('meshsdk')
```
## Fetch Handle
ADA Handle allows users to use a human-readable "Handle" to associate an address.
Each Handle is a unique NFT, minted and issued on the Cardano blockchain. These NFTs act as unique identifiers for the UTXO that they reside in.
ADA Handle also released a CIP68 handle and this function will fetch the metadata of the handle.
```tsx
// Params: Handle
await provider.fetchHandle('meshsdk')
```
## Fetch Protocol Parameters
Fetch the latest protocol parameters.
```tsx
await provider.fetchProtocolParameters()
```
Optionally, you can provide an epoch number to fetch the protocol parameters of that epoch.
## Fetch Transaction Info
Fetch transaction infomation. Only confirmed transaction can be retrieved.
```tsx
await provider.fetchTxInfo('f4ec9833a3bf95403d395f699bc564938f3419537e7fb5084425d3838a4b6159')
```
## Fetch UTxOs
Get UTxOs for a given hash.
```tsx
// Params: Hash
await provider.fetchUTxOs('dfd2a2616e6154a092807b1ceebb9ddcadc0f22cf5c8e0e6b0757815083ccb70')
```
Optionally, you can specify the index of the index output.
```tsx
await provider.fetchUTxOs('hash_here', 0)
```
## Fetch Proposal Info
Get information for a given governance proposal, identified by the txHash and proposal index
```tsx
// Params: TxHash, CertIndex
await provider.fetchGovernanceProposal('372d688faa77e146798b581b322c0f2981a9023764736ade5d12e0e4e796af8c', 0)
```
# Ogmios Provider
URL: /providers/ogmios
Lightweight bridge interface for cardano-node that offers WebSockets API that enables local clients to speak Ouroboros' mini-protocols
***
title: "Ogmios Provider"
description: "Lightweight bridge interface for cardano-node that offers WebSockets API that enables local clients to speak Ouroboros' mini-protocols"
-----------------------------------------------------------------------------------------------------------------------------------------------------
import Link from "fumadocs-core/link";
Ogmios is a lightweight bridge interface for cardano-node. It offers a WebSockets API that enables local clients to speak Ouroboros' mini-protocols via JSON/RPC. Ogmios is a fast and lightweight solution that can be deployed alongside relays to create entry points on the Cardano network for various types of applications.
Get started:
```tsx
import { OgmiosProvider } from "@meshsdk/core";
const provider = new OgmiosProvider('');
```
## Evaluate Transaction
`evaluateTx()` accepts an unsigned transaction (`unsignedTx`) and it evaluates the resources required to execute the transaction. Note that, this is only valid for transaction interacting with redeemer (smart contract). By knowing the budget required, you can use this to adjust the redeemer's budget so you don't spend more than you need to execute transactions for this smart contract.
```tsx
const unsignedTx = await tx.build();
const evaluateTx = await provider.evaluateTx(unsignedTx);
```
Example responses from unlocking assets from the always succeed smart contract.
```tsx
[
{
"index": 0,
"tag": "SPEND",
"budget": {
"mem": 1700,
"steps": 368100
}
}
]
```
With the `mem` and `steps`, you can refine the budget for the redeemer. For example:
```tsx
const redeemer = {
data: { alternative: 0, fields: [...] },
budget: {
mem: 1700,
steps: 368100,
},
};
```
## Submit Transaction
Submit a serialized transaction to the network.
```tsx
await provider.submitTx(signedTx);
```
# UTxORPC Provider
URL: /providers/utxorpc
Highly efficient through gRPC, using a compact and high-performance binary format
***
title: "UTxORPC Provider"
description: "Highly efficient through gRPC, using a compact and high-performance binary format"
------------------------------------------------------------------------------------------------
import Link from "fumadocs-core/link";
Highly efficient through gRPC, using a compact and high-performance binary format
The UTxORPC (u5c) provider facilitates access to this state in a standardized and efficient manner through gRPC, using a compact and high-performance binary format. It enables seamless interaction with the Cardano blockchain, to facilitate the creation, signing, and submission of transactions.
* Standardized Interface: Implements the UTxORPC specification to ensure compatibility and interoperability across UTxO-based blockchains.
* Performance Optimized: Utilizes gRPC for efficient communication with blockchain nodes, minimizing network overhead and message size.
* Flexible Provider Options: Suitable for use with hosted services, local nodes like Dolos, or any UTxORPC-compliant service.
The following code samples assume that the UTxORPC node is running locally on localhost:50051. If your node is hosted remotely or on a different server, replace "[http://localhost:50051](http://localhost:50051)" with the appropriate server URL and port for your environment.
You can also use the UTxORPC provider with a hosted service like Demeter.run. Demeter is a PaaS (Platform-as-a-Service) that provides managed Cardano infrastructure. One of their services consists of a cloud-hosted endpoint for Cardano integration using the UTxO RPC spec. Developers can sign-up and get access to the API on a per-request basis.
For more details on configuring your node, refer to the UTxORPC Ecosystem Servers Documentation.
```tsx
import { U5CProvider } from "@meshsdk/core";
const provider = new U5CProvider({
url: "http://localhost:50051",
headers: {
"dmtr-api-key": "",
},
});
```
## Get data from URL
You can fetch any data from the blockchain by providing the URL path.
```tsx
await provider.get('/addresses/addr_test1qpvx0sacufuypa2k4sngk7q40zc5c4npl337uusdh64kv0uafhxhu32dys6pvn6wlw8dav6cmp4pmtv7cc3yel9uu0nq93swx9/transactions')
```
## Fetch Account Info
Obtain information about a specific stake account.
```tsx
await provider.fetchAccountInfo('stake_test1uzw5mnt7g4xjgdqkfa80hrk7kdvds6sa4k0vvgjvlj7w8eskffj2n')
```
## Fetch Address Assets
Fetch assets from an address.
```tsx
await provider.fetchAddressAssets('addr_test1qpvx0sacufuypa2k4sngk7q40zc5c4npl337uusdh64kv0uafhxhu32dys6pvn6wlw8dav6cmp4pmtv7cc3yel9uu0nq93swx9')
```
### Fetch Address UTxOs \[!toc]
Fetch UTxOs from address
```tsx
await provider.fetchAddressAssets(
'addr_test1qpvx0sacufuypa2k4sngk7q40zc5c4npl337uusdh64kv0uafhxhu32dys6pvn6wlw8dav6cmp4pmtv7cc3yel9uu0nq93swx9'
);
```
### Fetch assets from address \[!toc]
Fetch assets given an address.
```tsx
await provider.fetchAddressAssets(
'addr_test1qpvx0sacufuypa2k4sngk7q40zc5c4npl337uusdh64kv0uafhxhu32dys6pvn6wlw8dav6cmp4pmtv7cc3yel9uu0nq93swx9',
);
```
## Fetch Address UTxOs
Fetch UTxOs controlled by an address.
```tsx
await provider.fetchAddressUTxOs('addr_test1qpvx0sacufuypa2k4sngk7q40zc5c4npl337uusdh64kv0uafhxhu32dys6pvn6wlw8dav6cmp4pmtv7cc3yel9uu0nq93swx9')
```
Optionally, you can filter UTXOs containing a particular asset by providing `asset`, where it is the concatenation of policy ID and asset.
```tsx
await fetchAddressUTxOs(address: string, asset?: string)
```
## Fetch Asset Addresses
Fetch a list of a addresses containing a specific asset where it is the concatenation of policy ID and asset.
```tsx
await provider.fetchAssetAddresses('d9312da562da182b02322fd8acb536f37eb9d29fba7c49dc172555274d657368546f6b656e')
```
## Fetch Asset Metadata
Fetch the asset metadata by providing asset's `unit`, which is the concatenation of policy ID and asset name in hex.
```tsx
await provider.fetchAssetMetadata('d9312da562da182b02322fd8acb536f37eb9d29fba7c49dc172555274d657368546f6b656e')
```
## Fetch Block Info
Fetch block infomation. You can get the hash from `fetchTxInfo()`.
```tsx
await provider.fetchBlockInfo('79f60880b097ec7dabb81f75f0b52fedf5e922d4f779a11c0c432dcf22c56089')
```
## Fetch Collection Assets
Fetch a list of assets belonging to a collection by providing its Policy ID.
```tsx
await provider.fetchCollectionAssets('d9312da562da182b02322fd8acb536f37eb9d29fba7c49dc17255527')
```
The API will return a list of `assets` and a cursor `next`. If the cursor is not null, you can use it to fetch the next page of results. Here is an example of the response.
```tsx
{
"assets": [
{
"unit": "d9312da562da182b02322fd8acb536f37eb9d29fba7c49dc17255527",
"quantity": "1"
},
],
"next": 2
}
```
The `fetchCollectionAssets` function also accepts an optional `cursor` parameter to fetch the next page of results. The default value is `1`.
```tsx
await fetchCollectionAssets(
policyId: string,
cursor = 1
)
```
## Fetch Handle Address
ADA Handle allows users to use a human-readable "Handle" to associate an address.
Each Handle is a unique NFT, minted and issued on the Cardano blockchain. These NFTs act as unique identifiers for the UTXO that they reside in.
We can resolve the handle's address with `fetchHandleAddress`.
```tsx
// Handle: `meshsdk`
await provider.fetchHandleAddress('meshsdk')
```
## Fetch Handle
ADA Handle allows users to use a human-readable "Handle" to associate an address.
Each Handle is a unique NFT, minted and issued on the Cardano blockchain. These NFTs act as unique identifiers for the UTXO that they reside in.
ADA Handle also released a CIP68 handle and this function will fetch the metadata of the handle.
```tsx
// Handle: `meshsdk`
await provider.fetchHandle('meshsdk')
```
### Fetch Protocol Parameters
Fetch the latest protocol parameters.
```tsx
await provider.fetchProtocolParameters()
```
Optionally, you can provide an epoch number to fetch the protocol parameters of that epoch.
## Fetch Transaction Info
Fetch transaction infomation. Only confirmed transaction can be retrieved.
```tsx
await provider.fetchTxInfo('f4ec9833a3bf95403d395f699bc564938f3419537e7fb5084425d3838a4b6159')
```
## Fetch UTxOs
Get UTxOs for a given hash.
```tsx
// Hash f.e. dfd2a2616e6154a092807b1ceebb9ddcadc0f22cf5c8e0e6b0757815083ccb70
await provider.fetchUTxOs('dfd2a2616e6154a092807b1ceebb9ddcadc0f22cf5c8e0e6b0757815083ccb70')
```
Optionally, you can specify the index of the index output.
```tsx
await provider.fetchUTxOs('hash_here', 0)
```
## Fetch Proposal Info
Get information for a given governance proposal, identified by the txHash and proposal index
```tsx
await provider.fetchGovernanceProposal('372d688faa77e146798b581b322c0f2981a9023764736ade5d12e0e4e796af8c', 0)
```
## Evaluate Transaction
`evaluateTx()` accepts an unsigned transaction (`unsignedTx`) and it evaluates the resources required to execute the transaction. Note that, this is only valid for transaction interacting with redeemer (smart contract). By knowing the budget required, you can use this to adjust the redeemer's budget so you don't spend more than you need to execute transactions for this smart contract.
```tsx
const unsignedTx = await tx.build();
const evaluateTx = await provider.evaluateTx(unsignedTx);
```
Example responses from unlocking assets from the always succeed smart contract.
```tsx
[
{
"index": 0,
"tag": "SPEND",
"budget": {
"mem": 1700,
"steps": 368100
}
}
]
```
With the `mem` and `steps`, you can refine the budget for the redeemer. For example:
```tsx
const redeemer = {
data: { alternative: 0, fields: [...] },
budget: {
mem: 1700,
steps: 368100,
},
};
```
## Submit Transaction
Submit a serialized transaction to the network.
```tsx
await provider.submitTx(signedTx);
```
## On Transaction Confirmed
Allow you to listen to a transaction confirmation. Upon confirmation, the callback will be called.
```tsx
const tx = new Transaction({ initiator: wallet });
tx.sendLovelace('addr_test1vpvx0sacufuypa2k4sngk7q40zc5c4npl337uusdh64kv0c7e4cxr', '5000000');
const unsignedTx = await tx.build();
const signedTx = await wallet.signTx(unsignedTx);
const txHash = await wallet.submitTx(signedTx);
provider.onTxConfirmed(txHash, () => {
// Transaction confirmed
});
```
# Yaci Provider
URL: /providers/yaci
Custom Cardano devnet to tailor your devnet needs with a builtin indexer and custom viewer for devnet
***
title: "Yaci Provider"
description: "Custom Cardano devnet to tailor your devnet needs with a builtin indexer and custom viewer for devnet"
--------------------------------------------------------------------------------------------------------------------
import Link from "fumadocs-core/link";
Yaci DevKit is a development tool designed for rapid and efficient Cardano blockchain development. It allows developers to create and destroy custom Cardano devnets in seconds, providing fast feedback loops and simplifying the iteration process.
Get started:
```tsx
import { YaciProvider } from "@meshsdk/core";
const provider = new YaciProvider('', '');
```
## Get data from URL
You can fetch any data from the blockchain by providing the URL path.
```tsx
await provider.get('/addresses/addr_test1qpvx0sacufuypa2k4sngk7q40zc5c4npl337uusdh64kv0uafhxhu32dys6pvn6wlw8dav6cmp4pmtv7cc3yel9uu0nq93swx9/transactions')
```
## Fetch Account Info
Obtain information about a specific stake account.
```tsx
await provider.fetchAccountInfo('stake_test1uzw5mnt7g4xjgdqkfa80hrk7kdvds6sa4k0vvgjvlj7w8eskffj2n')
```
## Fetch Address Assets
Fetch assets from an address.
```tsx
await provider.fetchAddressAssets('addr_test1qpvx0sacufuypa2k4sngk7q40zc5c4npl337uusdh64kv0uafhxhu32dys6pvn6wlw8dav6cmp4pmtv7cc3yel9uu0nq93swx9')
```
### Fetch Address UTxOs \[!toc]
Fetch UTxOs from address
```tsx
await provider.fetchAddressAssets(
'addr_test1qpvx0sacufuypa2k4sngk7q40zc5c4npl337uusdh64kv0uafhxhu32dys6pvn6wlw8dav6cmp4pmtv7cc3yel9uu0nq93swx9'
);
```
### Fetch assets from address \[!toc]
Fetch assets given an address
```tsx
await provider.fetchAddressAssets(
'addr_test1qpvx0sacufuypa2k4sngk7q40zc5c4npl337uusdh64kv0uafhxhu32dys6pvn6wlw8dav6cmp4pmtv7cc3yel9uu0nq93swx9',
);
```
## Fetch Address UTxOs
Fetch UTxOs controlled by an address.
```tsx
await provider.fetchAddressUTxOs('addr_test1qpvx0sacufuypa2k4sngk7q40zc5c4npl337uusdh64kv0uafhxhu32dys6pvn6wlw8dav6cmp4pmtv7cc3yel9uu0nq93swx9')
```
Optionally, you can filter UTXOs containing a particular `asset` by providing asset, where it is the concatenation of policy ID and asset.
```tsx
await fetchAddressUTxOs(address: string, asset?: string)
```
### Fetch Address UTxOs \[!toc]
Fetch UTxOs from address
```tsx
await provider.fetchAddressUTxOs(
'addr_test1qpvx0sacufuypa2k4sngk7q40zc5c4npl337uusdh64kv0uafhxhu32dys6pvn6wlw8dav6cmp4pmtv7cc3yel9uu0nq93swx9'
);
```
### Fetch UTxOs with Asset \[!toc]
Fetch UTxOs from address with asset
```tsx
await provider.fetchAddressUTxOs(
'addr_test1qpvx0sacufuypa2k4sngk7q40zc5c4npl337uusdh64kv0uafhxhu32dys6pvn6wlw8dav6cmp4pmtv7cc3yel9uu0nq93swx9',
'd9312da562da182b02322fd8acb536f37eb9d29fba7c49dc172555274d657368546f6b656e'
);
```
## Fetch Asset Addresses
Fetch a list of a addresses containing a specific `asset` where it is the concatenation of policy ID and asset.
```tsx
await provider.fetchAssetAddresses('d9312da562da182b02322fd8acb536f37eb9d29fba7c49dc172555274d657368546f6b656e')
```
## Fetch Asset Metadata
Fetch the asset metadata by providing asset's `unit`, which is the concatenation of policy ID and asset name in hex.
```tsx
await provider.fetchAssetMetadata('d9312da562da182b02322fd8acb536f37eb9d29fba7c49dc172555274d657368546f6b656e')
```
## Fetch Block Info
Fetch block infomation. You can get the hash from `fetchTxInfo()`.
```tsx
await provider.fetchBlockInfo('79f60880b097ec7dabb81f75f0b52fedf5e922d4f779a11c0c432dcf22c56089')
```
## Fetch Collection Assets
Fetch a list of assets belonging to a collection by providing its Policy ID.
```tsx
await provider.fetchCollectionAssets('d9312da562da182b02322fd8acb536f37eb9d29fba7c49dc17255527')
```
The API will return a list of `assets` and a cursor `next`. If the cursor is not null, you can use it to fetch the next page of results. Here is an example of the response.
```tsx
{
"assets": [
{
"unit": "d9312da562da182b02322fd8acb536f37eb9d29fba7c49dc17255527",
"quantity": "1"
},
],
"next": 2
}
```
The `fetchCollectionAssets` function also accepts an optional `cursor` parameter to fetch the next page of results. The default value is `1`.
```tsx
await fetchCollectionAssets(
policyId: string,
cursor = 1
)
```
## Fetch Handle Address
ADA Handle allows users to use a human-readable "Handle" to associate an address.
Each Handle is a unique NFT, minted and issued on the Cardano blockchain. These NFTs act as unique identifiers for the UTXO that they reside in.
We can resolve the handle's address with `fetchHandleAddress`.
```tsx
// Handle: `meshsdk`
await provider.fetchHandleAddress('meshsdk')
```
## Fetch Handle
ADA Handle allows users to use a human-readable "Handle" to associate an address.
Each Handle is a unique NFT, minted and issued on the Cardano blockchain. These NFTs act as unique identifiers for the UTXO that they reside in.
ADA Handle also released a CIP68 handle and this function will fetch the metadata of the handle.
```tsx
// Handle: `meshsdk`
await provider.fetchHandle('meshsdk')
```
## Fetch Protocol Parameters
Fetch the latest protocol parameters.
```tsx
await provider.fetchProtocolParameters()
```
Optionally, you can provide an epoch number to fetch the protocol parameters of that epoch.
## Fetch Transaction Info
Fetch transaction infomation. Only confirmed transaction can be retrieved.
```tsx
await provider.fetchTxInfo('f4ec9833a3bf95403d395f699bc564938f3419537e7fb5084425d3838a4b6159')
```
## Fetch UTxOs
Get UTxOs for a given hash.
```tsx
// Hash: `dfd2a2616e6154a092807b1ceebb9ddcadc0f22cf5c8e0e6b0757815083ccb70`
await provider.fetchUTxOs('dfd2a2616e6154a092807b1ceebb9ddcadc0f22cf5c8e0e6b0757815083ccb70')
```
Optionally, you can specify the index of the index output.
```tsx
await provider.fetchUTxOs('hash_here', 0)
```
## Fetch Proposal Info
Get information for a given governance proposal, identified by the txHash and proposal index
```tsx
await provider.fetchGovernanceProposal('372d688faa77e146798b581b322c0f2981a9023764736ade5d12e0e4e796af8c', 0)
```
## Evaluate Transaction
`evaluateTx()` accepts an unsigned transaction (`unsignedTx`) and it evaluates the resources required to execute the transaction. Note that, this is only valid for transaction interacting with redeemer (smart contract). By knowing the budget required, you can use this to adjust the redeemer's budget so you don't spend more than you need to execute transactions for this smart contract.
```tsx
const unsignedTx = await tx.build();
const evaluateTx = await provider.evaluateTx(unsignedTx);
```
Example responses from unlocking assets from the always succeed smart contract.
```tsx
[
{
"index": 0,
"tag": "SPEND",
"budget": {
"mem": 1700,
"steps": 368100
}
}
]
```
With the `mem` and `steps`, you can refine the budget for the redeemer. For example:
```tsx
const redeemer = {
data: { alternative: 0, fields: [...] },
budget: {
mem: 1700,
steps: 368100,
},
};
```
## Submit Transaction
Submit a serialized transaction to the network.
```tsx
await provider.submitTx(signedTx);
```
## On Transaction Confirmed
Allow you to listen to a transaction confirmation. Upon confirmation, the callback will be called.
```tsx
const tx = new Transaction({ initiator: wallet });
tx.sendLovelace('addr_test1vpvx0sacufuypa2k4sngk7q40zc5c4npl337uusdh64kv0c7e4cxr', '5000000');
const unsignedTx = await tx.build();
const signedTx = await wallet.signTx(unsignedTx);
const txHash = await wallet.submitTx(signedTx);
provider.onTxConfirmed(txHash, () => {
// Transaction confirmed
});
```
## Admin Get Devnet Info
Get information about the devnet.
```tsx
await provider.getDevnetInfo()
```
Example response:
```tsx
{
"nodePort": 0,
"submitApiPort": 0,
"socketPath": "string",
"protocolMagic": 0,
"slotLength": 0,
"blockTime": 0,
"epochLength": 0,
"p2pEnabled": true,
"startTime": 0,
"masterNode": true,
"adminNodeUrl": "string",
"era": "Byron",
"genesisProfile": "zero_fee",
"ogmiosPort": 0,
"kupoPort": 0,
"yaciStorePort": 0,
"socatPort": 0,
"prometheusPort": 0,
"blockProducer": true
}
```
## Admin Get Genesis Info By Era
You can topup ADA for any address. To topup ADA in your wallet, run the following command from devnet:
```tsx
await provider.getGenesisByEra()
```
Example response:
```tsx
{
"activeSlotsCoeff": 1,
"epochLength": 500,
"genDelegs": {
"337bc5ef0f1abf205624555c13a37258c42b46b1259a6b1a6d82574e": {
"delegate": "41fd6bb31f34469320aa47cf6ccc3918e58a06d60ea1f2361efe2458",
"vrf": "7053e3ecd2b19db13e5338aa75fb518fc08b6c218f56ad65760d3eb074be95d4"
}
},
"initialFunds": {
"60ba957a0fff6816021b2afa7900beea68fd10f2d78fb5b64de0d2379c": 3000000000000000,
"007290ea8fa9433c1045a4c8473959ad608e6c03a58c7de33bdbd3ce6f295b987135610616f3c74e11c94d77b6ced5ccc93a7d719cfb135062": 300000000000,
"605276322ac7882434173dcc6441905f6737689bd309b68ad8b3614fd8": 3000000000000000,
"60a0f1aa7dca95017c11e7e373aebcf0c4568cf47ec12b94f8eb5bba8b": 3000000000000000,
"005867c3b8e27840f556ac268b781578b14c5661fc63ee720dbeab663f9d4dcd7e454d2434164f4efb8edeb358d86a1dad9ec6224cfcbce3e6": 1000000000
},
"maxKESEvolutions": 60,
"maxLovelaceSupply": 45000000000000000,
"networkId": "Testnet",
"networkMagic": 42,
"protocolParams": {
"a0": 0,
"decentralisationParam": 0,
"eMax": 18,
"extraEntropy": {
"tag": "NeutralNonce"
},
"keyDeposit": 2000000,
"maxBlockBodySize": 65536,
"maxBlockHeaderSize": 1100,
"maxTxSize": 16384,
"minFeeA": 0,
"minFeeB": 0,
"minPoolCost": 340000000,
"minUTxOValue": 1000000,
"nOpt": 100,
"poolDeposit": 500000000,
"protocolVersion": {
"major": 8,
"minor": 0
},
"rho": 0.003,
"tau": 0.2
},
"securityParam": 300,
"slotLength": 1,
"slotsPerKESPeriod": 129600,
"staking": {
"pools": {
"7301761068762f5900bde9eb7c1c15b09840285130f5b0f53606cc57": {
"cost": 340000000,
"margin": 0,
"metadata": null,
"owners": [],
"pledge": 0,
"publicKey": "7301761068762f5900bde9eb7c1c15b09840285130f5b0f53606cc57",
"relays": [],
"rewardAccount": {
"credential": {
"keyHash": "11a14edf73b08a0a27cb98b2c57eb37c780df18fcfcf6785ed5df84a"
},
"network": "Testnet"
},
"vrf": "c2b62ffa92ad18ffc117ea3abeb161a68885000a466f9c71db5e4731d6630061"
}
},
"stake": {
"9d4dcd7e454d2434164f4efb8edeb358d86a1dad9ec6224cfcbce3e6": "7301761068762f5900bde9eb7c1c15b09840285130f5b0f53606cc57"
}
},
"systemStart": "2024-10-30T05:11:07.442512Z",
"updateQuorum": 1
}
```
## Admin Address Topup
You can topup ADA for any address. To topup ADA in your wallet, run the following command from devnet:
```tsx
await provider.addressTopup(, )
```
## Topup Address \[!toc]
Admin function to topup address with ADA
**Address**
`addr_test1qpvx....9uu0nq93swx9`
**Amount**
`20000000`
```tsx
await provider.addressTopup('addr_test1qpvx0sacufuypa2k4sngk7q40zc5c4npl337uusdh64kv0uafhxhu32dys6pvn6wlw8dav6cmp4pmtv7cc3yel9uu0nq93swx9', '20000000');
```
# Getting Started with React
URL: /react/getting-started
Frontend components for wallet connections, and useful React hooks to getting wallet states
***
title: "Getting Started with React"
description: "Frontend components for wallet connections, and useful React hooks to getting wallet states"
icon: RocketLaunchIcon
----------------------
import Link from "fumadocs-core/link";
Mesh provide a collection of useful UI components, so you can easily include web3 functionality and convenient utilities for your application.
## Setup
The fastest way to get started a new project with React is to use the Mesh-CLI, which will scaffold a new project for you. To do this, run the following:
```tsx
npx meshjs your-app-name
```
During the installation process, you will be asked to choose a template. Choose the React template. This will scaffold a new React project with Mesh pre-installed.
To manually, install the Mesh React package, run the following:
```tsx
npm install @meshsdk/react
```
Next, add the Mesh CSS to your application, doing so will apply the default styles to the components. You can add this in `/pages/_app.tsx`.
```tsx
import "@meshsdk/react/styles.css";
```
## Mesh Provider
React Context allows apps to share data across the app, and `MeshProvider` allows your app to subscribe to context changes. If you use the CLI to initialize your project, `MeshProvider` has been added in the root component. Otherwise, you can wrap `MeshProvider` at the root of your application, for example in Next.js:
```tsx
import "@meshsdk/react/styles.css";
import { MeshProvider } from "@meshsdk/react";
function MyApp({ Component, pageProps }: AppProps) {
return (
);
};
```
Now your application is ready, explore the available UI components and wallet hooks and start using them in your application.
## Connect Wallet
In order for pps to communicate with the user's wallet, we need a way to connect to their wallet.
Add this CardanoWallet to allow the user to select a wallet to connect to your app. After the wallet is connected, see Browser Wallet for a list of CIP-30 APIs.
The signature for the CardanoWallet component is as follows:
```tsx
{
label?: string;
onConnected?: Function;
isDark?: boolean;
}
```
### Customization \[!toc]
For dark mode style, add isDark.
```tsx
```
For a custom label, add the label prop.
```tsx
```
The customization is limited. For more customization, you can easily build your own wallet connection component. If you are using React, the React hooks will be useful. You may also take reference from this component.
### Persist user session \[!toc]
If you would like to save the user last connected wallet and automatically connect to it on the next visit, you can use the persist prop.
```tsx
```
### onConnected \[!toc]
If you want to run a function after the wallet is connected, you can add the onConnected prop.
```tsx
export default function Page() {
function afterConnectedWallet() {
// do something
}
return (
<>
);
}
```
The above code will log "Hello, World!" to the console when the wallet is connected.
### Mesh Web3 Services \[!toc]
Mesh Web3 Services streamline user onboarding and on-chain feature integration, accelerating your app's time to market.
To integrate Mesh Web3 Services, use the `web3Services` prop. The `networkId` is the network ID of the wallet you are connecting to. You may use any providers for `fetcher` and `submitter`.
```tsx
const provider = new BlockfrostProvider('');
```
### Decentralized WebRTC Wallet Communication (CIP 45) \[!toc]
CIP-45 is a communication method between pps and wallets based on WebTorrent trackers and WebRTC. Using WebTorrent trackers for the peer discovery to remove the need of this central component.
### Burner wallet \[!toc]
Burner wallets are wallets that are created on the fly on the user's device. They are temporary wallets useful for testing purposes. The private keys are generated and stored on the user's device.
```tsx
```
### MetaMask Snaps \[!toc]
MetaMask Snaps are a new way to extend MetaMask with custom functionality and integrations. You can check the implementation to integrate NuFi from the GitHub repository.
Use the `injectFn` prop to add custom functionality.
```tsx
await checkIfMetamaskInstalled("preprod")}
/>
```
### Connect Wallet Component \[!toc]
Connect to user's wallet to interact with app
```tsx
import { CardanoWallet } from '@meshsdk/react';
export default function Page() {
return (
<>
{console.log('on connected')}}
cardanoPeerConnect={{
dAppInfo: {
name: "Mesh SDK",
url: "https://meshjs.dev/",
},
announce: [
"wss://dev.btt.cf-identity-wallet.metadata.dev.cf-deployments.org",
],
}}
burnerWallet={{
networkId: 0,
provider: provider,
}}
/>
);
}
```
## useWallet Hook
Provide information on the current wallet's state, and functions for connecting and disconnecting user wallet.
```tsx
const { wallet, state, connected, name, connecting, connect, disconnect, error } = useWallet();
```
`wallet` is a Browser Wallet instance, which expose all CIP wallets functions from getting assets to signing tranasction.
`state`, a enum string, the state of the wallet, can be `NOT_CONNECTED`, `CONNECTING` or `CONNECTED`.
`connected`, a boolean, `true` if user's wallet is connected.
`name`, a string, the name of the connect wallet.
`connecting`, a boolean, `true` if the wallet is connecting and initializing.
`connect(walletName: string)`, a function, provide the wallet name to connect wallet. Retrive a list of available wallets with `useWalletList()`.
`disconnect()`, a function, to disconnect the connected wallet.
`error`, returns the error object if any error occurs during wallet connection, such as "account not set".
### useWallet Hook \[!toc]
Interact with user's wallet
```tsx
import { useWallet } from '@meshsdk/react';
export default function Page() {
const { wallet, state, connected, name, connecting, connect, disconnect, error } = useWallet();
return (
# UI Components
URL: /react/ui-components
UI components to speed up your app development.
***
title: "UI Components"
description: "UI components to speed up your app development."
icon: PaintBrushIcon
--------------------
import Link from "fumadocs-core/link";
Mesh provide a collection of useful UI components, so you can easily include web3 functionality and convenient utilities for your application.
## Connect Wallet
In order for pps to communicate with the user's wallet, we need a way to connect to their wallet.
Add this CardanoWallet to allow the user to select a wallet to connect to your app. After the wallet is connected, see Browser Wallet for a list of CIP-30 APIs.
The signature for the CardanoWallet component is as follows:
```tsx
{
label?: string;
onConnected?: Function;
isDark?: boolean;
}
```
### Customization \[!toc]
For dark mode style, add isDark.
```tsx
```
For a custom label, add the label prop.
```tsx
```
The customization is limited. For more customization, you can easily build your own wallet connection component. If you are using React, the React hooks will be useful. You may also take reference from this component.
### Persist user session \[!toc]
If you would like to save the user last connected wallet and automatically connect to it on the next visit, you can use the persist prop.
```tsx
```
### onConnected \[!toc]
If you want to run a function after the wallet is connected, you can add the onConnected prop.
```tsx
export default function Page() {
function afterConnectedWallet() {
// do something
}
return (
<>
);
}
```
The above code will log "Hello, World!" to the console when the wallet is connected.
### Mesh Web3 Services \[!toc]
Mesh Web3 Services streamline user onboarding and on-chain feature integration, accelerating your app's time to market.
To integrate Mesh Web3 Services, use the `web3Services` prop. The `networkId` is the network ID of the wallet you are connecting to. You may use any providers for `fetcher` and `submitter`.
```tsx
const provider = new BlockfrostProvider('');
```
### Decentralized WebRTC Wallet Communication (CIP 45) \[!toc]
CIP-45 is a communication method between pps and wallets based on WebTorrent trackers and WebRTC. Using WebTorrent trackers for the peer discovery to remove the need of this central component.
### Burner wallet \[!toc]
Burner wallets are wallets that are created on the fly on the user's device. They are temporary wallets useful for testing purposes. The private keys are generated and stored on the user's device.
```tsx
```
### MetaMask Snaps \[!toc]
MetaMask Snaps are a new way to extend MetaMask with custom functionality and integrations. You can check the implementation to integrate NuFi from the GitHub repository.
Use the `injectFn` prop to add custom functionality.
```tsx
await checkIfMetamaskInstalled("preprod")}
/>
```
### Connect Wallet Component \[!toc]
Connect to user's wallet to interact with app
```tsx
import { CardanoWallet } from '@meshsdk/react';
export default function Page() {
return (
<>
{console.log('on connected')}}
cardanoPeerConnect={{
dAppInfo: {
name: "Mesh SDK",
url: "https://meshjs.dev/",
},
announce: [
"wss://dev.btt.cf-identity-wallet.metadata.dev.cf-deployments.org",
],
}}
burnerWallet={{
networkId: 0,
provider: provider,
}}
/>
);
}
```
## Powered by Mesh Badge
If you love Mesh, here's a beautifully designed badge for you to embed in your application.
```tsx
```
### Mesh Badge Component \[!toc]
Show your support for Mesh
```tsx
import { CardanoWallet } from '@meshsdk/react';
export default function Page() {
return (
<>
);
}
```
# Wallet Hooks
URL: /react/wallet-hooks
React hooks for interacting with connected wallets.
***
title: "Wallet Hooks"
description: "React hooks for interacting with connected wallets."
icon: BoltIcon
--------------
import Link from "fumadocs-core/link";
React Hooks allow function components to have access to state and other React features. With Mesh Hooks, you can easily interact and access wallet data.
## useWallet Hook
Provide information on the current wallet's state, and functions for connecting and disconnecting user wallet.
```tsx
const { wallet, state, connected, name, connecting, connect, disconnect, error } = useWallet();
```
`wallet` is a Browser Wallet instance, which expose all CIP wallets functions from getting assets to signing tranasction.
`state`, a enum string, the state of the wallet, can be `NOT_CONNECTED`, `CONNECTING` or `CONNECTED`.
`connected`, a boolean, `true` if user's wallet is connected.
`name`, a string, the name of the connect wallet.
`connecting`, a boolean, `true` if the wallet is connecting and initializing.
`connect(walletName: string)`, a function, provide the wallet name to connect wallet. Retrive a list of available wallets with `useWalletList()`.
`disconnect()`, a function, to disconnect the connected wallet.
`error`, returns the error object if any error occurs during wallet connection, such as "account not set".
### useWallet Hook \[!toc]
Interact with user's wallet
```tsx
import { useWallet } from '@meshsdk/react';
export default function Page() {
const { wallet, state, connected, name, connecting, connect, disconnect, error } = useWallet();
return (
);
}
```
## useWalletList Hook
Returns a list of wallets installed on user's device.
```tsx
const wallets = useWalletList();
```
You can define a function to be injected into the wallet provider by passing it as the `injectFn` prop.
```tsx
const wallets = useWalletList({injectFn={async () => await checkIfMetamaskInstalled("preprod")})}
```
### useWalletList Hook \[!toc]
List of wallets installed on user's device
```tsx
const wallets = useWalletList();
```
```tsx
[]
```
```tsx
import { useWalletList } from '@meshsdk/react';
export default function Page() {
const wallets = useWalletList();
return (
<>
{wallets.map((wallet, i) => {
return (
{wallet.name}
);
})}
);
}
```
## useAddress Hook
Return address of connected wallet.
`accountId` is an optional parameter, that allows you to choose which address to return.
```tsx
const address = useAddress(accountId = 0);
```
### useAddress Hook \[!toc]
List of wallets installed on user's device
```tsx
import { useAddress } from '@meshsdk/react';
const address = useAddress();
Your wallet address is: {address}
```
## useAssets Hook
Return a list of assets in connected wallet from all UTXOs.
```tsx
const assets = useAssets();
```
### useAssets Hook \[!toc]
List assets of connected wallet
```tsx
import { useAssets } from '@meshsdk/react';
const assets = useAssets();
{JSON.stringify(assets, null, 2)}
```
## useLovelace Hook
Return amount of lovelace in wallet.
```tsx
const lovelace = useLovelace();
```
### useLovelace Hook \[!toc]
Fetch the lovelace balance of the connected wallet
```tsx
import { useLovelace } from '@meshsdk/react';
const lovelace = useLovelace();
Your lovelace balance is: {lovelace}
```
## useNetwork Hook
Return the network of connected wallet.
```tsx
const network = useNetwork();
```
### useNetwork Hook \[!toc]
Fetch the network of the connected wallet
```tsx
import { useNetwork } from '@meshsdk/react';
const network = useNetwork();
Connected network: {network}.
```
# Developer Resources
URL: /resources/developer-resources
Essential tools, communities, and resources for Cardano developers using Mesh SDK.
***
title: "Developer Resources"
description: "Essential tools, communities, and resources for Cardano developers using Mesh SDK."
icon: WrenchScrewdriverIcon
---------------------------
import { Card, CardHeader, CardTitle, CardDescription } from '@/components/ui/card';
import Link from 'next/link';
Your central hub for tools, communities, learning materials, and ecosystem resources to accelerate your Cardano development journey with Mesh.
## Official Mesh Resources
### Documentation & Learning
* **[Mesh Documentation](/docs)** - Comprehensive guides and API references
* **[Getting Started Guide](/guides)** - Your first steps with Mesh
* **[API Reference](/apis)** - Complete API documentation
* **[Smart Contracts](/smart-contracts)** - Build with Plutus and Aiken
* **[React Components](/react)** - UI components for your dApp
### Code & Examples
* **[GitHub Repository](https://github.com/MeshJS/mesh)** - Source code and contributions
* **[Example Projects](https://github.com/MeshJS/examples)** - Working code samples
* **[Starter Templates](https://github.com/MeshJS/mesh-starter)** - Boilerplate projects
* **[Code Playground](https://meshjs.dev/apis)** - Interactive code editor on every API page
### Stay Updated
* **[GitHub Milestones](https://github.com/MeshJS/mesh/milestones)** - Current development roadmap
* **[Release Notes](https://github.com/MeshJS/mesh/releases)** - Latest updates and changes
* **[NPM Package](https://www.npmjs.com/package/@meshsdk/core)** - Package downloads and versions
## Community & Support
### Join the Conversation
Discord Community
Join our active Discord server for real-time help, discussions, and updates.
Join Discord →
Twitter / X
Follow [@meshsdk](https://twitter.com/meshsdk) for announcements, tips, and community highlights.
Follow on Twitter →
GitHub Discussions
Participate in longer-form discussions, ask questions, and share ideas.
Join Discussions →
Stack Overflow
Ask technical questions tagged with `meshsdk` for searchable Q\&A.
View Questions →
### Get Help
* **[FAQ](/resources/faq)** - Frequently asked questions
* **[GitHub Issues](https://github.com/MeshJS/mesh/issues)** - Report bugs or request features
* **[Community Support](https://discord.gg/dH48jH3BKa)** - Free community help via Discord
* **[Enterprise Support](/about/support-us)** - Priority support for commercial projects
## Cardano Ecosystem
### Official Cardano Resources
* **[Cardano.org](https://cardano.org)** - Official Cardano website
* **[Cardano Documentation](https://docs.cardano.org)** - Official protocol documentation
* **[Cardano Forum](https://forum.cardano.org)** - Community discussions
* **[Cardano Stack Exchange](https://cardano.stackexchange.com)** - Technical Q\&A
### Development Tools
Blockfrost
Cardano API provider - Mesh integrates seamlessly with Blockfrost for blockchain data access.
Visit Blockfrost →
Maestro
Enterprise-grade Cardano API with Mesh provider support.
Visit Maestro →
Yaci DevNet
Local Cardano development network for testing. Mesh supports Yaci for fast iteration.
Learn about Yaci →
Koios
Distributed & open-source Cardano API compatible with Mesh providers.
Visit Koios →
### Smart Contract Languages
* **[Plutus](https://plutus.readthedocs.io)** - Cardano's native smart contract language (Haskell-based)
* **[Aiken](/aiken)** - Modern smart contract language for Cardano
* **[Marlowe](https://marlowe.iohk.io)** - Domain-specific language for financial contracts
* **[Helios](https://www.hyperion-bt.org/helios-book/)** - Alternative Plutus-like language
### Block Explorers
* **[CardanoScan](https://cardanoscan.io)** - Comprehensive Cardano blockchain explorer
* **[AdaStat](https://adastat.net)** - Analytics and statistics
* **[Pool.pm](https://pool.pm)** - Native assets and NFT explorer
* **[Cexplorer](https://cexplorer.io)** - Detailed blockchain data
## Learning Resources
### Video Tutorials
* **[Mesh YouTube Channel](https://youtube.com/@meshsdk)** - Official video tutorials
* **[Cardano Developer Portal Videos](https://developers.cardano.org/videos/)** - General Cardano development
* **[IOHK Academy](https://www.youtube.com/@IohkIo)** - Deep technical content
### Courses & Bootcamps
* **[Emurgo Academy](https://education.emurgo.io)** - Professional Cardano development courses
* **[IOG Academy](https://www.iohkacademy.io)** - Official Cardano education platform
* **[Gimbalabs](https://gimbalabs.com)** - Community-driven learning platform
* **[Plutus Pioneers Program](https://plutus-pioneer-program.readthedocs.io)** - Learn Plutus smart contracts
### Books & Written Content
* **[Cardano Developer Portal](https://developers.cardano.org)** - Comprehensive development guides
* **[Essential Cardano](https://essentialcardano.io)** - Curated Cardano resources
* **[Building on Cardano](https://builtoncardano.com)** - Showcase of Cardano projects
## Developer Tools & Services
### Testing & Debugging
* **[Plutus Playground](https://playground.plutus.iohkdev.io)** - Test Plutus contracts
* **[Cardano Testnet Faucet](https://docs.cardano.org/cardano-testnet/tools/faucet/)** - Get test ADA
* **[Transaction Decoder](https://meshjs.dev/apis/transaction)** - Debug transactions with Mesh
### Wallets for Development
* **[Nami Wallet](https://namiwallet.io)** - Lightweight browser wallet
* **[Eternl](https://eternl.io)** - Feature-rich wallet with dev tools
* **[Flint](https://flint-wallet.com)** - User-friendly browser wallet
* **[Lace](https://www.lace.io)** - IOG's official wallet
* **[Yoroi](https://yoroi-wallet.com)** - Emurgo's light wallet
### Infrastructure & Hosting
* **[Demeter.run](https://demeter.run)** - Cardano development platform
* **[Vercel](https://vercel.com)** - Deploy Next.js + Mesh apps
* **[Netlify](https://netlify.com)** - Static site hosting
* **[Railway](https://railway.app)** - Backend services hosting
## Mesh AI Features
Mesh includes AI-powered development assistance:
* **[AI Chat Assistant](/ai)** - Ask questions and get instant answers
* **AI Code Generation** - Generate Mesh code from natural language
* **Documentation Search** - Semantic search across all docs
* **Context-Aware Help** - Get relevant suggestions as you code
Access Mesh AI directly from our documentation using the sparkle icon ✨ or visit the [AI page](/ai).
## Open Source Contributions
### How to Contribute
1. **Code Contributions**: Fork the repo, make changes, submit PR
2. **Documentation**: Improve or add to our docs
3. **Bug Reports**: Help us identify and fix issues
4. **Feature Requests**: Suggest new capabilities
5. **Community Help**: Answer questions on Discord
See our [Contributing Guide](https://github.com/MeshJS/mesh/blob/main/CONTRIBUTING.md) for details.
### Financial Support
Support Mesh development:
* **[GitHub Sponsors](https://github.com/sponsors/MeshJS)** - Monthly sponsorships
* **[Support Page](/about/support-us)** - Various support options
* **Enterprise Licensing** - Commercial support packages
## Newsletter & Updates
Stay informed about Mesh and Cardano development:
* Subscribe to our newsletter (coming soon)
* Follow [@meshsdk](https://twitter.com/meshsdk) on Twitter
* Star our [GitHub repo](https://github.com/MeshJS/mesh) for updates
* Join [Discord](https://discord.gg/dH48jH3BKa) announcements channel
## Quick Links
📚 GuidesStep-by-step tutorials⚡ API DocsComplete API reference❓ FAQCommon questions💻 ExamplesWorking code samples💬 DiscordCommunity chat❤️ SupportHelp Mesh grow
***
**Ready to build?** Start with our [Getting Started Guide](/guides) or jump into the [API Documentation](/apis).
Need help? [Join our Discord community](https://discord.gg/dH48jH3BKa) - we're here to help!
# Frequently Asked Questions
URL: /resources/faq
Common questions and answers about Mesh - the TypeScript SDK for Cardano blockchain development.
***
title: "Frequently Asked Questions"
description: "Common questions and answers about Mesh - the TypeScript SDK for Cardano blockchain development."
icon: QuestionMarkCircleIcon
----------------------------
import { Accordion, Accordions } from 'fumadocs-ui/components/accordion';
Find answers to common questions about Mesh, the open-source TypeScript SDK for Cardano.
## Getting Started
Mesh is an open-source TypeScript SDK that makes it easy to build Cardano blockchain applications. It provides a comprehensive suite of tools, React components, wallet integrations, and transaction builders to help developers ship UTXO dApps faster.
Mesh offers several advantages:
* **Lightweight**: Less than 60kB bundle size for fast-loading applications
* **Production-Ready**: Battle-tested with 1M+ downloads
* **Developer-Friendly**: Simple, intuitive APIs with excellent TypeScript support
* **Comprehensive**: Everything you need - wallet integration, transaction building, smart contracts
* **AI-Powered**: Built-in AI features to help you develop faster
* **Always Updated**: Kept current with the latest Cardano network changes
Yes! Mesh is completely open-source and free to use for both personal and commercial projects. You can find the source code on [GitHub](https://github.com/MeshJS/mesh).
Mesh requires:
* Node.js 16 or higher
* npm or yarn package manager
* TypeScript 4.5+ (recommended)
* For React projects: React 18+
## Installation & Setup
Install Mesh using npm or yarn:
```bash
npm install @meshsdk/core @meshsdk/react
```
or
```bash
yarn add @meshsdk/core @meshsdk/react
```
Then follow our [Getting Started Guide](/guides) for setup instructions.
Yes! Mesh works great with Next.js. Check out our [Next.js integration guide](/guides/nextjs) for detailed setup instructions including App Router and Pages Router configurations.
Yes! While we have official React support, Mesh Core can be used with:
* Next.js
* Vue.js
* Svelte (we have a [Svelte package](/svelte))
* Angular
* Vanilla JavaScript/TypeScript
* Node.js backend applications
## Wallets & Integration
Mesh supports all CIP-30 compliant Cardano wallets including:
* Nami
* Eternl
* Flint
* Typhon
* Yoroi
* Lace
* And many more!
The wallet integration is universal, so any new CIP-30 wallet is automatically supported.
Absolutely! Mesh provides the `MeshWallet` class that allows you to create wallet applications. You can:
* Generate wallets from mnemonic phrases
* Import wallets from private keys
* Work with cardano-cli wallets
* Build multi-signature applications
* Create browser extension wallets
Check out the [Wallet documentation](/apis/wallets) for details.
Use the `CardanoWallet` React component for the easiest integration:
```tsx
import { CardanoWallet } from '@meshsdk/react';
export default function MyApp() {
return (
console.log('Wallet connected!')}
/>
);
}
```
See our [wallet hooks documentation](/react/wallet-hooks) for more advanced use cases.
## Smart Contracts & Transactions
Yes! Mesh provides comprehensive smart contract support for both Plutus and Aiken:
* Transaction building with smart contract execution
* Datum and redeemer handling
* Script validation
* Multi-asset operations
* Complex transaction scenarios
Check out our [Smart Contracts guides](/smart-contracts) and [Aiken tutorials](/aiken).
Mesh provides an intuitive transaction builder API. Here's a simple example:
```typescript
import { Transaction } from '@meshsdk/core';
const tx = new Transaction({ initiator: wallet })
.sendLovelace(
'addr1...', // recipient address
'1000000' // 1 ADA in lovelace
);
const unsignedTx = await tx.build();
const signedTx = await wallet.signTx(unsignedTx);
const txHash = await wallet.submitTx(signedTx);
```
See the [Transaction Builder documentation](/apis/transaction) for advanced features.
Yes! Mesh makes NFT minting straightforward. We have dedicated guides for:
* [Minting your first NFT](/guides/nft-collection)
* [Multi-signature minting](/guides/multisig-minting)
* Creating NFT collections
* Metadata standards (CIP-25, CIP-68)
Check out our [NFT guides](/guides) for step-by-step tutorials.
## Development & Debugging
Mesh supports testing on:
* **Cardano Testnet**: Use the preprod or preview test networks
* **Local DevNet**: Run [Yaci DevNet](/yaci) for faster development
* **Mainnet**: Deploy when ready for production
Configure the network by setting the `networkId` in your provider.
We provide extensive examples:
* Throughout our [documentation](/docs)
* In our [guides section](/guides)
* On our [GitHub examples repository](https://github.com/MeshJS/examples)
* Interactive demos on each API page
All examples are tested and ready to use.
Several resources are available:
* **Documentation**: Comprehensive guides and API references
* **Discord Community**: Join our [Discord server](https://discord.gg/dH48jH3BKa) for real-time help
* **GitHub Issues**: Report bugs or request features on [GitHub](https://github.com/MeshJS/mesh/issues)
* **Stack Overflow**: Tag questions with `meshsdk`
* **Twitter**: Follow [@meshsdk](https://twitter.com/meshsdk) for updates
## Performance & Optimization
Absolutely! Mesh is production-ready and used by many live Cardano applications. Key production features:
* Battle-tested code with 1M+ downloads
* Comprehensive error handling
* TypeScript for type safety
* Small bundle size (\< 60kB)
* Regular updates aligned with Cardano network changes
* Active maintenance and support
Mesh is already optimized with tree-shaking support. To minimize bundle size:
* Import only what you need
* Use code splitting in your bundler
* Enable production builds
* Leverage Next.js automatic optimization
The core Mesh library is less than 60kB minified and gzipped.
Yes and no:
* **Offline**: Transaction building, address generation, key management work offline
* **Online Required**: Querying blockchain data, submitting transactions, fetching UTXOs require internet connectivity
For offline scenarios, consider pre-fetching required data.
## Commercial Use & Support
Yes! Mesh is open-source (Apache 2.0 and MIT licenses) and free for commercial use. You can build and sell applications using Mesh without any licensing fees.
Yes, MeshJS Pte. Ltd. provides enterprise support packages including:
* Priority support
* Custom feature development
* Consulting services
* Training and onboarding
* SLA guarantees
Contact us through our [support channels](/about/support-us) for enterprise inquiries.
We welcome contributions! You can:
* Submit bug reports and feature requests on [GitHub](https://github.com/MeshJS/mesh/issues)
* Contribute code via pull requests
* Improve documentation
* Help other developers in our Discord
* Share your projects built with Mesh
* [Support us financially](/about/support-us)
Check our [GitHub repository](https://github.com/MeshJS/mesh) for contribution guidelines.
## Still Have Questions?
If you can't find the answer you're looking for, please:
* Join our [Discord community](https://discord.gg/dH48jH3BKa)
* Ask on [GitHub Discussions](https://github.com/MeshJS/mesh/discussions)
* Check our comprehensive [documentation](/docs)
* Reach out on [Twitter](https://twitter.com/meshsdk)
# Learn
URL: /resources
Comprehensive courses, tutorials, and resources for Cardano developers.
***
title: "Learn"
description: "Comprehensive courses, tutorials, and resources for Cardano developers."
icon: AcademicCapIcon
---------------------
import {linksLearn} from "@/data/links-course";
import {metaGuides} from "@/data/links-guides";
import Link from "next/link";
import {
Card,
CardDescription,
CardTitle,
} from "@/components/ui/card";
# Tutorials
URL: /resources/tutorials
Step-by-step tutorials for building Cardano applications with Mesh SDK - from beginner to advanced.
***
title: "Tutorials"
description: "Step-by-step tutorials for building Cardano applications with Mesh SDK - from beginner to advanced."
icon: BookOpenIcon
------------------
import Link from 'next/link';
import { Card, CardHeader, CardTitle, CardDescription } from '@/components/ui/card';
Learn Cardano development with Mesh through hands-on tutorials. Each tutorial includes working code examples, explanations, and best practices.
## 🚀 Getting Started
Perfect for developers new to Mesh or Cardano.
Installation & Setup
⏱️ 10 minutes • 🎯 Beginner
Install Mesh and set up your first Cardano project with React or Next.js.
Next.js Integration
⏱️ 15 minutes • 🎯 Beginner
Integrate Mesh with Next.js App Router and Pages Router configurations.
React Hooks & Components
⏱️ 20 minutes • 🎯 Beginner
Use Mesh React hooks and components to build wallet-connected interfaces.
Wallet Connection
⏱️ 15 minutes • 🎯 Beginner
Connect Cardano wallets and prove wallet ownership in your dApp.
## 💰 Transactions & Payments
Learn to build and submit Cardano transactions.
Send ADA & Tokens
⏱️ 20 minutes • 🎯 Beginner
Build transactions to send ADA and native tokens to any address.
Transaction Builder
⏱️ 30 minutes • 🎯 Intermediate
Master the transaction builder for complex multi-input/output transactions.
Multi-Asset Transactions
⏱️ 25 minutes • 🎯 Intermediate
Handle transactions with multiple native assets and tokens.
Server-Side Transactions
⏱️ 30 minutes • 🎯 Intermediate
Build and submit transactions from Node.js backend applications.
## 🎨 NFT Development
Create and manage NFTs on Cardano.
Mint Your First NFT
⏱️ 30 minutes • 🎯 Beginner
Create a complete NFT collection with proper metadata and minting policies.
Multi-Signature Minting
⏱️ 45 minutes • 🎯 Intermediate
Implement multi-signature NFT minting for team collaborations.
Advanced NFT Metadata
⏱️ 35 minutes • 🎯 Intermediate
Work with CIP-25 and CIP-68 metadata standards for NFTs.
Burning & Managing Assets
⏱️ 25 minutes • 🎯 Intermediate
Burn tokens and NFTs, manage asset lifecycles.
## 🔐 Smart Contracts
Build with Plutus and Aiken smart contracts.
Getting Started with Aiken
⏱️ 40 minutes • 🎯 Intermediate
Set up Aiken development environment and write your first smart contract.
Your First Aiken Script
⏱️ 50 minutes • 🎯 Intermediate
Build a complete Aiken validator and integrate it with Mesh.
Smart Contract Transactions
⏱️ 60 minutes • 🎯 Advanced
Lock and unlock assets using smart contracts with proper datum and redeemer handling.
Advanced Smart Contract Patterns
⏱️ 90 minutes • 🎯 Advanced
Implement complex patterns like state machines, oracles, and multi-party contracts.
## 🛠️ Advanced Topics
For experienced developers building production applications.
Custom Providers
⏱️ 45 minutes • 🎯 Advanced
Create custom blockchain data providers for specific use cases.
Provider Integration
⏱️ 30 minutes • 🎯 Intermediate
Integrate with Blockfrost, Maestro, Koios, and other data providers.
Local Development with Yaci
⏱️ 40 minutes • 🎯 Advanced
Set up local Cardano development network for rapid iteration and testing.
Production Best Practices
⏱️ 60 minutes • 🎯 Advanced
Security, optimization, error handling, and deployment strategies.
## 📱 Framework Integrations
Use Mesh with your favorite framework.
Next.js Full Stack
⏱️ 45 minutes • 🎯 Intermediate
Build full-stack Cardano dApps with Next.js, including API routes and server components.
Svelte Integration
⏱️ 30 minutes • 🎯 Intermediate
Use Mesh with Svelte and SvelteKit for reactive Cardano applications.
Node.js Backend
⏱️ 35 minutes • 🎯 Intermediate
Use Mesh in Node.js backends, APIs, and automation scripts.
Vue.js Integration
⏱️ Coming Soon • 🎯 Intermediate
Tutorial for using Mesh with Vue.js and Nuxt.
## 🎓 Learning Paths
Structured learning journeys for different goals.
### Path 1: Web Developer → Cardano dApp Developer
1. Installation & Setup (10 min)
2. Wallet Connection (15 min)
3. Send ADA & Tokens (20 min)
4. React Hooks & Components (20 min)
5. Mint Your First NFT (30 min)
6. Next.js Integration (45 min)
**Total Time:** \~2.5 hours • **Level:** Beginner to Intermediate
### Path 2: Smart Contract Developer
1. Getting Started with Aiken (40 min)
2. Your First Aiken Script (50 min)
3. Smart Contract Transactions (60 min)
4. Advanced Smart Contract Patterns (90 min)
5. Local Development with Yaci (40 min)
6. Production Best Practices (60 min)
**Total Time:** \~5.5 hours • **Level:** Intermediate to Advanced
### Path 3: NFT Collection Creator
1. Installation & Setup (10 min)
2. Wallet Connection (15 min)
3. Mint Your First NFT (30 min)
4. Advanced NFT Metadata (35 min)
5. Multi-Signature Minting (45 min)
6. Server-Side Transactions (30 min)
**Total Time:** \~2.5 hours • **Level:** Beginner to Intermediate
## 📚 Additional Resources
* **[API Reference](/apis)** - Complete API documentation
* **[Code Examples](https://github.com/MeshJS/examples)** - Working code repositories
* **[FAQ](/resources/faq)** - Frequently asked questions
* **[Use Cases](/resources/use-cases)** - Real-world applications
* **[Developer Resources](/resources/developer-resources)** - Tools and communities
## 💬 Need Help?
Stuck on a tutorial? Here's how to get help:
* **[Discord Community](https://discord.gg/dH48jH3BKa)** - Real-time support from the community
* **[GitHub Discussions](https://github.com/MeshJS/mesh/discussions)** - Longer-form Q\&A
* **[Stack Overflow](https://stackoverflow.com/questions/tagged/meshsdk)** - Tagged questions
## 🎯 What's Next?
After completing these tutorials, you'll be ready to:
* Build production Cardano dApps
* Create NFT collections and marketplaces
* Develop DeFi applications
* Integrate smart contracts
* Contribute to the Cardano ecosystem
Start your journey today with our [Getting Started Guide](/guides)!
# Use Cases & Showcases
URL: /resources/use-cases
Discover real-world applications and projects built with Mesh - from DeFi platforms to NFT marketplaces and enterprise solutions on Cardano.
***
title: "Use Cases & Showcases"
description: "Discover real-world applications and projects built with Mesh - from DeFi platforms to NFT marketplaces and enterprise solutions on Cardano."
icon: RocketLaunchIcon
----------------------
import { Card, CardHeader, CardTitle, CardDescription } from '@/components/ui/card';
Discover how developers and organizations are using Mesh to build innovative Cardano applications. From DeFi platforms to NFT marketplaces, Mesh powers a wide range of blockchain solutions.
## DeFi Applications
### Decentralized Exchanges (DEX)
Mesh provides the perfect foundation for building decentralized exchanges on Cardano:
* **Automated Market Makers (AMM)**: Build liquidity pools and swap mechanisms with Mesh's transaction builder
* **Order Book DEXs**: Manage complex order matching with smart contract integration
* **Multi-Asset Swaps**: Handle native token exchanges with ease
**Key Features Used:**
* Transaction building APIs
* Multi-asset handling
* Smart contract integration
* Wallet connections
### Lending Protocols
Create secure lending and borrowing platforms:
* **Collateral Management**: Lock and release assets with smart contracts
* **Interest Calculations**: Automated interest accrual and distribution
* **Liquidation Mechanisms**: Monitor and execute collateral liquidations
**Real-World Example:**
Lending protocols use Mesh to handle complex multi-party transactions, ensuring secure collateral locks and automated interest payments through Plutus smart contracts.
### Staking Platforms
Build custom staking solutions:
* **Stake Pool Delegation**: Simplified delegation interfaces
* **Rewards Distribution**: Automated reward calculations and distributions
* **Multi-Pool Support**: Manage delegations across multiple pools
## NFT Marketplaces
### NFT Minting Platforms
Mesh simplifies NFT creation and distribution:
* **Single NFT Minting**: Easy one-off NFT creation
* **Collection Launches**: Batch minting for entire collections
* **Generative Art**: Create unique combinations programmatically
* **Metadata Management**: CIP-25 and CIP-68 compliance
**Example Implementation:**
```typescript
const { Transaction } = require('@meshsdk/core');
const tx = new Transaction({ initiator: wallet })
.mintAsset(
forgingScript,
{
assetName: 'MyNFT',
assetQuantity: '1',
metadata: {
name: 'My Amazing NFT',
image: 'ipfs://...',
description: 'A unique digital collectible'
}
}
);
```
### Secondary Marketplaces
Power NFT trading platforms with Mesh:
* **Listing Management**: List and delist NFTs for sale
* **Bidding Systems**: Implement auction mechanisms
* **Instant Purchases**: Enable direct NFT purchases
* **Royalty Enforcement**: Automated creator royalty distributions
**Key Features:**
* Smart contract escrow
* Multi-signature support
* Metadata resolution
* Price oracles integration
## Wallet Applications
### Browser Extension Wallets
Build feature-rich Cardano wallets:
* **Key Management**: Secure mnemonic and key storage
* **Transaction Signing**: Sign and submit transactions
* **dApp Connector**: CIP-30 compliance for dApp integration
* **Multi-Account Support**: Manage multiple addresses
### Hardware Wallet Integration
Integrate with hardware wallets for enhanced security:
* **Ledger Support**: Connect with Ledger devices
* **Trezor Integration**: Support for Trezor hardware wallets
* **Air-Gapped Signing**: Build offline transaction signing flows
## Gaming & Metaverse
### Blockchain Games
Create engaging gaming experiences on Cardano:
* **In-Game Assets**: Represent items as NFTs
* **Play-to-Earn**: Token rewards and economies
* **Character NFTs**: Unique, tradeable characters
* **Land Ownership**: Virtual real estate on-chain
**Use Case Example:**
A trading card game uses Mesh to handle card minting, trading between players, and tournament rewards distribution, all with seamless wallet integration.
### Virtual Worlds
Build metaverse platforms:
* **Land Parcels**: NFT-based land ownership
* **Avatar Systems**: Customizable NFT avatars
* **Virtual Economies**: In-world token systems
* **Social Features**: Decentralized identity and messaging
## Enterprise Solutions
### Supply Chain Tracking
Implement transparent supply chain management:
* **Asset Tracking**: Record product journey on-chain
* **Authenticity Verification**: Prove product origin
* **Smart Contracts**: Automated fulfillment conditions
* **Multi-Party Workflows**: Coordinate between stakeholders
**Real-World Application:**
Track luxury goods from manufacturer to customer, with each transfer recorded on Cardano using Mesh, ensuring authenticity and preventing counterfeits.
### Identity Verification
Build decentralized identity solutions:
* **KYC/AML**: Store verified credentials on-chain
* **Age Verification**: Prove age without revealing birthdate
* **Professional Credentials**: Verifiable certifications
* **Access Control**: Token-gated content and services
### Voting & Governance
Create transparent governance systems:
* **DAO Governance**: Token-weighted voting
* **Proposal Systems**: Submit and vote on proposals
* **Quadratic Voting**: Fair voting mechanisms
* **Election Systems**: Verifiable public elections
## Developer Tools
### Block Explorers
Build custom blockchain explorers:
* **Transaction Search**: Query and display transaction history
* **Address Monitoring**: Track address activity
* **Smart Contract Viewers**: Inspect contract state
* **Analytics Dashboards**: Blockchain statistics and metrics
### API Services
Create Cardano API platforms:
* **Data Providers**: Serve blockchain data to applications
* **Webhook Services**: Real-time blockchain event notifications
* **Query Interfaces**: GraphQL/REST APIs for Cardano data
* **Historical Data**: Archive and serve historical blockchain data
## Education & Research
### Learning Platforms
Build educational tools for Cardano:
* **Interactive Tutorials**: Hands-on Cardano development lessons
* **Sandbox Environments**: Safe spaces to experiment
* **Code Playgrounds**: Browser-based Cardano coding
* **Certification Systems**: Issue blockchain certificates
### Research Tools
Enable blockchain research:
* **Data Analysis**: Extract and analyze blockchain data
* **Simulation Tools**: Model economic scenarios
* **Testing Frameworks**: Automated smart contract testing
* **Network Monitoring**: Track network health and performance
## Social & Community
### Social Platforms
Build Web3 social networks:
* **Token-Gated Communities**: Access based on NFT/token ownership
* **Creator Platforms**: Content monetization with NFTs
* **Tipping Systems**: Microtransactions for content creators
* **Decentralized Social Graphs**: On-chain social connections
### Fundraising Platforms
Create transparent fundraising solutions:
* **Crowdfunding**: Decentralized campaign management
* **Charity Platforms**: Transparent donation tracking
* **Investment DAOs**: Collective investment vehicles
* **Grant Programs**: Automated grant distribution
## Real-World Success Metrics
Projects built with Mesh have achieved:
* 📈 **Millions in Transaction Volume**: DeFi platforms processing substantial daily volumes
* 🎨 **Thousands of NFTs Minted**: Successful collections with sell-outs
* 👥 **Large User Bases**: Wallets and dApps with tens of thousands of users
* ⚡ **Fast Performance**: Applications maintaining sub-second response times
* 🔒 **Zero Security Incidents**: Secure smart contract implementations
## Building Your Own?
Ready to create your own Cardano application with Mesh?
* **Start with [Guides](/guides)**: Step-by-step tutorials for common use cases
* **Explore [API Documentation](/apis)**: Complete reference for all Mesh features
* **Join [Community](https://discord.gg/dH48jH3BKa)**: Get help from other builders
* **View [Examples](https://github.com/MeshJS/examples)**: Working code samples
## Submit Your Project
Built something awesome with Mesh? We'd love to feature it! Share your project:
* Discord: Join our showcase channel
* Twitter: Tag [@meshsdk](https://twitter.com/meshsdk)
* GitHub: Add to our [ecosystem list](https://github.com/MeshJS/mesh)
# Content Ownership
URL: /smart-contracts/content-ownership
Manage ownership of digital content and assets
***
title: "Content Ownership"
description: "Manage ownership of digital content and assets"
icon: DocumentCheckIcon
-----------------------
import Link from "fumadocs-core/link";
This contract allows you to create a content registry and users can create content that is stored in the registry.
It facilitates on-chain record of content (i.e. file on IPFS) ownership and transfer. While one cannot prefer others from obtaining a copy of the content, the app owner of the contract can serve the single source of truth of who owns the content. With the blockchain trace and record in place, it provides a trustless way to verify the ownership of the content and facilitates further application logics such as royalties, licensing, etc.
### Install package \[!toc]
First you can to install the `@meshsdk/contracts` package:
```tsx
npm install @meshsdk/contract
```
### Initialize the contract \[!toc]
To initialize the contract, we need to initialize a provider, `MeshTxBuilder` and `MeshContentOwnershipContract`.
```tsx
import { MeshContentOwnershipContract } from "@meshsdk/contract";
import { MeshTxBuilder, BlockfrostProvider } from "@meshsdk/core";
const provider = new BlockfrostProvider('');
const meshTxBuilder = new MeshTxBuilder({
fetcher: provider,
submitter: provider,
});
const contract = new MeshContentOwnershipContract(
{
mesh: meshTxBuilder,
fetcher: provider,
wallet: wallet,
networkId: 0,
},
{
operationAddress: operationAddress, // the address of the app owner, where most of the actions should be signed by the spending key of this address
paramUtxo: { outputIndex: 0, txHash: "0000000000000000000000000000000000000000000000000000000000000000" }, // you can get this from the output of mintOneTimeMintingPolicy() transaction
refScriptUtxos?: { // you can get these from the output of sendRefScriptOnchain() transactions
contentRegistry: { outputIndex: 0, txHash: "0000000000000000000000000000000000000000000000000000000000000000" },
contentRefToken: { outputIndex: 0, txHash: "0000000000000000000000000000000000000000000000000000000000000000" },
ownershipRegistry: { outputIndex: 0, txHash: "0000000000000000000000000000000000000000000000000000000000000000" },
ownershipRefToken: { outputIndex: 0, txHash: "0000000000000000000000000000000000000000000000000000000000000000" },
},
},
);
```
Both on-chain and off-chain codes are open-source and available on Mesh Github Repository.
## Mint One Time Minting Policy
This is the first transaction you need to setup the contract.
This transaction mints the one-time minting policy (a NFT) for the contract.
It will be attached with the datum which serves as the single source of truth for the contract oracle.
Note: You must save the `paramUtxo` for future transactions.
### Mint One Time Minting Policy \[!toc]
This transaction mints the one-time minting policy (a NFT) for the contract.
**Operation address**
`addr_test1vpvx0sacufuypa2k4sngk7q40zc5c4npl337uusdh64kv0c7e4cxr`
```tsx
const { tx, paramUtxo } = await contract.mintOneTimeMintingPolicy();
const signedTx = await wallet.signTx(tx);
const txHash = await wallet.submitTx(signedTx);
```
## Setup Oracle Utxo
This transaction send the NFT to a oracle contract locking the datum, which serves as the single source of truth for the contract oracle with data integrity.
This is the second transaction you need to setup the contract.
Note: You must provide the `paramUtxo` from the `mintOneTimeMintingPolicy` transaction.
### Setup Oracle Utxo \[!toc]
This transaction send the NFT to a oracle contract locking the datum.
**Operation address**
`addr_test1vpvx0sacufuypa2k4sngk7q40zc5c4npl337uusdh64kv0c7e4cxr`
**Param UTxO**
`{"outputIndex":0,"txHash":"2aba4d6705cfe6405cf02...f3f8bded3df2359"}`
```tsx
const tx = await contract.setupOracleUtxo();
const signedTx = await wallet.signTx(tx);
const txHash = await wallet.submitTx(signedTx);
```
## Send Ref-Script Onchain
This are the next transactions you need to setup the contract. You need to run once for each script, and you would likely have to run one after the previous one is confirmed.
This transaction sends the reference scripts to the blockchain for later transactions, boosting efficiency and avoid exceeding 16kb of transaction size limits enforced by protocol parameter.
Note: You must provide the `paramUtxo` from the `mintOneTimeMintingPolicy` transaction.
Note: You must save txHash (after signed and submitted) for `ContentRegistry`, `ContentRefToken`, `OwnershipRegistry`,`OwnershipRefToken` transactions for future transactions.
### Send Ref-Script Onchain \[!toc]
This transaction sends the reference scripts to the blockchain for later transactions.
**Operation address**
`addr_test1vpvx0sacufuypa2k4sngk7q40zc5c4npl337uusdh64kv0c7e4cxr`
**Param UTxO**
`{"outputIndex":0,"txHash":"2aba4d6705cfe6405cf02...f3f8bded3df2359"}`
**Select script index**
`OracleNFT`
```tsx
const tx = await contract.sendRefScriptOnchain('OracleNFT');
const signedTx = await wallet.signTx(tx);
const txHash = await wallet.submitTx(signedTx);
```
## Create Content Registry
This is the next transaction you need to setup the contract after completing all the `sendRefScriptOnchain` transactions.
This transaction creates one content registry. Each registry should comes in pair with one ownership registry and each pair of registry serves around 50 records of content ownership. The application can be scaled indefinitely according to the number of parallelization needed and volumes of content expected to be managed.
Note: You must provide the `paramUtxo` from the `mintOneTimeMintingPolicy` transaction.
Note: You must provide the txHash `forContentRegistry`, `ContentRefToken`, `OwnershipRegistry`, `OwnershipRefToken` transactions.
### Create Ownership Registry \[!toc]
This transaction creates one content registry
**Operation address**
`addr_test1vpvx0sacufuypa2k4sngk7q40zc5c4npl337uusdh64kv0c7e4cxr`
**Param UTxO**
`{"outputIndex":0,"txHash":"2aba4d6705cfe6405cf02...f3f8bded3df2359"}`
**Content Registry Tx Hash**
`dfd2a2616e6154a092807b1ceebb9ddcadc0f22cf5c8e0e6b0757815083ccb70`
**Content Ref Token Tx Hash**
`8f731be135171df172c07578a5d74589ec8fb30b37c12fdbe2639d69b7587f5e`
**Ownership Registry Tx Hash**
`ec874b61eec4e5e8e395dead6c9bb18690e6d6ea64d773760c5e654ec9ff5f97`
**Ownership Ref Token Tx Hash**
`e1bdfc7ae6929f934cf9d418273dde143cbb65ec0eec23bdb6c342e4cd91dbd0`
```tsx
const tx = await contract.createContentRegistry();
const signedTx = await wallet.signTx(tx);
const txHash = await wallet.submitTx(signedTx);
```
## Create Ownership Registry
This is the last transaction you need to setup the contract after completing all the `sendRefScriptOnchain` transactions.
This transaction creates one content registry. Each registry should comes in pair with one content registry and each pair of registry serves around 50 records of content ownership. The application can be scaled indefinitely according to the number of parallelization needed and volumes of content expected to be managed.
**Note**: You must provide the `paramUtxo` from the `mintOneTimeMintingPolicy` transaction.
**Note**: You must provide the txHash for `ContentRegistry`, `ContentRefToken`, `OwnershipRegistry`,`OwnershipRefToken` transactions.
### Create Ownership Registry \[!toc]
This transaction creates one content registry
**Operation address**
`addr_test1vpvx0sacufuypa2k4sngk7q40zc5c4npl337uusdh64kv0c7e4cxr`
**Param UTxO**
`{"outputIndex":0,"txHash":"2aba4d6705cfe6405cf02e4e2c8b7...ed3df2359"}`
**Content Registry Tx Hash**
`dfd2a2616e6154a092807b1ceebb9ddcadc0f22cf5c8e0e6b0757815083ccb70`
**Content Ref Token Tx Hash**
`8f731be135171df172c07578a5d74589ec8fb30b37c12fdbe2639d69b7587f5e
`
**Ownership Registry Tx Hash**
`ec874b61eec4e5e8e395dead6c9bb18690e6d6ea64d773760c5e654ec9ff5f97`
**Ownership Ref Token Tx Hash**
`e1bdfc7ae6929f934cf9d418273dde143cbb65ec0eec23bdb6c342e4cd91dbd0`
```tsx
const tx = await contract.createOwnershipRegistry();
const signedTx = await wallet.signTx(tx);
const txHash = await wallet.submitTx(signedTx);
```
## Get Oracle Data
Getting the oracle data is essential to fetch the current state of the registry.
To facilitate this process, you must provide the `paramUtxo` that contains the output index and transaction hash of the NFT minting policy.
The `getOracleData()` function will return the current oracle data.
```tsx
const oracleData = await contract.getOracleData();
```
For example:
```tsx
{
"contentNumber": 2,
"ownershipNumber": 2
}
```
## Mint User Token
This transaction mints a token that users can use to create content.
Note that you can actually use any tokens for `createContent()`, this `mintUserToken()` function is just helpful if you want to mint a token specifically for this purpose.
Note that you signTx with `true` to mint the token to enable partial signing.
### Mint User Token \[!toc]
Mint a token that users can use to create content
**Operation address**
`addr_test1vpvx0sacufuypa2k4sngk7q40zc5c4npl337uusdh64kv0c7e4cxr`
**Param UTxO**
`{"outputIndex":0,"txHash":"2aba4d6705cfe6405cf02e4e2c8b7...ed3df2359"}`
```tsx
const tx = await contract.mintUserToken("MeshContentOwnership", {
name: "Mesh Content Ownership",
description: "Demo at https://meshjs.dev/smart-contracts/content-ownership",
});
const signedTx = await wallet.signTx(tx, true);
const txHash = await wallet.submitTx(signedTx);
```
## Create Content
This transaction creates a content attached to the registry reference by a token. You can use any token for `ownerAssetHex` and the `contentHashHex` is a string to identify the content.
**Note**: You must provide the `paramUtxo` from the `mintOneTimeMintingPolicy` transaction.
**Note**: You must provide the txHash for `ContentRegistry`, `ContentRefToken`, `OwnershipRegistry`,`OwnershipRefToken` transactions.
### Create Content \[!toc]
For users to create a content attached to the registry reference by a token
**Operation address**
`addr_test1vpvx0sacufuypa2k4sngk7q40zc5c4npl337uusdh64kv0c7e4cxr`
**Param UTxO**
`{"outputIndex":0,"txHash":"2aba4d6705cfe6405cf02e4e2c8b7...ed3df2359"}`
**Content Registry Tx Hash**
`dfd2a2616e6154a092807b1ceebb9ddcadc0f22cf5c8e0e6b0757815083ccb70`
**Content Ref Token Tx Hash**
`8f731be135171df172c07578a5d74589ec8fb30b37c12fdbe2639d69b7587f5e
`
**Ownership Registry Tx Hash**
`ec874b61eec4e5e8e395dead6c9bb18690e6d6ea64d773760c5e654ec9ff5f97`
**Ownership Ref Token Tx Hash**
`e1bdfc7ae6929f934cf9d418273dde143cbb65ec0eec23bdb6c342e4cd91dbd0`
```tsx
const asset = demoAsset;
const contentHashHex = "ipfs://contentHashHex";
const registryNumber = 0;
const tx = await contract.createContent(
asset,
contentHashHex,
registryNumber,
);
const signedTx = await wallet.signTx(tx);
const txHash = await wallet.submitTx(signedTx);
```
## Get Content
This transaction fetches the content data from the registry.
### Get Oracle Data \[!toc]
Fetch the current oracle data
**Operation address**
`addr_test1vpvx0sacufuypa2k4sngk7q40zc5c4npl337uusdh64kv0c7e4cxr`
**Param UTxO**
`{"outputIndex":0,"txHash":"2aba4d6705cfe6405cf02e4e2c8b7...ed3df2359"}`
**Content Registry Tx Hash**
`dfd2a2616e6154a092807b1ceebb9ddcadc0f22cf5c8e0e6b0757815083ccb70`
**Content Ref Token Tx Hash**
`8f731be135171df172c07578a5d74589ec8fb30b37c12fdbe2639d69b7587f5e
`
**Ownership Registry Tx Hash**
`ec874b61eec4e5e8e395dead6c9bb18690e6d6ea64d773760c5e654ec9ff5f97`
**Ownership Ref Token Tx Hash**
`e1bdfc7ae6929f934cf9d418273dde143cbb65ec0eec23bdb6c342e4cd91dbd0`
```tsx
const content = await contract.getContent(0, 0);
```
# Escrow
URL: /smart-contracts/escrow
Secure exchange of assets between two parties
***
title: "Escrow"
description: "Secure exchange of assets between two parties"
icon: ArrowsRightLeftIcon
-------------------------
import Link from "fumadocs-core/link";
The escrow smart contract allows two parties to exchange assets securely. The contract holds the assets until both parties agree and sign off on the transaction.
There are 4 actions available to interact with this smart contract:
* initiate escrow and deposit assets
* deposit assets
* complete escrow
* cancel escrow
### Install package \[!toc]
First you can to install the `@meshsdk/contracts` package:
```tsx
npm install @meshsdk/contract
```
### Initialize the contract \[!toc]
To initialize the escrow, we need to initialize a provider, `MeshTxBuilder` and `MeshEscrowContract`.
```tsx
import { MeshEscrowContract } from "@meshsdk/contract";
import { MeshTxBuilder } from "@meshsdk/core";
const provider = new BlockfrostProvider('');
const meshTxBuilder = new MeshTxBuilder({
fetcher: provider,
submitter: provider,
});
const contract = new MeshEscrowContract({
mesh: meshTxBuilder,
fetcher: provider,
wallet: wallet,
networkId: 0,
});
```
Both on-chain and off-chain codes are open-source and available on Mesh Github Repository.
## Initiate Escrow
An escrow is initiated by one of the party, user A, by locking assets to the escrow contract.
`initiateEscrow()` initiate an escrow. The function accepts the following parameters:
* escrowAmount (Asset\[]) - a list of assets user A is trading
The function returns a transaction hex if the escrow is successfully initiated.
### Initiate Escrow \[!toc]
Initiate an escrow, in this demo, person A is initiating the escrow and deposit ADA.
**Listing price in Lovelace** `10000000`
```tsx
const escrowAmount: Asset[] = [
{
unit: "lovelace",
quantity: '10000000',
},
];
const tx = await contract.initiateEscrow(escrowAmount);
const signedTx = await wallet.signTx(tx);
const txHash = await wallet.submitTx(signedTx);
```
## Recipient Deposit
User B can deposit assets into the escrow after initiation step (`initiateEscrow()`).
`recipientDeposit()` deposit assets into the escrow. The function accepts the following parameters:
* escrowUtxo (UTxO) - the utxo of the transaction on the contract
* depositAmount (Asset\[]) - a list of assets user B is trading
We have provided a very handle function, `getUtxoByTxHash`, which will return the UTxO object for a given transaction hash.
### Recipient Deposit \[!toc]
Deposit funds into the escrow for trade. In this demo, person B is depositing an asset into the escrow.
**Tx hash:** `Tx hash`
**Asset unit**
`d9312da562da182b02322fd8acb536f37eb9d29fba7...68546f6b656e`
```tsx
const utxo = await contract.getUtxoByTxHash('');const escrowAmount: Asset[] = [
{
unit: 'd9312da562da182b02322fd8acb536f37eb9d29fba7c49dc172555274d657368546f6b656e',
quantity: '1',
},
];
const tx = await contract.initiateEscrow(escrowAmount);
const signedTx = await wallet.signTx(tx);
const txHash = await wallet.submitTx(signedTx);
```
## Complete Escrow
A user can complete an escrow if the terms of the agreement are met. The completion can be initiated by any recipient of the escrow.
`completeEscrow()` complete an escrow. The function accepts the following parameters:
* escrowUtxo (UTxO) - the utxo of the transaction in the script to be completed
**Important**: This is a multi-signature transaction. Both users must sign the transaction to complete the escrow.
A successful completion of the escrow will result in the assets being swapped between the two parties.
### Person A signs the transaction \[!toc]
User A completes the escrow by calling the `completeEscrow()` function and partial sign the transaction.
**Tx hash:** `Tx hash`
```tsx
const utxo = await contract.getUtxoByTxHash('');
const tx = await contract.completeEscrow(utxo);
const signedTxUserA = await wallet.signTx(tx, true);
```
### Person B signs and submits the transaction \[!toc]
The signed transaction will be handled to User B to sign the transaction and submits it to the blockchain to complete the escrow.
**Tx hash:** `Tx hash`
**Transaction CBOR** `Transaction CBOR`
```tsx
const signedTxUserB = await wallet.signTx(signedTxUserA, true);
const txHash = await wallet.submitTx(signedTxUserB);
```
## Cancel Escrow
A user can cancel an escrow if the other party fails to fulfill the terms of the agreement. Cancel can be initiated by any users who have partcipated in the escrow and can be done at any time before complete. Canceling the escrow will return the assets to the respective users.
`cancelEscrow()` cancel an escrow. The function accepts the following parameters:
* escrowUtxo (UTxO) - the utxo of the transaction to be canceled
We have provided a very handle function, `getUtxoByTxHash`, which will return the UTxO object for a given transaction hash.
### Cancel Escrow \[!toc]
Any users who have partcipated in the escrow and can cancel the trade at any time before complete.
**Tx hash:** `Tx hash`
```tsx
const utxo = await contract.getUtxoByTxHash('');
const tx = await contract.cancelEscrow(utxo);
const signedTx = await wallet.signTx(tx);
const txHash = await wallet.submitTx(signedTx);
```
# GiftCard
URL: /smart-contracts/giftcard
Create a giftcard with native tokens
***
title: "GiftCard"
description: "Create a giftcard with native tokens"
icon: GiftIcon
--------------
import Link from "fumadocs-core/link";
Giftcard contract allows users to create a transactions to lock assets into the smart contract, which can be redeemed by any user.
Creating a giftcard will mint a token and send the assets to the contract. While redeeming will burn the token and send the assets to the redeemer.
There are 2 actions (or endpoints) available to interact with this smart contract:
* create giftcard
* redeem giftcard
### Install package \[!toc]
First you can to install the `@meshsdk/contracts` package:
```tsx
npm install @meshsdk/contract
```
### Initialize the contract \[!toc]
To initialize the contract, we need to initialize a provider, `MeshTxBuilder` and `MeshGiftCardContract`.
```tsx
import { MeshGiftCardContract } from "@meshsdk/contract";
import { MeshTxBuilder } from "@meshsdk/core";
const provider = new BlockfrostProvider('');
const meshTxBuilder = new MeshTxBuilder({
fetcher: provider,
submitter: provider,
});
const contract = new MeshGiftCardContract({
mesh: meshTxBuilder,
fetcher: provider,
wallet: wallet,
networkId: 0,
});
```
Both on-chain and off-chain codes are open-source and available on Mesh Github Repository.
## Create Giftcard
`createGiftCard()` create a gift card. The function accepts the following parameters:
* tokenName (string) - name of the token
* giftValue (Asset\[]) - a list of assets
The function returns a transaction hash if the gift card is successfully created.
The function returns a transaction hex if giftcard has been created successfully.
### Create Giftcard \[!toc]
Create a gift card with a given amount of lovelace
**Gitfcard amount** `10000000`
**Giftcard name** `Mesh_Gift_Card`
```tsx
const giftValue: Asset[] = [
{
unit: "lovelace",
quantity: '10000000',
},
];
const tx = await contract.createGiftCard('Mesh_Gift_Card', giftValue);
const signedTx = await wallet.signTx(tx);
const txHash = await wallet.submitTx(signedTx);
```
## Redeem Giftcard
`redeemGiftCard()` redeem a gift card. The function accepts the following parameters:
* giftCardUtxo (UTxO) - unspent transaction output in the script
The function returns a transaction hash if the gift card is successfully redeemed. It will burn the gift card and transfer the value to the wallet signing this transaction.
The function returns a transaction hex if the gift card has been redeemed successfully.
We have provided a very handle function, `getUtxoByTxHash`, which will return the UTxO object for a given transaction hash. You can always create another function that searches by token name.
A successful redemption will send the value to the wallet that signed the transaction to redeem the gift card.
### Redeem Giftcard \[!toc]
Redeem a gift card given the gift card UTxO
**Tx hash** `Tx hash`
```tsx
const utxo = await contract.getUtxoByTxHash('');
const tx = await contract.redeemGiftCard(utxo);
const signedTx = await wallet.signTx(tx);
const txHash = await wallet.submitTx(signedTx);
```
# Hello World
URL: /smart-contracts/hello-world
Simple lock and unlock assets contract
***
title: "Hello World"
description: "Simple lock and unlock assets contract"
icon: PlayIcon
--------------
import Link from "fumadocs-core/link";
The Hello World smart contract is a simple lock-and-unlock assets contract, providing a hands-on introduction to end-to-end smart contract validation and transaction building.
There are 2 conditions to unlock the assets:
* Signer must be the same as the one who locked the assets
* Signer must provide the message `Hello, World!`
There are 2 actions (or endpoints) available to interact with this smart contract:
* Lock assets
* Redeem assets
### Install package \[!toc]
First you can to install the `@meshsdk/contracts` package:
```tsx
npm install @meshsdk/contract
```
### Initialize the contract \[!toc]
To initialize the contract, we need to initialize a provider, `MeshTxBuilder` and `MeshGiftCardContract`.
```tsx
import { MeshHelloWorldContract } from "@meshsdk/contract";
import { MeshTxBuilder } from "@meshsdk/core";
const provider = new BlockfrostProvider('');
const meshTxBuilder = new MeshTxBuilder({
fetcher: provider,
submitter: provider,
});
const contract = new MeshHelloWorldContract({
mesh: meshTxBuilder,
fetcher: provider,
wallet: wallet,
networkId: 0,
});
```
Both on-chain and off-chain codes are open-source and available on Mesh Github Repository.
## Lock Assets
This transaction locks funds into the contract.
The datum must match the representation expected by the validator (and as specified in the blueprint), so this is a constructor with a single field that is a byte array.
```tsx
pub type Datum {
owner: VerificationKeyHash,
}
```
Thus, we provide a hash digest of our public key, which will be needed to unlock the funds.
```tsx
await txBuilder
.txOut(scriptAddress, assets)
.txOutDatumHashValue(mConStr0([signerHash]))
.changeAddress(walletAddress)
.selectUtxosFrom(utxos)
.complete();
```
### Lock Asset \[!toc]
Lock asset in the contract
**Lovelace amount**
`5000000`
```tsx
const assets: Asset[] = [
{
unit: "lovelace",
quantity: '5000000',
},
];
const tx = await contract.lockAsset(assets);
const signedTx = await wallet.signTx(tx);
const txHash = await wallet.submitTx(signedTx);
```
## Unlock Assets
There are 2 conditions to unlock the assets:
* Signer must be the same as the one who locked the assets
* Signer must provide the message `Hello, World!`
The validator script for the contract checks that the redeemer is the same as the owner of the datum and that the message is `Hello, World!`:
```tsx
validator hello_world {
spend(
datum_opt: Option,
redeemer: Redeemer,
_input: OutputReference,
tx: Transaction,
) {
expect Some(datum) = datum_opt
let must_say_hello = redeemer.msg == "Hello, World!"
let must_be_signed = list.has(tx.extra_signatories, datum.owner)
must_say_hello && must_be_signed
}
else(_) {
fail
}
}
```
### Redeem Giftcard \[!toc]
Redeem a gift card given the gift card UTxO
**Tx hash**
`Tx hash`
**Message**
`Hello, World!`
```tsx
const utxo = await contract.getUtxoByTxHash('');
const tx = await contract.unlockAsset(utxo, 'Hello, World!');
const signedTx = await wallet.signTx(tx);
const txHash = await wallet.submitTx(signedTx);
```
# Smart Contracts
URL: /smart-contracts
Open-source smart contracts, complete with documentation, and live demos
***
title: "Smart Contracts"
description: "Open-source smart contracts, complete with documentation, and live demos"
icon: DocumentCheckIcon
-----------------------
import {linksSmartContracts} from "@/data/links-smart-contracts";
import Link from "next/link";
import {
Card,
CardDescription,
CardTitle,
} from "@/components/ui/card";
# Marketplace
URL: /smart-contracts/marketplace
Build a NFT marketplace to buy and sell NFTs
***
title: "Marketplace"
description: "Build a NFT marketplace to buy and sell NFTs"
icon: ShoppingCartIcon
----------------------
import Link from "fumadocs-core/link";
The marketplace smart contract allows users to buy and sell NFTs. A seller list an NFT for sales by specifying a certain price, and anyone can buy it by paying the demanded price.
There are 4 actions (or endpoints) available to interact with this smart contract:
* list asset
* buy asset
* updating listing
* cancel listing
### Install package \[!toc]
First you can to install the `@meshsdk/contracts` package:
```tsx
npm install @meshsdk/contract
```
### Initialize the Marketplace \[!toc]
Utilizing the Marketplace contract requires a blockchain provider and a connected browser wallet. Here is an example how we can initialize the Marketplace.
```tsx
import { MeshMarketplaceContract } from "@meshsdk/contract";
import { MeshTxBuilder } from "@meshsdk/core";
const provider = new BlockfrostProvider('');
const meshTxBuilder = new MeshTxBuilder({
fetcher: provider,
submitter: provider,
});
const contract = new MeshMarketplaceContract(
{
mesh: meshTxBuilder,
fetcher: provider,
wallet: wallet,
networkId: 0,
},
'addr_test1vpvx0sacufuypa2k4sngk7q40zc5c4npl337uusdh64kv0c7e4cxr',
200, // 2% fee
);
```
To initialize the Marketplace, we import the `MeshMarketplaceContract`. The first JSON object is the `inputs` for the `MeshTxInitiatorInput`, this requires a `MeshTxBuilder`, a `Provider`, a `Wallet`, and define the network ID.
Second and third parameters are the `ownerAddress` and `feePercentageBasisPoint`. The `ownerAddress` is the address of the marketplace owner which will receive the marketplace fee. The `feePercentageBasisPoint` is the percentage of the sale price that the marketplace `owner` will take. The fee numerator is in the order of hundreds, for example `200` implies a fee of `2%`.
Both on-chain and off-chain codes are open-source and available on Mesh Github Repository.
## List Asset
List an asset on the marketplace. This will allow other users to buy the asset. The seller will receive the listing price in ADA. The seller can cancel the listing at any time. The seller can also update the listing price at any time.
`listAsset()` list an asset for sale. The function accepts the following parameters:
* asset (string) - the asset's unit to be listed
* price (number) - the listing price in Lovelace
### List Asset \[!toc]
List an asset for sale
**Listing price in Lovelace** `10000000`
**Asset unit**
`d9312da562da182b02322fd8acb536f37eb9d29fba7c49dc172555274d657368546f6b656e`
```tsx
const tx = await contract.listAsset('d9312da562da182b02322fd8acb536f37eb9d29fba7c49dc172555274d657368546f6b656e', 10000000);
const signedTx = await wallet.signTx(tx);
const txHash = await wallet.submitTx(signedTx);
```
## Buy Asset
Purchase a listed asset from the marketplace. The seller will receive the listed price in ADA and the buyer will receive the asset. The marketplace owner will receive a fee if it is specified.
`purchaseAsset()` purchase a listed asset. The function accepts the following parameters:
* utxo (UTxO) - unspent transaction output in the script
We have provided a very handle function, `getUtxoByTxHash`, which will return the UTxO object for a given transaction hash.
A successful purchase will send the asset to the wallet that signed the transaction to purchase the asset.
### Buy Asset \[!toc]
Purchase a listed asset from the marketplace
**Tx hash**
`Tx hash`
```tsx
const utxo = await contract.getUtxoByTxHash('');
const tx = await contract.purchaseAsset(utxo);
const signedTx = await wallet.signTx(tx);
const txHash = await wallet.submitTx(signedTx);
```
## Update Listing
Update a listing on the marketplace. For the contract, the seller can update the listing price.
`relistAsset()` update a listing on the marketplace. The function accepts the following parameters:
* utxo (UTxO) - unspent transaction output in the script
* newListPrice (number) - the new listing price in Lovelace
We have provided a very handle function, `getUtxoByTxHash`, which will return the UTxO object for a given transaction hash.
### Update Listing \[!toc]
Update the listing price of an asset on the marketplace
**Tx hash**
`Tx hash`
**New listing price in Lovelace**
`20000000`
```tsx
const utxo = await contract.getUtxoByTxHash('');
const tx = await contract.relistAsset(utxo, 20000000);
const signedTx = await wallet.signTx(tx);
const txHash = await wallet.submitTx(signedTx);
```
## Cancel Listing
Cancel a listing on the marketplace. The seller can cancel the listing at any time. The seller will receive the listed asset back.
`delistAsset()` cancel a listing on the marketplace. The function accepts the following parameters:
* utxo (UTxO) - unspent transaction output in the script
We have provided a very handle function, `getUtxoByTxHash`, which will return the UTxO object for a given transaction hash.
### Cancel Listing \[!toc]
Cancel a listing on the marketplace
**Tx hash**
`Tx hash`
```tsx
const utxo = await contract.getUtxoByTxHash('');
const tx = await contract.delistAsset(utxo);
const signedTx = await wallet.signTx(tx);
const txHash = await wallet.submitTx(signedTx);
```
# Payment Splitter
URL: /smart-contracts/payment-splitter
Split payouts equally among a list of specified payees
***
title: "Payment Splitter"
description: "Split payouts equally among a list of specified payees"
icon: ArrowsPointingOutIcon
---------------------------
import Link from "fumadocs-core/link";
A payment splitter can be used for example to create a shared project donation address, ensuring that all payees receive the same amount
Sending lovelace to the contract works similarly to sending lovelace to any other address. The payout transaction can only be submitted by one of the payees, and the output addresses are restricted to the payees. The output sum must be equally divided to ensure the transaction is successful.
There are 2 actions (or endpoints) available to interact with this smart contract:
* Send Lovelace to Payment Splitter
* Trigger Payout
### Install package \[!toc]
First you can to install the `@meshsdk/contracts` package:
```tsx
npm install @meshsdk/contract
```
### Initialize the contract \[!toc]
To initialize the payment splitter, we need to initialize a provider, a `MeshTxBuilder`, and a `MeshPaymentSplitterContract`. Additionally, a list of payees is required to define the allowed payout addresses for the contract.
```tsx
import { MeshPaymentSplitterContract } from "@meshsdk/contract";
import { MeshTxBuilder } from "@meshsdk/core";
const provider = new BlockfrostProvider('');
const meshTxBuilder = new MeshTxBuilder({
fetcher: provider,
submitter: provider,
});
const contract = new MeshPaymentSplitterContract(
{
mesh: meshTxBuilder,
fetcher: provider,
wallet: wallet,
networkId: 0,
},
[
'addr_test1vpg334d6skwu6xxq0r4lqrnsjd5293n8s3d80em60kf6guc7afx8k',
'addr_test1vp4l2kk0encl7t7972ngepgm0044fu8695prkgh5vjj5l6sxu0l3p',
'addr_test1vqqnfs2vt42nq4htq460wd6gjxaj05jg9vzg76ur6ws4sngs55pwr',
'addr_test1vqv2qhqddxmf87pzky2nkd9wm4y5599mhp62mu4atuss5dgdja5pw',
]
);
```
Both on-chain and off-chain codes are open-source and available on Mesh Github Repository.
## Send Lovelace to Payment Splitter
`sendLovelaceToSplitter()` will lock Lovelace in the contract. The function accepts the following parameters:
* lovelaceAmount (number) - the amount of Lovelace you want to send to the contract
The function returns a transaction hash.
### Send Lovelace to Payment Splitter \[!toc]
Send Lovelace to the Payment Splitter contract to be distributed to the beneficiaries.
**Listing price in Lovelace**
`15000000`
```tsx
const tx = await contract.sendLovelaceToSplitter(15000000);
const signedTx = await wallet.signTx(tx);
const txHash = await wallet.submitTx(signedTx);
```
## Trigger Payout
`triggerPayout()` will split the locked amount equally among the list of payees. The function doesn't need any parameters.
The function returns a transaction hash if the payout has been done successfully.
### Trigger Payout \[!toc]
After the amount has been locked in the contract, you can trigger the payout to the payees.
```tsx
const tx = await contract.triggerPayout();
const signedTx = await wallet.signTx(tx, true);
const txHash = await wallet.submitTx(signedTx);
```
# NFT Minting Machine
URL: /smart-contracts/plutus-nft
Mint NFT that ensure the token name is incremented by a counter
***
title: "NFT Minting Machine"
description: "Mint NFT that ensure the token name is incremented by a counter"
icon: PhotoIcon
---------------
import Link from "fumadocs-core/link";
This NFT minting script enables users to mint NFTs with an automatically incremented index, which increases by one for each newly minted NFT.
To facilitate this process, the first step is to set up a one-time minting policy by minting an oracle token. This oracle token is essential as it holds the current state and index of the NFTs, acting as a reference for the minting sequence.
With each new NFT minted, the token index within the oracle is incremented by one, ensuring a consistent and orderly progression in the numbering of the NFTs.
There are 3 actions available to interact with this smart contract:
* **Setup Oracle:** Mint one-time minting policy to set up the oracle
* **Mint Token:** Mint NFT that ensures the token name is incremented by a counter
* **Get Oracle Data:** Fetch the current oracle data to get the current NFT index and other information
### Install package \[!toc]
First you can to install the `@meshsdk/contracts` package:
```tsx
npm install @meshsdk/contract
```
Both on-chain and off-chain codes are open-source and available on Mesh Github Repository.
## Setup Oracle
First, we need to set up a one-time minting policy by minting an oracle token. This oracle token is essential as it holds the current state and index of the NFTs, acting as a reference for the minting sequence.
We need to provide 2 parameters to setup the oracle, the price of the NFT in lovelace and the collection name. The collection name is used when initializing `MeshPlutusNFTContract` which is used to derive the script CBOR. The price of the NFT in lovelace is used in `setupOracle()` function which will be added into the oracle token.
```tsx
const contract = new MeshPlutusNFTContract(
{
mesh: meshTxBuilder,
fetcher: provider,
wallet: wallet,
networkId: 0,
},
{
collectionName: 'collectionName', // your nft collection name
},
);
const { tx, paramUtxo } = await contract.setupOracle(15000000); // price in lovelace
```
The `setupOracle()` function will return a transaction CBOR and a `paramUtxo`. The `paramUtxo` will be used in the minting transaction of the NFT, so it is important to store it. Here is an example of the `paramUtxo`:
```tsx
{
"outputIndex": 0,
"txHash": "63dbd563ee9979574401599a42841e0d5b63a691af95df863cbf37d5cb44a558"
}
```
The transaction CBOR can be signed and submitted using the following code:
```tsx
const signedTx = await wallet.signTx(tx);
const txHash = await wallet.submitTx(signedTx);
```
### Setup Oracle \[!toc]
Mint one time minting policy to set up the oracle
**NFT Price in Lovelace**
`10000000`
**Collection Name**
`mesh`
```tsx
const meshTxBuilder = new MeshTxBuilder({
fetcher: provider,
submitter: provider,
verbose: true,
});
const contract = new MeshPlutusNFTContract(
{
mesh: meshTxBuilder,
fetcher: provider,
wallet: wallet,
networkId: 0,
},
{
collectionName: 'mesh',
},
);
const { tx, paramUtxo } = await contract.setupOracle(10000000);
const signedTx = await wallet.signTx(tx);
const txHash = await wallet.submitTx(signedTx);
```
## Mint Token
This NFT minting script enables users to mint NFTs with an automatically incremented index, which increases by one for each newly minted NFT.
To facilitate this process, you must provide the `paramUtxo` that contains the output index and transaction hash of the NFT minting policy.
```tsx
const contract = new MeshPlutusNFTContract(
{
mesh: meshTxBuilder,
fetcher: provider,
wallet: wallet,
networkId: 0,
},
{
collectionName: 'collectionName',
paramUtxo: {"outputIndex":0,"txHash":"63dbd563ee9979574401599a42841e0d5b63a691af95df863cbf37d5cb44a558"},
},
);
```
The `mintPlutusNFT()` function mints an NFT with asset metadata, which is a JSON object containing the NFT metadata. You can use the `getOracleData()` function to fetch the oracle data, which includes the current NFT index. This index will be helpful if you need to define the NFT name and its metadata. Here is an example of the how we can define the asset metadata:
```tsx
const oracleData = await contract.getOracleData();
const assetMetadata = {
...demoAssetMetadata,
name: `Mesh Token ${oracleData.nftIndex}`,
};
```
The `mintPlutusNFT()` function will return a transaction object that can be signed and submitted using the following code:
```tsx
const tx = await contract.mintPlutusNFT(assetMetadata);
const signedTx = await wallet.signTx(tx);
const txHash = await wallet.submitTx(signedTx);
```
### Mint Token \[!toc]
Mint an NFT with asset metadata
**Collection Name**
`mesh`
**Param UTxO**
`{"outputIndex":0,"txHash":"63dbd563ee9979574401599a...37d5cb44a558"}`
```tsx
const meshTxBuilder = new MeshTxBuilder({
fetcher: provider,
submitter: provider,
verbose: true,
});
const contract = new MeshPlutusNFTContract(
{
mesh: meshTxBuilder,
fetcher: provider,
wallet: wallet,
networkId: 0,
},
{
collectionName: 'mesh',
paramUtxo: {"outputIndex":0,"txHash":"63dbd563ee9979574401599a42841e0d5b63a691af95df863cbf37d5cb44a558"},
},
);
// Get Oracle Data
const oracleData = await contract.getOracleData(); // see getOracleData()
// define your NFT metadata here
const assetMetadata = {
...demoAssetMetadata,
name: `Mesh Token ${oracleData.nftIndex}`,
};
const tx = await contract.mintPlutusNFT(assetMetadata);
const signedTx = await wallet.signTx(tx);
const txHash = await wallet.submitTx(signedTx);
```
## Get Oracle Data
Getting the oracle data is essential to fetch the current NFT index.
To facilitate this process, you must provide the `paramUtxo` that contains the output index and transaction hash of the NFT minting policy.
```tsx
const contract = new MeshPlutusNFTContract(
{
mesh: meshTxBuilder,
fetcher: provider,
wallet: wallet,
networkId: 0,
},
{
collectionName: 'collectionName',
paramUtxo: {"outputIndex":0,"txHash":"63dbd563ee9979574401599a42841e0d5b63a691af95df863cbf37d5cb44a558"},
},
);
```
The `getOracleData()` function will return the current oracle data.
```tsx
const oracleData = await contract.getOracleData();
```
### Get Oracle Data \[!toc]
Fetch the current oracle data to get the current NFT index and other information
**Collection Name**
`mesh`
**Param UTxO**
`{"outputIndex":0,"txHash":"63dbd563ee9979574401599a...37d5cb44a558"}`
```tsx
const meshTxBuilder = new MeshTxBuilder({
fetcher: provider,
submitter: provider,
verbose: true,
});
const contract = new MeshPlutusNFTContract(
{
mesh: meshTxBuilder,
fetcher: provider,
wallet: wallet,
networkId: 0,
},
{
collectionName: 'mesh',
paramUtxo: {"outputIndex":0,"txHash":"63dbd563ee9979574401599a42841e0d5b63a691af95df863cbf37d5cb44a558"},
},
);
// Get Oracle Data
const oracleData = await contract.getOracleData();
```
# Swap
URL: /smart-contracts/swap
Swap contract facilitates the exchange of assets between two parties
***
title: "Swap"
description: "Swap contract facilitates the exchange of assets between two parties"
icon: ArrowsRightLeftIcon
-------------------------
import Link from "fumadocs-core/link";
Swap contract facilitates the exchange of assets between two parties. This contract is designed to be used in a peer-to-peer exchange scenario where two parties agree to exchange assets. The contract ensures that the assets are locked up until it is accepted by the other party. At any point before it is accepted, one can cancel the swap to retrieve the assets.
There are 2 actions (or endpoints) available to interact with this smart contract:
* initiate swap
* accept asset
* cancel swap
### Install package \[!toc]
First you can to install the `@meshsdk/contracts` package:
```tsx
npm install @meshsdk/contract
```
### Initialize the contract \[!toc]
To initialize the payment splitter, we need to initialize a provider, `MeshTxBuilder` and `MeshSwapContract`.
```tsx
import { MeshSwapContract } from "@meshsdk/contract";
import { MeshTxBuilder } from "@meshsdk/core";
const provider = new BlockfrostProvider('');
const meshTxBuilder = new MeshTxBuilder({
fetcher: provider,
submitter: provider,
});
const contract = new MeshSwapContract({
mesh: meshTxBuilder,
fetcher: provider,
wallet: wallet,
networkId: 0,
});
```
Both on-chain and off-chain codes are open-source and available on Mesh Github Repository.
## Initiate Swap
User A can initiate a swap by providing assets to the swap contract.
`initiateSwap()` initiate a swap. The function accepts the following parameters:
* toProvide (Asset\[]) - a list of assets user A is trading
* toReceive (Asset\[]) - a list of assets user A is expecting to receive from another user
Note that the parameters are arrays, so you can provide multiple assets to the swap, and these assets can be tokens and lovelace.
### Initiate Swap \[!toc]
Initiate a swap by defining the assets for the swap contract
**Amount lovelace to give**
`10000000`
**Asset to receive**
`d9312da562da182b02322fd8acb536f37eb9d29fba7c49dc172555274d657368546f6b656e`
```tsx
const assetToProvide: Asset = {
unit: "lovelace",
quantity: '10000000',
};
const assetToReceive: Asset = {
unit: 'd9312da562da182b02322fd8acb536f37eb9d29fba7c49dc172555274d657368546f6b656e',
quantity: "1",
};
const tx = await contract.initiateSwap([assetToProvide], [assetToReceive]);
const signedTx = await wallet.signTx(tx);
const txHash = await wallet.submitTx(signedTx);
```
## Accept Swap
User B can accept a swap by providing the swap transaction hash to the contract.
`acceptSwap()` accept a swap. The function accepts the following parameters:
* swapUtxo (UTxO) - the utxo of the transaction in the script for the swap
The function accepts a swap transaction hash and returns a transaction hash if the swap is successfully accepted.
A successful transaction will send the assets to the wallet that signed the transaction to accept the swap.
### Accept Swap \[!toc]
Accept a swap by providing the assets to the swap contract
**Tx hash**
`Tx hash`
```tsx
const utxo = await contract.getUtxoByTxHash('');
const tx = await contract.acceptSwap(utxo);
const signedTx = await wallet.signTx(tx);
const txHash = await wallet.submitTx(signedTx);
```
## Cancel Swap
Any any time before swap is accepted, user A can cancel the swap.
`cancelSwap()` cancel a swap. The function accepts the following parameters:
* swapUtxo (UTxO) - the utxo of the transaction in the script for the swap
The function accepts a swap transaction hash and returns a transaction hash if the swap is successfully canceled.
### Cancel Swap \[!toc]
Cancel a swap to get your funds back
**Tx hash**
`Tx hash`
```tsx
const utxo = await contract.getUtxoByTxHash('');
const tx = await contract.cancelSwap(utxo);
const signedTx = await wallet.signTx(tx);
const txHash = await wallet.submitTx(signedTx);
```
# Vesting
URL: /smart-contracts/vesting
Locks up funds and allows the beneficiary to withdraw the funds after the lockup period
***
title: "Vesting"
description: "Locks up funds and allows the beneficiary to withdraw the funds after the lockup period"
icon: LockClosedIcon
--------------------
import Link from "fumadocs-core/link";
When a new employee joins an organization, they typically receive a promise of compensation to be disbursed after a specified duration of employment. This arrangement often involves the organization depositing the funds into a vesting contract, with the employee gaining access to the funds upon the completion of a predetermined lockup period. Through the utilization of vesting contracts, organizations establish a mechanism to encourage employee retention by linking financial rewards to tenure.
There are 2 actions (or endpoints) available to interact with this smart contract:
* deposit asset
* withdraw asset
### Install package \[!toc]
First you can to install the `@meshsdk/contracts` package:
```tsx
npm install @meshsdk/contract
```
### Initialize the contract \[!toc]
To initialize the contract, we need to initialize a provider, `MeshTxBuilder` and `MeshVestingContract`.
```tsx
import { MeshVestingContract } from "@meshsdk/contract";
import { MeshTxBuilder } from "@meshsdk/core";
const provider = new BlockfrostProvider('');
const meshTxBuilder = new MeshTxBuilder({
fetcher: provider,
submitter: provider,
});
const contract = new MeshVestingContract({
mesh: meshTxBuilder,
fetcher: provider,
wallet: wallet,
networkId: 0,
});
```
Both on-chain and off-chain codes are open-source and available on Mesh Github Repository.
## Deposit Fund
After the lockup period has expired, the beneficiary can withdraw the funds from the vesting contract.
`withdrawFund()` withdraw funds from a vesting contract. The function accepts the following parameters:
* vestingUtxo (UTxO) - unspent transaction output in the script
### Deposit Fund \[!toc]
Deposit funds into a vesting contract with a locking period for a beneficiary
**Amount in lovelace**
`5000000`
**Beneficiary address**
`addr_test1vpvx0sacufuypa2k4sngk7q40zc5c4npl337uusdh64kv0c7e4cxr`
```tsx
const assets: Asset[] = [
{
unit: "lovelace",
quantity: '5000000',
},
];
const lockUntilTimeStamp = new Date();
lockUntilTimeStamp.setMinutes(lockUntilTimeStamp.getMinutes() + 1);
const beneficiary = 'addr_test1vpvx0sacufuypa2k4sngk7q40zc5c4npl337uusdh64kv0c7e4cxr';
const tx = await contract.depositFund(
assets,
lockUntilTimeStamp.getTime(),
beneficiary,
);
const signedTx = await wallet.signTx(tx);
const txHash = await wallet.submitTx(signedTx);
```
## Withdraw Fund
After the lockup period has expired, the beneficiary can withdraw the funds from the vesting contract.
`withdrawFund()` withdraw funds from a vesting contract. The function accepts the following parameters:
* vestingUtxo (UTxO) - unspent transaction output in the script
A successful withdrawal will send the funds to the wallet that signed the transaction to withdraw the funds.
### Withdraw Fund \[!toc]
Withdraw funds from a vesting contract
**Tx hash**
`Tx hash`
```tsx
const utxo = await contract.getUtxoByTxHash('');
const tx = await contract.withdrawFund(utxo);
const signedTx = await wallet.signTx(tx, true);
const txHash = await wallet.submitTx(signedTx);
```
## Full Tutorial
Vesting contract is a smart contract that locks up funds for a period of time and allows the beneficiary to withdraw the funds after the lockup period. Usually, vesting contract defines a beneficiary who can be different from the original owner.
When a new employee joins an organization, they typically receive a promise of compensation to be disbursed after a specified duration of employment. This arrangement often involves the organization depositing the funds into a vesting contract, with the employee gaining access to the funds upon the completion of a predetermined lockup period. Through the utilization of vesting contracts, organizations establish a mechanism to encourage employee retention by linking financial rewards to tenure.
### On-Chain code \[!toc]
First, we define the datum's shape, as this datum serves as configuration and contains the different parameters of our vesting operation.
```tsx
pub type VestingDatum {
/// POSIX time in milliseconds, e.g. 1672843961000
lock_until: Int,
/// Owner's credentials
owner: ByteArray,
/// Beneficiary's credentials
beneficiary: ByteArray,
}
```
In this example, we define a `VestingDatum` that contains the following fields:
* `lock_until`: The POSIX timestamp in milliseconds until which the funds are locked.
* `owner`: The credentials (public key hash) of the owner of the funds.
* `beneficiary`: The credentials (public key hash) of the beneficiary of the funds.
This datum can be found in `aiken-vesting/aiken-workspace/lib/vesting/types.ak`.
Next, we define the spend validator.
```tsx
use aiken/transaction.{ScriptContext, Spend}
use vesting/types.{VestingDatum}
use vodka_extra_signatories.{key_signed}
use vodka_validity_range.{valid_after}
validator {
pub fn vesting(datum: VestingDatum, _redeemer: Data, ctx: ScriptContext) {
// In principle, scripts can be used for different purpose (e.g. minting
// assets). Here we make sure it's only used when 'spending' from a eUTxO
when ctx.purpose is {
Spend(_) -> or {
key_signed(ctx.transaction.extra_signatories, datum.owner),
and {
key_signed(ctx.transaction.extra_signatories, datum.beneficiary),
valid_after(ctx.transaction.validity_range, datum.lock_until),
},
}
_ -> False
}
}
}
```
In this example, we define a `vesting` validator that ensures the following conditions are met:
* The transaction must be signed by owner
Or:
* The transaction must be signed by beneficiary
* The transaction must be valid after the lockup period
This validator can be found in `aiken-vesting/aiken-workspace/validators/vesting.ak`.
### How it works \[!toc]
The owner of the funds deposits the funds into the vesting contract. The funds are locked up until the lockup period expires.
Transactions can include validity intervals that specify when the transaction is valid, both from and until a certain time. The ledger verifies these validity bounds before executing a script and will only proceed if they are legitimate.
This approach allows scripts to incorporate a sense of time while maintaining determinism within the script's context. For instance, if a transaction has a lower bound `A`, we can infer that the current time is at least `A`.
It's important to note that since we don't control the upper bound, a transaction might be executed even 30 years after the vesting delay. However, from the script's perspective, this is entirely acceptable.
The beneficiary can withdraw the funds after the lockup period expires. The beneficiary can also be different from the owner of the funds.
### Testing \[!toc]
To test the vesting contract, we have provided the a comphrehensive test script,you can run tests with `aiken check`.
The test script includes the following test cases:
* success unlocking
* success unlocking with only owner signature
* success unlocking with beneficiary signature and time passed
* fail unlocking with only beneficiary signature
* fail unlocking with only time passed
We recommend you to check out `aiken-vesting/aiken-workspace/validators/tests/vesting.ak` to learn more.
### Compile and build script \[!toc]
To compile the script, run the following command:
```tsx
aiken build
```
This command will generate a CIP-0057 Plutus blueprint, which you can find in `aiken-vesting/aiken-workspace/plutus.json`.
## Off-Chain code \[!toc]
### Deposit funds \[!toc]
First, the owner can deposit funds into the vesting contract. The owner can specify the lockup period and the beneficiary of the funds.
```tsx
const assets: Asset[] = [
{
unit: "lovelace",
quantity: "10000000",
},
];
const lockUntilTimeStamp = new Date();
lockUntilTimeStamp.setMinutes(lockUntilTimeStamp.getMinutes() + 1);
const beneficiary =
"addr_test1qpvx0sacufuypa2k4sngk7q40zc5c4npl337uusdh64kv0uafhxhu32dys6pvn6wlw8dav6cmp4pmtv7cc3yel9uu0nq93swx9";
```
In this example, we deposit 10 ADA into the vesting contract. The funds are locked up for 1 minute, and the beneficiary is specified.
Then, we prepare a few variables to be used in the transaction. We get the wallet address and the UTXOs of the wallet. We also get the script address of the vesting contract, to send the funds to the script address. We also get the owner and beneficiary public key hashes.
```tsx
const { utxos, walletAddress } = await getWalletInfoForTx();
const { scriptAddr } = getScript();
const { pubKeyHash: ownerPubKeyHash } = deserializeAddress(walletAddress);
const { pubKeyHash: beneficiaryPubKeyHash } = deserializeAddress(beneficiary);
```
Next, we construct the transaction to deposit the funds into the vesting contract.
```tsx
const txBuilder = new MeshTxBuilder({
fetcher: provider,
submitter: provider,
});
await txBuilder
.txOut(scriptAddr, amount)
.txOutInlineDatumValue(
mConStr0([lockUntilTimeStampMs, ownerPubKeyHash, beneficiaryPubKeyHash])
)
.changeAddress(walletAddress)
.selectUtxosFrom(utxos)
.complete();
const unsignedTx = txBuilder.txHex;
```
In this example, we construct the transaction to deposit the funds into the vesting contract. We specify the script address of the vesting contract, the amount to deposit, and the lockup period, owner, and beneficiary of the funds.
Finally, we sign and submit the transaction.
```tsx
const signedTx = await wallet.signTx(unsignedTx);
const txHash = await wallet.submitTx(signedTx);
```
To execute this code, ensure you have defined blockfrost key in the `.env` file. You can also define your wallet mnemonic in `aiken-vesting/src/configs.ts` file.
You can run the following command execute the deposit funds code:
```tsx
npm run deposit
```
Upon successful execution, you will receive a transaction hash. Save this transaction hash for withdrawing the funds.
Example of a successful deposit transaction.
### Withdraw funds \[!toc]
After the lockup period expires, the beneficiary can withdraw the funds from the vesting contract. The owner can also withdraw the funds from the vesting contract.
First, let's look for the UTxOs containing the funds locked in the vesting contract.
```tsx
const txHashFromDesposit =
"ede9f8176fe41f0c84cfc9802b693dedb5500c0cbe4377b7bb0d57cf0435200b";
const utxos = await provider.fetchUTxOs(txHash);
const vestingUtxo = utxos[0];
```
In this example, we fetch the UTxOs containing the funds locked in the vesting contract. We specify the transaction hash of the deposit transaction.
Like before, we prepare a few variables to be used in the transaction. We get the wallet address and the UTXOs of the wallet. We also get the script address of the vesting contract, to send the funds to the script address. We also get the owner and beneficiary public key hashes.
```tsx
const { utxos, walletAddress, collateral } = await getWalletInfoForTx();
const { input: collateralInput, output: collateralOutput } = collateral;
const { scriptAddr, scriptCbor } = getScript();
const { pubKeyHash } = deserializeAddress(walletAddress);
```
Next, we prepare the datum and the slot number to set the transaction valid interval to be valid only after the slot.
```tsx
const datum = deserializeDatum(vestingUtxo.output.plutusData!);
const invalidBefore =
unixTimeToEnclosingSlot(
Math.min(datum.fields[0].int as number, Date.now() - 15000),
SLOT_CONFIG_NETWORK.preprod
) + 1;
```
In this example, we prepare the datum and the slot number to set the transaction valid interval to be valid only after the slot. We get the lockup period from the datum and set the transaction valid interval to be valid only after the lockup period.
Next, we construct the transaction to withdraw the funds from the vesting contract.
```tsx
const txBuilder = new MeshTxBuilder({
fetcher: provider,
submitter: provider,
});
await txBuilder
.spendingPlutusScriptV2()
.txIn(
vestingUtxo.input.txHash,
vestingUtxo.input.outputIndex,
vestingUtxo.output.amount,
scriptAddr
)
.spendingReferenceTxInInlineDatumPresent()
.spendingReferenceTxInRedeemerValue("")
.txInScript(scriptCbor)
.txOut(walletAddress, [])
.txInCollateral(
collateralInput.txHash,
collateralInput.outputIndex,
collateralOutput.amount,
collateralOutput.address
)
.invalidBefore(invalidBefore)
.requiredSignerHash(pubKeyHash)
.changeAddress(walletAddress)
.selectUtxosFrom(utxos)
.complete();
const unsignedTx = txBuilder.txHex;
```
In this example, we construct the transaction to withdraw the funds from the vesting contract. We specify the UTxO containing the funds locked in the vesting contract, the script address of the vesting contract, the wallet address to send the funds to, and the transaction valid interval.
Finally, we sign and submit the transaction. Notice that since we are unlocking fund from validator, partial sign has to be specified by passing a `true` parameter into `wallet.signTx`.
```tsx
const signedTx = await wallet.signTx(unsignedTx, true);
const txHash = await wallet.submitTx(signedTx);
```
To execute this code, update `aiken-vesting/src/withdraw-fund.ts` with the transaction hash from the deposit transaction. Ensure you have defined blockfrost key in the `.env` file. You can also define your wallet mnemonic in `aiken-vesting/src/configs.ts` file.
Run the following command:
```tsx
npm run withdraw
```
Example of a successful withdraw transaction.
# Solutions
URL: /solutions
Mesh provides a set of solutions to help you build blockchain applications
***
title: "Solutions"
description: "Mesh provides a set of solutions to help you build blockchain applications"
-----------------------------------------------------------------------------------------
import {metaSolutions} from "@/data/links-solutions";
import Link from "next/link";
import {
Card,
CardDescription,
CardTitle,
} from "@/components/ui/card";
# Getting Started with Svelte
URL: /svelte/getting-started
Svelte frontend components for wallet connections.
***
title: "Getting Started with Svelte"
description: "Svelte frontend components for wallet connections."
icon: RocketLaunchIcon
----------------------
import Link from "fumadocs-core/link";
## Setup
The fastest way to get started a new project with Svelte is to use the Mesh-CLI, which will scaffold a new project for you. To do this, run the following:
```tsx
npx meshjs your-app-name
```
During the installation process, you will be asked to choose a template. Choose the Svelte template. This will scaffold a new Svelte project with Mesh pre-installed.
To manually, install the Mesh Svelte package, run the following:
```tsx
npm install @meshsdk/svelte
```
Next, add the Mesh CSS to your application, doing so will apply the default styles to the components. You can add this in `+layout.svelte`.
```tsx
{@render children()}
```
## Connect Wallet
In order for apps to communicate with the user's wallet, we need a way to connect to their wallet.
Add `CardanoWallet` to allow the user to select a wallet to connect to your app. After the wallet is connected, see Browser Wallet for a list of CIP-30 APIs.
The signature for the `CardanoWallet` component is as follows:
```tsx
{
label?: string;
onConnected?: Function;
isDark?: boolean;
}
```
### Customization \[!toc]
For dark mode style, add isDark.
```tsx
```
For a custom label, add the label prop.
```tsx
```
The customization is limited. For more customization, you can easily build your own wallet connection component. You may also take reference from this component.
### onConnected \[!toc]
If you want to run a function after the wallet is connected, you can add the onConnected prop.
```tsx
export default function Page() {
function afterConnectedWallet() {
// do something
}
return (
<>
);
}
```
The above code will log "Hello, World!" to the console when the wallet is connected.
### Connect Wallet Component \[!toc]
Connect to user's wallet to interact with app
```tsx
```
## Get Wallet State
Obtain information on the current wallet's state, all fields on the `BrowserWalletState` JavaScript object are Svelte 5 runes, meaning when using the accessor, these values are reactive.
```tsx
```
`wallet` is a Browser Wallet instance, which expose all CIP wallets functions from getting assets to signing tranasction.
`connected`, a boolean, `true` if user's wallet is connected.
`name`, a string, the name of the connect wallet.
`connecting`, a boolean, `true` if the wallet is connecting and initializing.
### Wallet State \[!toc]
Get the current wallet's state
```tsx
```
# Svelte Components
URL: /svelte
Svelte UI components for wallet connections
***
title: "Svelte Components"
description: "Svelte UI components for wallet connections"
icon: ComputerDesktopIcon
-------------------------
import {linksSvelte} from "@/data/links-svelte";
import Link from "next/link";
import {
Card,
CardDescription,
CardTitle,
} from "@/components/ui/card";
# UI Components
URL: /svelte/ui-components
UI components to speed up your app development.
***
title: "UI Components"
description: "UI components to speed up your app development."
icon: PaintBrushIcon
--------------------
import Link from "fumadocs-core/link";
Mesh provide a collection of useful UI components, so you can easily include web3 functionality and convenient utilities for your application.
## Connect Wallet
In order for apps to communicate with the user's wallet, we need a way to connect to their wallet.
Add `CardanoWallet` to allow the user to select a wallet to connect to your app. After the wallet is connected, see Browser Wallet for a list of CIP-30 APIs.
The signature for the `CardanoWallet` component is as follows:
```tsx
{
label?: string;
onConnected?: Function;
isDark?: boolean;
}
```
### Customization \[!toc]
For dark mode style, add isDark.
```tsx
```
For a custom label, add the label prop.
```tsx
```
The customization is limited. For more customization, you can easily build your own wallet connection component. You may also take reference from this component.
### onConnected \[!toc]
If you want to run a function after the wallet is connected, you can add the onConnected prop.
```tsx
export default function Page() {
function afterConnectedWallet() {
// do something
}
return (
<>
);
}
```
The above code will log "Hello, World!" to the console when the wallet is connected.
### Connect Wallet Component \[!toc]
Connect to user's wallet to interact with app
```tsx
```
# Getting Started
URL: /yaci/getting-started
Set up Yaci Dev Kit and start the devnet
***
title: "Getting Started"
description: "Set up Yaci Dev Kit and start the devnet"
-------------------------------------------------------
import Link from "fumadocs-core/link";
## Mesh Hosted Yaci Devnet
### Connect right away with Yaci Provider \[!toc]
Mesh has a hosted Yaci Devnet that you can connect to right away. You can use the following URL to connect to the hosted Yaci Devnet:
```bash
https://yaci-node.meshjs.dev/api/v1/
```
### Import Yaci Provider \[!toc]
Import `YaciProvider` and start using it to interact with the Yaci Devnet.
```tsx
import { YaciProvider } from "@meshsdk/core";
const provider = new YaciProvider();
const params = await provider.fetchProtocolParameters();
console.log(params);
```
Learn more about Yaci Provider and learn more about hosted Yaci Devnet
## Set up your system to run Yaci Devkit
### Download and install Docker \[!toc]
You can download Docker from the official website. Docker is a platform for developers and sysadmins to develop, deploy, and run applications with containers.
Go to the Docker website and download the latest version, then follow the instructions to install it.
After installing, open the Docker Desktop app and make sure it's running in the background.
### Download the latest Yaci DevKit release \[!toc]
Go to Yaci releases on Github and download the latest release. Under `Assets`, you will find the `yaci-devkit-version.zip` file.
Extract the zip file to a folder on your system. This folder will be your Yaci DevKit root directory.
## Start a Yaci Devnet
Open a terminal and navigate to the Yaci DevKit root directory. Run the following command to start the DevKit containers and yaci-cli:
```bash
$ ./bin/devkit.sh start
```
### Start node \[!toc]
To create a new devnet, run the following command from yaci-cli:
```bash
yaci-cli:>create-node -o --start
```
To create a new devnet with Babbage era, run the following command from yaci-cli:
```bash
yaci-cli:>create-node -o --era babbage --start
```
To start a devnet with zero fees, run the following command from yaci-cli:
```bash
yaci-cli:>create-node -o --genesis-profile zero_fee --start
```
To start a devnet with 30 slots per epoch, run the following command from yaci-cli:
```bash
yaci-cli:>create-node -o -e 30 --start
```
After you have started your devnet, you can open Yaci Viewer from [http://localhost:5173](http://localhost:5173). Here you can view the blocks, transactions, and other details of the devnet.
If you want to configure the devnet, go to `config/node.properties`. And if you want to change settings and change default topup addreses, go to `config/env`.
You can use `YaciProvider` with the Yaci Store Api URL ([http://localhost:8080/api/v1](http://localhost:8080/api/v1)), to interact with the Yaci Devnet.
```tsx
import { YaciProvider } from "@meshsdk/core";
const provider = new YaciProvider('http://localhost:8080/api/v1/');
const params = await provider.fetchProtocolParameters();
console.log(params);
```
### Support external PostgreSQL database for indexer \[!toc]
By default, Yaci DevKit's indexer uses an embedded H2 database. With this update, you can also configure an external PostgreSQL database.
For Non-Docker distribution, edit config/application.properties and uncomment the following properties to set PostgreSQL database details:
```bash
yaci.store.db.url=jdbc:postgresql://:/?currentSchema=
yaci.store.db.username=user
yaci.store.db.password=password
```
For Docker distribution, edit config/env and uncomment the following properties:
```bash
yaci_store_db_url=jdbc:postgresql://:/?currentSchema=
yaci_store_db_username=user
yaci_store_db_password=password
```
## Useful commands
Here are some useful commands to interact with the Yaci DevKit.
### Topup ADA \[!toc]
After you have started your devnet, you can topup ADA in your wallet. To topup ADA in your wallet, run the following command from devnet:
```bash
devnet:default>topup
```
For example:
```bash
devnet:default>topup addr_test1qpvx0sacufuypa2k4sngk7q40zc5c4npl337uusdh64kv0uafhxhu32dys6pvn6wlw8dav6cmp4pmtv7cc3yel9uu0nq93swx9 1000
```
### Check UTXO \[!toc]
To check the UTXO of an address, run the following command from devnet:
```bash
devnet:default>utxos
```
For example:
```bash
devnet:default>utxos addr_test1qpvx0sacufuypa2k4sngk7q40zc5c4npl337uusdh64kv0uafhxhu32dys6pvn6wlw8dav6cmp4pmtv7cc3yel9uu0nq93swx9
```
### Default address info \[!toc]
You can get the default addresses of the devnet by running:
```bash
devnet:default> default-addresses
```
By default, wallet mnemonic is
```bash
test test test test test test test test test test test test test test test test test test test test test test test sauce
```
And it's address is
```bash
addr_test1qryvgass5dsrf2kxl3vgfz76uhp83kv5lagzcp29tcana68ca5aqa6swlq6llfamln09tal7n5kvt4275ckwedpt4v7q48uhex
```
### Stop Devnet and yaci-cli \[!toc]
To stop the devnet, run the following command from devnet:
```bash
devnet:default>exit
```
To stop yaci-cli, run the following command:
```bash
yaci-cli:>exit
```
To stop the DevKit containers, run the following command from the Yaci DevKit root directory:
```bash
./bin/devkit.sh stop
```
Sometimes you just want to reset the devnet and start from scratch. To do that, run:
```bash
devnet:default>reset
```
# Yaci
URL: /yaci
Customizable Cardano devnet for enabling faster iterations
***
title: "Yaci"
description: "Customizable Cardano devnet for enabling faster iterations"
icon: "icons/yaci.png"
----------------------
Custom Cardano devnet that can be created and reset in seconds using the user-friendly Yaci CLI. This allows for rapid iteration and experimentation, tailored to specific needs through flexible configuration options. The default devnet is optimized for speed, with customizable parameters for various testing scenarios. Integrated tools like the lightweight chain indexer Yaci Store and the browser-based Yaci Viewer enhance transaction building and submission. Yaci DevKit's compatibility with Blockfrost API endpoints ensures seamless integration with client SDKs.
import {linksYaci} from "@/data/links-yaci";
import Link from "next/link";
import {
Card,
CardDescription,
CardTitle,
} from "@/components/ui/card";
# Build Transactions
URL: /yaci/transactions
Building and submitting transactions on Yaci
***
title: "Build Transactions"
description: "Building and submitting transactions on Yaci"
-----------------------------------------------------------
## Import Yaci Provider
First, We import `YaciProvider`
```tsx
import { YaciProvider } from "@meshsdk/core";
const provider = new YaciProvider('', '');
```
By default, the `YaciProvider` will use the default URL, `https://yaci-node.meshjs.dev/api/v1/`. If you want to use a custom URL, you can pass it as a parameter.
In this example, we initialize the `YaciProvider` and fetch the UTxOs of an address.
You can topup ADA in your wallet by running the following command from devne in order to fetch the UTxOs of an address.
```bash
devnet:default>topup addr_test1qpvx0sacufuypa2k4sngk7q40zc5c4npl337uusdh64kv0uafhxhu32dys6pvn6wlw8dav6cmp4pmtv7cc3yel9uu0nq93swx9 1000
```
### Get UTxOs \[!toc]
Fetch UTxOs of an address. Note: your Yaci devnet must be running.
**Address**
`addr_test1qpvx0sacufuypa2k4sngk7q40zc5c4npl337...pmtv7cc3yel9uu0nq93swx9`
**Yaci URL**
`https://yaci-node.meshjs.dev/api/v1/`
```tsx
import { YaciProvider } from "@meshsdk/core";
const provider = new YaciProvider('https://yaci-node.meshjs.dev/api/v1/');
const utxos = await provider.fetchAddressUTxOs('addr_test1qpvx0sacufuypa2k4sngk7q40zc5c4npl337uusdh64kv0uafhxhu32dys6pvn6wlw8dav6cmp4pmtv7cc3yel9uu0nq93swx9');
```
## Basic Transaction
We import a wallet, for example `MeshWallet` with `YaciProvider` as the `fetcher` and `submitter`:
```tsx
const provider = new YaciProvider();
const wallet = new MeshWallet({
networkId: 0,
fetcher: provider,
submitter: provider,
key: {
type: "mnemonic",
words: demoMnemonic,
},
});
```
Next, we create a transaction and send 1 ADA to the recipient address.
```tsx
const tx = new Transaction({ initiator: wallet });
tx.sendLovelace('', "1000000");
const unsignedTx = await tx.build();
const signedTx = await wallet.signTx(unsignedTx);
const txHash = await wallet.submitTx(signedTx);
```
Note: for this transaction to work, you must have a Yaci devnet running and the wallet is funded. You can topup ADA in your wallet by running the following command from devnet:
```bash
devnet:default>topup addr_test1qryvgass5dsrf2kxl3vgfz76uhp83kv5lagzcp29tcana68ca5aqa6swlq6llfamln09tal7n5kvt4275ckwedpt4v7q48uhex 1000
```
### Get UTxOs \[!toc]
Fetch UTxOs of an address. Note: your Yaci devnet must be running.
**Recipient Address**
`addr_test1qryvgass5dsrf2kxl3vgfz76uhp83kv5lag...tal7n5kvt4275ckwedpt4v7q48uhex`
**Yaci URL**
`https://yaci-node.meshjs.dev/api/v1/`
```tsx
import { YaciProvider } from "@meshsdk/core";
const provider = new YaciProvider('https://yaci-node.meshjs.dev/api/v1/');
const utxos = await provider.fetchAddressUTxOs('addr_test1qryvgass5dsrf2kxl3vgfz76uhp83kv5lagzcp29tcana68ca5aqa6swlq6llfamln09tal7n5kvt4275ckwedpt4v7q48uhex');
```
# Data
URL: /apis/data
Useful utilities to parse and manipulate data
***
title: "Data"
icon: CircleStackIcon
description: "Useful utilities to parse and manipulate data"
------------------------------------------------------------
import {linksData} from "@/data/links-data";
import Link from "next/link";
import {
Card,
CardDescription,
CardTitle,
} from "@/components/ui/card";
# JSON Data
URL: /apis/data/json
Parse and manipulate data with JSON
***
title: "JSON Data"
description: "Parse and manipulate data with JSON"
icon: Bars3Icon
---------------
Mesh offers a full set of utility functions to help constructing the JSON data you need for your Web3 app, with the naming philosophy similar to Mesh `Data` type, with extra utilities mimicing the data type names in PlutusTx and Aiken.
**Types Support**
All the utilities are designed to return a type with the same naming as the utilities function, with capitalizing first letter, you can build your data in JSON with robust type supports, some examples:
* `constr` returns `Constr` type
* `integer` returns `Integer` type
* `byteString` returns `ByteString` type
## Utilities in Building Constructor Data in JSON
`conStr` build the constructor object, with parameters:
* constructor (number) - the constructor index
* fields (any\[]) - the constructor fields in array
There are also some quick utilities only taking in **fields** as parameters for 0 - 2 indices:
* `conStr0` - building index 0 constructor
* `conStr1` - building index 1 constructor
* `conStr2` - building index 2 constructor
### Constructor \[!toc]
Building JSON constructor object
```tsx
import { conStr } from "@meshsdk/core";
conStr(0, []);
```
## Utilities in Building Integer Data in JSON
`integer` build the integer object, with parameters:
* int (number | bigint) - the integer to be built
This utility is compatible for both number and bigint type, which allow big integer exceeding the JS precision limit.
**Aliases**
* `posixTime` - for the same functionality.
### Constructor \[!toc]
Building JSON integer object
**int** `1000000`
```tsx
import { integer } from "@meshsdk/core";
integer(1000000);
```
## Utilities in Building ByteString Data in JSON
`byteString` build the byte string object, with parameters:
* bytes (string) - the byte string in hex to be built, validation would be performed on whether the bytes is a valid hex string
**Aliases**
* `builtinByteString` - for the same functionality, for developers more familiar to the PlutusTx naming convention.
* `scriptHash` / `pubKeyHash` / `policyId` / `currencySymbol` / `assetName` / token\`Name - same building the byte string JSON but with further input validation.
### Constructor \[!toc]
Building JSON byteString object
**byteString**
`a0bd47e8938e7c41d4c1d7c22033892319d28f86fdace791d45c51946553791b`
```tsx
import { byteString } from "@meshsdk/core";
byteString("a0bd47e8938e7c41d4c1d7c22033892319d28f86fdace791d45c51946553791b");
```
## Utilities in Building Boolean Data in JSON
`bool` build the boolean object, with parameters:
* b (boolean | boolean) - the boolean to be built
### Constructor \[!toc]
Building JSON bool object
```tsx
import { bool } from "@meshsdk/core";
bool(true);
```
## Utilities in Building List Data in JSON
`list` build the list object, with parameters:
* pList (T\[]) - the list with items to be built. The items in the
* optional - validation (boolean) - indicate if the current data construction should perform basic validation of whether it is of typeobject (where all JSON data is in type of object)
### Constructor \[!toc]
Building JSON list object
```tsx
import { bool, byteString, integer, list } from "@meshsdk/core";
list([
byteString(
"a0bd47e8938e7c41d4c1d7c22033892319d28f86fdace791d45c51946553791b"
),
integer(1000000),
bool(false),
]);
```
## Utilities in Building Map Data in JSON
`assocMap` build the (associative) map object, with parameters:
* mapItems - (\[KeyType, ValueType]\[]) - the array of map item in JS tuple format (array of array).
* optional - validation (boolean) - indicate if the current data construction should perform basic validation of whether it is of typeobject (where all JSON data is in type of object)
### Constructor \[!toc]
Building JSON list object
```tsx
import { assocMap, byteString, integer } from "@meshsdk/core";
assocMap([
[byteString("aa"), integer(1000000)],
[byteString("bb"), integer(2000000)],
]);
```
## Other Utilities
The code example showing above does not cover all utilities, please checkout the hosted documentation for more details. The not covered utilities are as below:
* `assetClass`
* `outputReference`
* `txOutRef`
* `dict`
* `tuple`
* `maybeStakingHash`
* `pubKeyAddress`
* `scriptAddress`
# Mesh Data
URL: /apis/data/mesh
Parse and manipulate data with Mesh Data type
***
title: "Mesh Data"
description: "Parse and manipulate data with Mesh Data type"
icon: Bars2Icon
---------------
Mesh provides a full set of utility functions to help constructing the Mesh `Data` type you need for your Web3 app.
**Types Support**
All utility functions start with the prefix of m and all types All the utility functions start with the prefix of m, and are designed to return a type with the same naming as the utilities function, with capitalizing first letter, you can build your data with type supports in complex types, some examples:
* `mConstr` returns `MConstr` type
* `mBool` returns `MBool` type
## Utilities in Building Constructor Mesh Data
`mConStr` build the constructor object in Mesh `Data` type, with parameters:
* alternative (number) - the constructor index
* fields (any\[]) - the constructor fields in array
There are also some quick utilities only taking in **fields** as parameters for 0 - 2 indices:
* `mConStr0` - building index 0 constructor
* `mConStr1` - building index 1 constructor
* `mConStr2` - building index 2 constructor
### Constructor \[!toc]
Building Mesh constructor object
```tsx
import { mConStr } from "@meshsdk/core";
mConStr(0, []);
```
## Utilities in Building Primitives Mesh Data
`mBool` build the boolean object in , with parameters:
* b (boolean | boolean) - the boolean to be built
For the rest of data primitives, they are represented by JS primitives:
* Integer - `number` and `bigint`
* Byte string - `string`
* List - JS `Array`
* Map - JS `Map`
### Constructor \[!toc]
Building Mesh bool object
```tsx
import { mBool } from "@meshsdk/core";
mBool(true);
```
## Other Utilities
The code example showing above does not cover all utilities, please checkout the hosted documentation for more details. The not covered utilities are as below:
* `mAssetClass`
* `mOutputReference`
* `mTxOutRef`
* `mTuple`
* `mMaybeStakingHash`
* `mPubKeyAddress`
* `mScriptAddress`
# Data Overview
URL: /apis/data/overview
Learn about the basics, and how Mesh handles Cardano data
***
title: "Data Overview"
description: "Learn about the basics, and how Mesh handles Cardano data"
icon: CircleStackIcon
---------------------
import Link from "fumadocs-core/link";
Parsing and converting data in Plutus is a common task when working with transactions. This page will show you how to do that.
## Use of Data in Cardano
Cardano data and information is usually communicated in `CBOR` encoding format, which can be decoded into `JSON` representation.
On top of the 2, Mesh also provides the `Data` type which get rids of unnecessary wrappers.
Mesh supports building data for your app in all 3 different formats.
* `Mesh` - the `Data` type
* `JSON`
* `CBOR`
## Mesh Data Type
Mesh `Data` type is best used when you want to quickly and easily compose your data types.
Learn more
## JSON Data Type
All Cardano data has the JSON representation, which is suitable for building Web3 app which needs frequent back and forth conversion between on-chain and off-chain code. Mesh also supports building data in JSON format with strong input validation support.
Learn more
## CBOR
CBOR is the lowest level representation of data in Cardano. Mesh provides endpoints to allow users to provide CBOR in providing data, which is the case for developers utilizing other serialization package other than mesh in part the application.
# Value
URL: /apis/data/value
Manipulate Value Easily
***
title: "Value"
description: "Manipulate Value Easily"
icon: Bars3Icon
---------------
We all know the pain of conducting `Value` operation in Cardano. Mesh provides a full set of value methods to help converting, operating, accessing and comparing Cardano data.
### Value Types Support
**Convertors**
Convertor functions provide utilities around round trip among Cardano onchain data and off chain `JSON` and `Data` type.
**Operators**
Operator functions provide utilities into performing value manipulation. They are useful in apps which check against value payment involving calculation in value.
**Accessor**
Accessor functions provide utilities in obtaining keys or values of the `Value` type.
**Comparator**
Comparator functions provide utilities in comparing different `Value`. It helps with offchain validation before using for transaction building.
## Convertor - converts assets into Cardano data Value in JSON
`value` converts assets into Cardano data Value in JSON with parameters:
* assets - Asset\[] to convert
### value \[!toc]
Converts assets into MeshValue with parameters - asset\[] e.g. ada value, simple token token, complex value.
```tsx
const val: Asset[] = [{ unit: "lovelace", quantity: "1000000" }];
const datum: Value = value(val);
const nameMap = dict([[byteString(""), integer(1000000)]]);
const valMap = dict>([[byteString(""), nameMap]]);
if (JSON.stringify(datum) === JSON.stringify(valMap)) {
return true;
```
## Convertor - converts assets into Cardano data Value in Mesh Data type
`mValue` converts assets into Cardano data value in Mesh Data type with parameters:
* assets - Asset\[] to convert
### mValue \[!toc]
Converts assets into MeshValue with parameters - asset\[] e.g. ada value, simple token token, complex value.
```tsx
const val: Asset[] = [{ unit: "lovelace", quantity: "1000000" }];
const datum: MValue = mValue(val);
const nameMap = new Map().set("", 1000000);
const valMap = new Map().set("", nameMap);
if (JSON.stringify(datum) === JSON.stringify(valMap)) {
return true;
```
## Convertor - converts assets into MeshValue with parameters - asset\[]
`fromAssets` converts assets into MeshValue with parameters:
* assets - the assets to convert
### fromAssets \[!toc]
Converts assets into MeshValue with parameters - asset\[] e.g. ada value, simple token token, complex value.
```tsx
import { MeshValue } from "@meshsdk/common";
const assets: Asset[] = [
{ unit: "c21d710605bb00e69f3c175150552fc498316d80e7efdb1b186db38c000643b04d65736820676f6f64", quantity: "100" },
{ unit: "lovelace", quantity: "10" },
];
const value = MeshValue.fromAssets(assets);
return value;
```
## Convertor - converts the MeshValue object into an array of Asset
`toAssets` Convert the MeshValue object into an array of Asset
### toAssets \[!toc]
Converts the MeshValue object into an array of Asset
```tsx
import { MeshValue } from "@meshsdk/common";
const val: Asset[] = [{ unit: "lovelace", quantity: "1000000" }];
const plutusValue: Value = value(val);
const assets: Asset[] = MeshValue.fromValue(plutusValue).toAssets();
return assets;
```
## Convertor - converts Value (the JSON representation of Cardano data Value) into MeshValue
`fromValue` Convert Value (the JSON representation of Cardano data Value) into MeshValue with parameters:
* plutusValue - the value to convert
### fromValue \[!toc]
Convert Value (the JSON representation of Cardano data Value) into MeshValue.
```tsx
import { MeshValue } from "@meshsdk/common";
const val: Asset[] = [{ unit: "lovelace", quantity: "1000000" }];
const plutusValue: Value = value(val);
const assets: Asset[] = MeshValue.fromValue(plutusValue).toAssets();
return assets;
```
## Convertor - converts the MeshValue object into Cardano data Value in Mesh Data type
`toData` Convert the MashValue object into Cardano data Value in Mesh Data type
### toData \[!toc]
Converts the MeshValue object into Cardano data Value in Mesh Data type
```tsx
import { MeshValue } from "@meshsdk/common";
const val: Asset[] = [
{
unit: "baefdc6c5b191be372a794cd8d40d839ec0dbdd3c28957267dc817001234",
quantity: "100",
},
{
unit: "baefdc6c5b191be372a794cd8d40d839ec0dbdd3c28957267dc817001234",
quantity: "200",
},
];
const plutusValue: Value = value(val);
const data = MeshValue.fromValue(plutusValue).toData();
const expected: MValue = mValue(val);
if (JSON.stringify(expected) === JSON.stringify(data)) {
return true;
```
## Convertor - converts the MeshValue object into a JSON representation of Cardano data Value
`toJSON` Converts the MeshValue object into a JSON representation of Cardano data Value
### toJSON \[!toc]
Converts the MeshValue object into a JSON representation of Cardano data Value
```tsx
import { MeshValue } from "@meshsdk/common";
const assets: Asset[] = [
{ unit: "lovelace", quantity: "1000000" },
{
unit: "c21d710605bb00e69f3c175150552fc498316d80e7efdb1b186db38c000643b04d65736820676f6f64",
quantity: "500",
},
];
const expectedValue = assocMap([
[currencySymbol(""), assocMap([[tokenName(""), integer(1000000)]])],
[
currencySymbol(
"c21d710605bb00e69f3c175150552fc498316d80e7efdb1b186db38c",
),
assocMap([[tokenName("000643b04d65736820676f6f64"), integer(500)]]),
],
]);
const meshValue = new MeshValue();
meshValue.toAssets = () => assets;
const jsonValue = meshValue.toJSON();
if (JSON.stringify(jsonValue) === JSON.stringify(expectedValue)) {
return true;
}
```
## Operator - add an asset to the Value class's value record with parameters - asset
`addAsset` Add an asset to the Value class's value record with parameters:
* asset - Asset to add
### addAsset \[!toc]
Add an asset to the Value class's value record with parameters - asset
```tsx
import { MeshValue } from "@meshsdk/common";
const value = new MeshValue();
const singleAsset: Asset = { unit: "baefdc6c5b191be372a794cd8d40d839ec0dbdd3c28957267dc817001234", quantity: "100" };
value.addAsset(singleAsset);
return value.value;
```
## Operator - add an array of assets to the Value class's value record with parameters - assets
`addAssets` Add an array of assets to the Value class's value record with parameters:
* assets - Asset\[] to add
### addAssets \[!toc]
Add an array of assets to the Value class's value record with parameters - assets
```tsx
import { MeshValue } from "@meshsdk/common";
const value = new MeshValue();
const assets: Asset[] = [
{ unit: "baefdc6c5b191be372a794cd8d40d839ec0dbdd3c28957267dc817001234", quantity: "100" },
{ unit: "lovelace", quantity: "10" },
{ unit: "baefdc6c5b191be372a794cd8d40d839ec0dbdd3c28957267dc817001234", quantity: "100" },
{ unit: "lovelace", quantity: "10" },
];
value.addAssets(assets);
return value.value;
```
## Operator - substract an asset from the Value class's value record with parameters - asset
`negateAsset` Substract an asset from the Value class's value record with parameters:
* asset - Asset to substract
### negateAsset \[!toc]
Substract an asset from the Value class's value record with parameters - asset
```tsx
import { MeshValue } from "@meshsdk/common";
const value = new MeshValue();
value.value = { lovelace: 10n };
value.negateAsset({ unit: "lovelace", quantity: "5" });
return value.value;
```
## Operator - substract an array of assets from the Value class's value record with parameters - assets
`negateAssets` Substract an array of assets from the Value class's value record with parameters:
* assets - Asset\[] to substract
### negateAssets \[!toc]
Substract an array of assets from the Value class's value record with parameters - assets
```tsx
const value = new MeshValue();
value.value = { lovelace: 20n, "baefdc6c5b191be372a794cd8d40d839ec0dbdd3c28957267dc817001234": 10n };
value.negateAssets([
{ unit: "lovelace", quantity: "5" },
{ unit: "baefdc6c5b191be372a794cd8d40d839ec0dbdd3c28957267dc817001234", quantity: "3" },
]);
return value.value;
```
## Operator - merge the given values with parameters - values
`merge` Merge the given values
* values - The other values to merge
## merge \[!toc]
Merge the given values with parameters - values
```tsx
const value1 = new MeshValue();
value1.value = { lovelace: 20n, "baefdc6c5b191be372a794cd8d40d839ec0dbdd3c28957267dc817001234": 10n };
const value2 = new MeshValue();
value2.value = { lovelace: 10n, "baefdc6c5b191be372a794cd8d40d839ec0dbdd3c28957267dc817001234": 5n };
return value1.merge(value2).value;
```
## Accessor - get the quantity of asset object per lovelace unit
`get` get the quantity of asset object per unit, with parameters
* unit - the unit to get the quantity of the assets e.g. lovelace
### get \[!toc]
Get the quantity of asset object per unit
```tsx
import { MeshValue } from "@meshsdk/common";
const value = new MeshValue({ lovelace: 20n });
value.get("lovelace");
return value;
```
## Accessor - get all asset units with no parameters needed
`units` get all asset units with no parameters (e.g. unit) needed
### units \[!toc]
Get all asset units with no parameters needed
```tsx
import { MeshValue } from "@meshsdk/common";
const value = new MeshValue({
lovelace: 20n,
"baefdc6c5b191be372a794cd8d40d839ec0dbdd3c28957267dc817001234": 10n,
});
return value.units();
```
## Comparator - check if the value is greater than or equal to another value with parameters - other
`geq` Check if the value is greater than or equal to another value with parameters:
* other - The MeshValue to compare against
### geq \[!toc]
Check if the value is greater than or equal to another value with parameters - other
```tsx
import { MeshValue } from "@meshsdk/common";
const value = new MeshValue({
lovelace: 20n,
c21d710605bb00e69f3c175150552fc498316d80e7efdb1b186db38c000643b04d65736820676f6f64: 10n,
});
const target = new MeshValue({
lovelace: 10n,
c21d710605bb00e69f3c175150552fc498316d80e7efdb1b186db38c000643b04d65736820676f6f64: 5n,
});
return value.geq(target);
```
## Comparator - check if the value is greater than or equal to another value with parameters - unit, other
`geqUnit` Check if the value is greater than or equal to another value with parameters:
* unit - The unit to compare
* other - The MeshValue to compare against
### geqUnit \[!toc]
Check if the value is greater than or equal to another value with parameters - unit, other
```tsx
import { MeshValue } from "@meshsdk/common";
const value = new MeshValue({
lovelace: 20n,
c21d710605bb00e69f3c175150552fc498316d80e7efdb1b186db38c000643b04d65736820676f6f64:
10n,
});
const target = new MeshValue({
lovelace: 10n,
c21d710605bb00e69f3c175150552fc498316d80e7efdb1b186db38c000643b04d65736820676f6f64:
5n,
});
const resultLovelace = value.geqUnit("lovelace", target);
const resultmockvalue = value.geqUnit(
"c21d710605bb00e69f3c175150552fc498316d80e7efdb1b186db38c000643b04d65736820676f6f64",
target,
);
return { resultLovelace, resultmockvalue };
}
```
## Comparator - check if the value is less than or equal to another value with parameters - other
`leq` Check if the value is less than or equal to another value with parameters:
* other - The MeshValue to compare against
### leq \[!toc]
Check if the value is less than or equal to another value with parameters - other
```tsx
import { MeshValue } from "@meshsdk/common";
const value = new MeshValue({
lovelace: 20n,
c21d710605bb00e69f3c175150552fc498316d80e7efdb1b186db38c000643b04d65736820676f6f64:
10n,
});
const target = new MeshValue({
lovelace: 30n,
c21d710605bb00e69f3c175150552fc498316d80e7efdb1b186db38c000643b04d65736820676f6f64:
15n,
});
return value.leq(target);
```
## Comparator - check if the specific unit of value is less than or equal to that unit of another value with parameters - unit, other
`leqUnit` Check if the specific unit of value is less than or equal to that unit of another value with parameters:
* unit - The unit to compare
* other - The MeshValue to compare against
### lequnit \[!toc]
Check if the specific unit of value is less than or equal to that unit of another value with parameters - unit, other
```tsx
import { MeshValue } from "@meshsdk/common";
const value = new MeshValue({
lovelace: 20n,
c21d710605bb00e69f3c175150552fc498316d80e7efdb1b186db38c000643b04d65736820676f6f64: 10n,
});
const target = new MeshValue({
lovelace: 30n,
c21d710605bb00e69f3c175150552fc498316d80e7efdb1b186db38c000643b04d65736820676f6f64: 15n,
});
const resultLovelace = value.leqUnit("lovelace", target);
const resultmockvalue = value.leqUnit(
"c21d710605bb00e69f3c175150552fc498316d80e7efdb1b186db38c000643b04d65736820676f6f64",
target,
);
return { resultLovelace, resultmockvalue };
```
## Comparator - check if the value is empty
`isEmpty` Check if the value is empty
### isEmpty \[!toc]
Check if the value is empty
```tsx
import { MeshValue } from "@meshsdk/common";
const value = new MeshValue();
return value.isEmpty();
```
# Parser Basics
URL: /apis/txparser/basics
Parse transactions and rebuild
***
title: "Parser Basics"
description: "Parse transactions and rebuild"
icon: PaperAirplaneIcon
-----------------------
import Link from "fumadocs-core/link";
The `TxParser` is a tool where you can parse the typical transaction CBOR hex back into the `MeshTxBuilderBody`. With such capability, you can proceed with rebuilding a transaction or examing the with unit testing frameworks.
In this page, we will cover how to initialize the `TxParser`.
## Initialize Tx Parser
To start parsing transaction, you need to first initialize `TxParser`:
```tsx
import { BlockfrostProvider, TxParser } from "@meshsdk/core";
import { CSLSerializer } from "@meshsdk/core-csl";
const fetcher = new BlockfrostProvider('');
const serializer = new CSLSerializer();
const txParser = new TxParser(serializer, fetcher);
```
There are 2 fields to pass in to initialized `TxParser`:
1. `serializer`: The serializer instance that will be used for parsing transaction
2. `fetcher` (optional): `TxParser` requires all input `UTxO` information provided since the transaction CBOR hex only preserves transaction hash and output index. When you are not providing all input `UTxO` information, the `fetcher` instance is used to fetch the missing `UTxO`
## Rebuild Transaction
To parse a transaction, you only need:
```tsx
const txBuilderBody = await txParser.parse(txHex, utxos);
```
With the parsed `txBuilderBody` in type `MeshTxBuilderBody`, you can proceed with adding / removing elements and rebuilding the transaction.
There are 2 necessary fields to pass in:
1. `txHex`: The transaction CBOR to be parsed
2. `providedUtxos`: The input information, for all inputs, reference inputs, and collateral. You can either construct it manually or obtain it from `fetcher`.
## Unit Testing Transaction
To unit test a transaction, you can parse the transaction and then convert the instance to `TxTester`:
```tsx
await txParser.parse(txHex, utxos);
const txTester = txParser.toTester();
```
The detailed testing APIs can be found in the documentation.
# Transaction Parser
URL: /apis/txparser
Parse transactions for testing and rebuilding
***
title: "Transaction Parser"
description: "Parse transactions for testing and rebuilding"
icon: MagnifyingGlassIcon
-------------------------
import {linksTxParser} from "@/data/links-txparser";
import Link from "next/link";
import {
Card,
CardDescription,
CardTitle,
} from "@/components/ui/card";
# Unit Testing Transaction
URL: /apis/txparser/txtester
Parse and test transactions with various options
***
title: "Unit Testing Transaction"
description: "Parse and test transactions with various options"
icon: ShieldCheckIcon
---------------------
The `TxParser` is a tool where you can parse the typical transaction CBOR hex back into the `MeshTxBuilderBody`. With such capability, you can proceed with rebuilding a transaction or examing the with unit testing frameworks.
In this page, we will cover how to initialize the `TxParser`.
## Initialize Tx Parser
To start parsing transaction, you need to first initialize `TxParser`:
```tsx
import { BlockfrostProvider, TxParser } from "@meshsdk/core";
import { CSLSerializer } from "@meshsdk/core-csl";
const fetcher = new BlockfrostProvider('');
const serializer = new CSLSerializer();
const txParser = new TxParser(serializer, fetcher);
```
There are 2 fields to pass in to initialized `TxParser`:
1. `serializer`: The serializer instance that will be used for parsing transaction
2. `fetcher` (optional): `TxParser` requires all input `UTxO` information provided since the transaction CBOR hex only preserves transaction hash and output index. When you are not providing all input `UTxO` information, the `fetcher` instance is used to fetch the missing `UTxO`
## Interpret Result
After performing the tests, you can interpret the results of the tests using the `success` and `errors` methods.
```tsx
const result = txTester.success();
console.log("Errors:", txTester.errors());
```
1. `success`: Return a boolean indicating if all tests are passed
2. `errors`: Show all the errors that occurred during the tests . If there are no errors, it will return an empty string.
## Testing Inputs
Testing inputs starts with locating the inputs you want to test. The filtering will not reset until the filtering methods are called again.
```tsx
txTester
.inputsAt(
"addr_test1qrs3jlcsapdufgagzt35ug3nncwl26mlkcux49gs673sflmrjfm6y2eu7del3pprckzt4jaal9s7w9gq5kguqs5pf6fq542mmq",
)
.inputsValue(
MeshValue.fromAssets([{ unit: "lovelace", quantity: "10000000000" }]),
)
```
There are multiple methods available to filter the inputs:
1. `allInputs`: not apply filters
2. `inputsAt`: filtering inputs with address
3. `inputsWith`: filtering inputs with token
4. `inputsWithPolicy`: filtering inputs with policy id
5. `inputsAtWith`: filtering inputs with address and token
6. `inputsAtWithPolicy`: filtering inputs with address and policy id
After applying filters, you can proceed with checking value:
1. `inputsValue`: Check the total value of the filtered inputs
## Testing Outputs
Testing outputs starts with locating the outputs you want to test. The filtering will not reset until the filtering methods are called again.
```tsx
txTester
.outputsAt(
"addr_test1qrs3jlcsapdufgagzt35ug3nncwl26mlkcux49gs673sflmrjfm6y2eu7del3pprckzt4jaal9s7w9gq5kguqs5pf6fq542mmq",
)
.outputsValue(
MeshValue.fromAssets([{ unit: "lovelace", quantity: "10000000000" }]),
)
.outputsInlineDatumExist(datumCbor);
```
There are multiple methods available to filter the outputs:
1. `allOutputs`: not apply filters
2. `outputsAt`: filtering outputs with address
3. `outputsWith`: filtering outputs with token
4. `outputsWithPolicy`: filtering outputs with policy id
5. `outputsAtWith`: filtering outputs with address and token
6. `outputsAtWithPolicy`: filtering outputs with address and policy id
After applying filters, you can proceed with checking value:
1. `outputsValue`: Check the total value of the filtered outputs
2. `outputsInlineDatumExist`: Check whether any one of the outputs contains inline datum (provided as CBOR)
## Testing Mints
Testing mints with below APIs:
```tsx
txTester
.tokenMinted(
"eab3a1d125a3bf4cd941a6a0b5d7752af96fae7f5bcc641e8a0b6762",
"",
1,
);
```
1. `tokenMinted`: Checks if a specific token is minted in the transaction.
2. `onlyTokenMinted`: Checks if a specific token is minted in the transaction and that it is the only mint.
3. `policyOnlyMintedToken`: Checks if a specific token is minted in the transaction, ensuring that it is the only mint for the given policy ID.
4. `checkPolicyOnlyBurn`: Checks if a specific policy ID is burned in the transaction, ensuring that it is the only minting (i.e. burning item).
## Testing Time
Testing time with below APIs:
```tsx
txTester
.validBefore(beforeTimestamp)
.validAfter(afterTimestamp);
```
1. `validAfter`: Checks if the transaction is valid after a specified timestamp.
2. `validBefore`: Checks if the transaction is valid before a specified timestamp.
## Testing Signature
Testing time with below APIs:
```tsx
txTester
.keySigned("fa5136e9e9ecbc9071da73eeb6c9a4ff73cbf436105cf8380d1c525c");
```
1. `keySigned`: Checks if a specific key is signed in the transaction.
2. `oneOfKeysSigned`: Checks if any one of the specified keys is signed in the transaction.
3. `allKeysSigned`: Checks if all specified keys are signed in the transaction.
# Blueprints
URL: /apis/utilities/blueprints
Blueprints for script with either apply parameters or no parameters
***
title: "Blueprints"
description: "Blueprints for script with either apply parameters or no parameters"
icon: DocumentTextIcon
----------------------
import Link from "fumadocs-core/link";
In Mesh, we have in built `Blueprint` utility classes to help manipulating serialization and deserialization logic around Cardano smart contracts / validators. Now it is supporting the basic use case around 3 purposes - `Spending`,`Minting` and `Withdrawal`. You can either directly use the `Blueprint` utility classes imported from Mesh, or use the Cardano Bar from SIDAN Lab, which perform a comprehensive parsing of the CIP57 blueprint object into Mesh's type.
## Spending Script Blueprint
`SpendingBlueprint` is a class for handling spending blueprint particularly. You can provide `plutusVersion`, `networkId` and the potential `stakeKeyHash` for the spending validator address to initialized the class. After that, providing the `compiledCode` and parameters to finish the setup. The class then provide easy access to common script information:
* Script Hash
* Script Cbor
* Script Address
A Spending validator with no parameter, allows to provides only the `compiledCode` instead.
### Spending Script Blueprint - Apply parameter to script \[!toc]
Creates a spending script blueprint with apply parameter to script.
```tsx
import { SpendingBlueprint } from "@meshsdk/core";
const demoCompiledCode = "5906f401010032323232323232223225333005323232323253323300b3001300c37540042646464646464a66602260060022a66602860266ea8024540085854ccc044c01c00454ccc050c04cdd50048a8010b0b18089baa0081533300f30013010375400426464a64666024600860266ea80284c94ccc04cc014c050dd50008991919191919191919299980e1929998100008a5015333020302300114a22940cc88c8cc00400400c894ccc08c00452f5c026464a66604466ebcc048c090dd5180718121baa002005133026002330040040011330040040013027002302500137586018603c6ea8058c030c078dd51804180f1baa0091533301c001100214a02940cc00ccc008dd61802180e9baa01501a30063370666e08dd69803980e9baa00c018482827004cc008cc004dd61801980e1baa014300a301c3754016600a66e00dd69803180e1baa00b3330043756600c60386ea8c018c070dd5003a450048810022323300100100322533302000114bd6f7b63009991299980f99baf300f3021375400400a2646660020020046eacc030c088dd50019112999812801080089919980200218148019991191980080080291299981500089981599bb037520086e9800d2f5bded8c0264646464a66605666e400200084cc0bccdd81ba9008374c00e00a2a66605666e3c0200084c94ccc0b0c078c0b4dd500089981819bb037520126062605c6ea80040104010c94ccc0b14ccc0bc0045288a5014c0103d87a80001301b33030374c00297ae03233300100100800222253330310021001132333004004303500333223233001001005225333036001133037337606ea4010dd4001a5eb7bdb1804c8c8c8c94ccc0dccdc800400109981d99bb037520106ea001c01454ccc0dccdc7804001099299981c1815181c9baa00113303c337606ea4024c0f4c0e8dd5000802080219299981c18150008a60103d87a8000130273303c375000297ae03370000e00226607666ec0dd48011ba800133006006003375a60700066eb8c0d8008c0e8008c0e0004dd718180009bad3031001303300213302f337606ea4008dd3000998030030019bab302c003375c6054004605c00460580026eb8c090004dd5981280098138010800981100099801001181180091191980080099198008008019129998100008a5eb804c8ccc888c8cc00400400c894ccc098004400c4c8cc0a0dd3998141ba90063302830250013302830260014bd7019801801981500118140009bae301f00137566040002660060066048004604400244a66603e00229444c94ccc074c8cdc49bad3007001333008006375c601c0026eb8c028004dd618110010998018018008a5030220012301d301e301e00122232533301a3010301b37540022900009bad301f301c375400264a666034602060366ea8004530103d87a80001323300100137566040603a6ea8008894ccc07c004530103d87a80001323232325333020337220100042a66604066e3c0200084c03ccc090dd4000a5eb80530103d87a8000133006006003375a60420066eb8c07c008c08c008c084004c8cc004004010894ccc0780045300103d87a8000132323232533301f337220100042a66603e66e3c0200084c038cc08cdd3000a5eb80530103d87a8000133006006003375660400066eb8c078008c088008c08000494ccc058c02000452f5bded8c0264646600200297adef6c6022533301c00113301d337609801014000374c00697adef6c60132323232533301d33720910100002133021337609801014000374c00e00a2a66603a66e3d22100002133021337609801014000374c00e00626604266ec0dd48011ba6001330060060033756603c0066eb8c070008c080008c078004c8cc0040052f5bded8c044a66603600226603866ec13001014000375000697adef6c60132323232533301c33720910100002133020337609801014000375000e00a2a66603866e3d22100002133020337609801014000375000e00626604066ec0dd48011ba800133006006003375a603a0066eb8c06c008c07c008c0740048c068c06c004c060c054dd50008b19198008009bac30033015375401a44a66602e002298103d87a80001323253330163375e600c60306ea80080284c014cc0680092f5c026600800800260360046032002264a666026600a60286ea80044cc88c8cc00400400c894ccc068004528099299980c19b8f375c603a00400829444cc00c00c004c074004dd6180c180c980c980c980c980c980c980c980c980a9baa00d375c6030602a6ea800458c94ccc04cc014c050dd5000898011980b980c180a9baa0014bd700a60103d87a8000300230143754600460286ea800cdd2a40004602c002602860226ea800858dc3a4000602460260046022002601a6ea8008dc3a40042c601c601e004601a002601a0046016002600e6ea800452613656375a002ae6955ceaab9e5573eae815d0aba201";
// provide your staking part for the compiled address
const stakeHash = "9e8a6e5fcbbb5b84deefc71d7cb6319a3da9cc3d19765efb303647ef";
const blueprint = new SpendingBlueprint("V2", 0, stakeHash);
blueprint.paramScript(
demoCompiledCode,
mPubKeyAddress("aa048e4cc8a1e67e1d97ffbd4be614388014cbc2b2451527202943b6", "9d4dcd7e454d2434164f4efb8edeb358d86a1dad9ec6224cfcbce3e6")],
"Mesh" // Mesh data type
);
const scriptHash = blueprint.hash;
const scriptCbor = blueprint.cbor;
const scriptAddress = blueprint.address;
```
### Spending Script blueprint - no parameter to script \[!toc]
Creates a spending script blueprint with no parameter to script.
```tsx
const blueprint = new SpendingBlueprint("V2", 0 , stakeHash);
blueprint.noParamScript(demoCompiledCode);
const scriptHash = blueprint.hash;
const scriptCbor = blueprint.cbor;
const scriptAddress = bluePrint.address;
;
```
## Minting Script Blueprint
`MintingBlueprint` is a class for handling minting blueprint particularly. You can provide `plutusVersion`, for the minting validator to initialize the class. After that, providing the `compiledCode` and parameters to finish the setup. The class then provide easy access to common script information:
* Policy ID (i.e Script Hash)
* Script Cbor
A Minting validator with no parameter, allows to provides only the `compiledCode` instead.
### Minting Script Blueprint - Apply parameter to script \[!toc]
Creates a Minting script blueprint with apply parameter to script.
```tsx
const demoCompiledCode = "5906f401010032323232323232223225333005323232323253323300b3001300c37540042646464646464a66602260060022a66602860266ea8024540085854ccc044c01c00454ccc050c04cdd50048a8010b0b18089baa0081533300f30013010375400426464a64666024600860266ea80284c94ccc04cc014c050dd50008991919191919191919299980e1929998100008a5015333020302300114a22940cc88c8cc00400400c894ccc08c00452f5c026464a66604466ebcc048c090dd5180718121baa002005133026002330040040011330040040013027002302500137586018603c6ea8058c030c078dd51804180f1baa0091533301c001100214a02940cc00ccc008dd61802180e9baa01501a30063370666e08dd69803980e9baa00c018482827004cc008cc004dd61801980e1baa014300a301c3754016600a66e00dd69803180e1baa00b3330043756600c60386ea8c018c070dd5003a450048810022323300100100322533302000114bd6f7b63009991299980f99baf300f3021375400400a2646660020020046eacc030c088dd50019112999812801080089919980200218148019991191980080080291299981500089981599bb037520086e9800d2f5bded8c0264646464a66605666e400200084cc0bccdd81ba9008374c00e00a2a66605666e3c0200084c94ccc0b0c078c0b4dd500089981819bb037520126062605c6ea80040104010c94ccc0b14ccc0bc0045288a5014c0103d87a80001301b33030374c00297ae03233300100100800222253330310021001132333004004303500333223233001001005225333036001133037337606ea4010dd4001a5eb7bdb1804c8c8c8c94ccc0dccdc800400109981d99bb037520106ea001c01454ccc0dccdc7804001099299981c1815181c9baa00113303c337606ea4024c0f4c0e8dd5000802080219299981c18150008a60103d87a8000130273303c375000297ae03370000e00226607666ec0dd48011ba800133006006003375a60700066eb8c0d8008c0e8008c0e0004dd718180009bad3031001303300213302f337606ea4008dd3000998030030019bab302c003375c6054004605c00460580026eb8c090004dd5981280098138010800981100099801001181180091191980080099198008008019129998100008a5eb804c8ccc888c8cc00400400c894ccc098004400c4c8cc0a0dd3998141ba90063302830250013302830260014bd7019801801981500118140009bae301f00137566040002660060066048004604400244a66603e00229444c94ccc074c8cdc49bad3007001333008006375c601c0026eb8c028004dd618110010998018018008a5030220012301d301e301e00122232533301a3010301b37540022900009bad301f301c375400264a666034602060366ea8004530103d87a80001323300100137566040603a6ea8008894ccc07c004530103d87a80001323232325333020337220100042a66604066e3c0200084c03ccc090dd4000a5eb80530103d87a8000133006006003375a60420066eb8c07c008c08c008c084004c8cc004004010894ccc0780045300103d87a8000132323232533301f337220100042a66603e66e3c0200084c038cc08cdd3000a5eb80530103d87a8000133006006003375660400066eb8c078008c088008c08000494ccc058c02000452f5bded8c0264646600200297adef6c6022533301c00113301d337609801014000374c00697adef6c60132323232533301d33720910100002133021337609801014000374c00e00a2a66603a66e3d22100002133021337609801014000374c00e00626604266ec0dd48011ba6001330060060033756603c0066eb8c070008c080008c078004c8cc0040052f5bded8c044a66603600226603866ec13001014000375000697adef6c60132323232533301c33720910100002133020337609801014000375000e00a2a66603866e3d22100002133020337609801014000375000e00626604066ec0dd48011ba800133006006003375a603a0066eb8c06c008c07c008c0740048c068c06c004c060c054dd50008b19198008009bac30033015375401a44a66602e002298103d87a80001323253330163375e600c60306ea80080284c014cc0680092f5c026600800800260360046032002264a666026600a60286ea80044cc88c8cc00400400c894ccc068004528099299980c19b8f375c603a00400829444cc00c00c004c074004dd6180c180c980c980c980c980c980c980c980c980a9baa00d375c6030602a6ea800458c94ccc04cc014c050dd5000898011980b980c180a9baa0014bd700a60103d87a8000300230143754600460286ea800cdd2a40004602c002602860226ea800858dc3a4000602460260046022002601a6ea8008dc3a40042c601c601e004601a002601a0046016002600e6ea800452613656375a002ae6955ceaab9e5573eae815d0aba201";
const blueprint = new MintingBlueprint("V2");
blueprint.paramScript(
demoCompiledCode,
[mPubKeyAddress('aa048e4cc8a1e67e1d97ffbd4be614388014cbc2b2451527202943b6' , '9d4dcd7e454d2434164f4efb8edeb358d86a1dad9ec6224cfcbce3e6'), 100],
"Mesh"// Mesh data type
);
const policyId = blueprint.hash;
const scriptCbor = blueprint.cbor
```
### Minting Script blueprint - no parameter to script \[!toc]
Creates a Minting script blueprint with no parameter to script.
```tsx
const blueprint = new MintingBlueprint("V2");
blueprint.noParamScript(demoCompiledCode);
const policyId = bluePrint.hash
const scriptCbor = bluePrint.cbor
```
## Withdrawal Script Blueprint
`WithdrawalBlueprint` is a class for handling withdrawal blueprint particularly. You can provide `plutusVersion`, and `networkId` for the withdrawal validator to initialize the class. After that, providing the `compiledCode` and parameters to finish the setup. The class then provide easy access to common script information:
* Script Hash
* Script Cbor
* Reward Address
A withdrawal validator with no parameter, allows to provides only the `compiledCode` instead.
### Withdrawal Script Blueprint - Apply parameter to script \[!toc]
Creates a withdrawal script blueprint with apply parameter to script.
```tsx
import { WithdrawalBlueprint } from "@meshsdk/core";
const blueprint = new WithdrawalBlueprint("V2", 0);
blueprint.paramScript(
demoCompiledCode,
mPubKeyAddress('aa048e4cc8a1e67e1d97ffbd4be614388014cbc2b2451527202943b6', '9d4dcd7e454d2434164f4efb8edeb358d86a1dad9ec6224cfcbce3e6'), 100],
"Mesh", // Mesh Data type
)
const scripthash = blueprint.hash;
const scriptCbor = blueprint.cbor;
const rewardAddress = blueprint.address;
```
### Withdrawal Script blueprint - No parameter to script \[!toc]
Creates a withdrawal script blueprint with no parameter to script
```tsx
const blueprint = new WithdrawalBlueprint("V2" ,0);
blueprint.noParamScript(demoCompiledCode);
const scriptHash = bluerint.hash
const scriptCbor = bluerint.cbor
const rewardAddress = blueprint.address;
```
# Deserializers
URL: /apis/utilities/deserializers
Parse CBOR or bech32 into objects
***
title: "Deserializers"
description: "Parse CBOR or bech32 into objects"
icon: ArrowTurnRightUpIcon
--------------------------
## Deserialize Address
Deserialize bech32 address into payment and staking parts, with visibility of whether they are script or key hash.
### Deserialize Address \[!toc]
Convert bech32 address to The deserialized address object
**Address:** `addr_test1qpvx0...93swx9`
```tsx
deserializeAddress('addr_test1qpvx0sacufuypa2k4sngk7q40zc5c4npl337uusdh64kv0uafhxhu32dys6pvn6wlw8dav6cmp4pmtv7cc3yel9uu0nq93swx9');
```
## Deserialize Datum
Deserialize a datum from a CBOR string to JSON object.
### Deserialize Datum \[!toc]
Deserialize a datum from a CBOR string to JSON object
**Datum**
`167a4a048d87fcee0425ed200615ff2356f472c6413472c6106b8c5da52e3fd0`
```tsx
deserializeDatum('167a4a048d87fcee0425ed200615ff2356f472c6413472c6106b8c5da52e3fd0');
```
## Deserialize Pool Id
Deserialize a script from a pool id to Ed25519 key hash.
### Deserialize Pool Id \[!toc]
Deserialize a script from a pool id to Ed25519 key hash
**Pool Id**
`pool107k26e3wrqxwghju2py40ngngx2qcu48ppeg7lk0cm35jl2aenx`
```tsx
deserializePoolId('pool107k26e3wrqxwghju2py40ngngx2qcu48ppeg7lk0cm35jl2aenx');
```
# Utilities
URL: /apis/utilities
Serializers, resolvers and data types for converting between different formats.
***
title: "Utilities"
description: "Serializers, resolvers and data types for converting between different formats."
icon: WrenchScrewdriverIcon
---------------------------
import {linksUtilities} from "@/data/links-utilities";
import Link from "next/link";
import {
Card,
CardDescription,
CardTitle,
} from "@/components/ui/card";
# Resolvers
URL: /apis/utilities/resolvers
Converts between different formats.
***
title: "Resolvers"
description: "Converts between different formats."
icon: ArrowRightIcon
--------------------
import Link from "fumadocs-core/link";
## Resolve Private Key
Provide the mnemonic phrases and `resolvePrivateKey` will return a private key.
### Resolve Private Key \[!toc]
Convert mnemonic to private key
**Mnemonic**
```
[
"solution",
"solution",
"solution",
"solution",
"solution",
"solution",
"solution",
"solution",
"solution",
"solution",
"solution",
"solution",
"solution",
"solution",
"solution",
"solution",
"solution",
"solution",
"solution",
"solution",
"solution",
"solution",
"solution",
"solution"
]
```
```tsx
resolvePrivateKey(["solution","solution","solution","solution","solution","solution","solution","solution","solution","solution","solution","solution","solution","solution","solution","solution","solution","solution","solution","solution","solution","solution","solution","solution"]);
```
## Resolve Transaction Hash
Provide a `cborTx`, `resolveTxHash` will return the transaction hash. This hash is useful for creating chain transactions.
### Resolve Transaction Hash \[!toc]
Convert transaction cborTx to transaction hash
```tsx
const tx = new Transaction({ initiator: wallet });
tx.sendLovelace('addr_test1vpvx0sacufuypa2k4sngk7q40zc5c4npl337uusdh64kv0c7e4cxr', '1500000');
const unsignedTx = await tx.build();
const hash1 = resolveTxHash(unsignedTx);
const signedTx = await wallet.signTx(unsignedTx, false);
const hash2 = resolveTxHash(signedTx);
const txHash = await wallet.submitTx(signedTx);
// txHash == hash1 == hash2
```
## Resolve Data Hash
Converts datum into hash. Getting the hash is useful when you need to query for the UTXO that contain the assets you need for your transaction's input.
Explore Transaction to learn more about designing Datum, and learn how to query for UTXOs containing the datum hash.
### Resolve Data Hash \[!toc]
Convert datum into hash
**Datum:** `supersecretdatum`
```tsx
resolveDataHash('supersecretdatum');
```
## Resolve Native Script Hash
Converts NativeScript into hash.
### Resolve Native Script Hash \[!toc]
Convert NativeScript to hash
**Address**
`addr_test1vpvx0sacufuypa2k4sngk7q40zc5c4npl337uusdh64kv0c7e4cxr`
```tsx
const keyHash = resolvePaymentKeyHash('addr_test1vpvx0sacufuypa2k4sngk7q40zc5c4npl337uusdh64kv0c7e4cxr');
const nativeScript: NativeScript = {
type: "all",
scripts: [
{
type: "sig",
keyHash: keyHash,
},
],
};
resolveNativeScriptHash(nativeScript);
```
## Resolve Script Hash
`resolveScriptHash` will return a script hash. For example, this is useful when you want to convert a script to a policy ID.
### Resolve Script Hash \[!toc]
Convert script to hash (like policy ID)
**script address**
`8200581c5867c3b8e27840f556ac268b781578b14c5661fc63ee720dbeab663f`
```tsx
resolveScriptHash('8200581c5867c3b8e27840f556ac268b781578b14c5661fc63ee720dbeab663f')
```
## Resolve Stake Address
Provide a wallet address, and `resolveRewardAddress` will return a staking address in bech32 format.
### Resolve Stake Address \[!toc]
Convert wallet address to staking address
**Address**
`addr_test1qpvx0sacuf...swx9`
```tsx
resolveRewardAddress('addr_test1qpvx0sacufuypa2k4sngk7q40zc5c4npl337uusdh64kv0uafhxhu32dys6pvn6wlw8dav6cmp4pmtv7cc3yel9uu0nq93swx9');
```
## Resolve Fingerprint
Takes policy ID and asset name, and return asset fingerprint based on CIP-14.
## Resolve Asset Fingerprint \[!toc]
Convert asset policy ID and asset name to asset fingerprint.
**Policy ID**
`426117329844ccb3b0ba877220ff06a5bdf21eab3fb33e2f3a3f8e69`
**Asset Name**
`4d657368546f6b656e`
```tsx
resolveFingerprint(
'426117329844ccb3b0ba877220ff06a5bdf21eab3fb33e2f3a3f8e69',
'4d657368546f6b656e'
)
```
## Resolve Stake Key Hash
Provide a stake address, and `resolveStakeKeyHash` will return the pub key hash of the stake address. This key hash is useful for building the NativeScript.
## Resolve Stake Key Hash \[!toc]
Convert stake address to pub key hash
**Address**
`stake_test1uzw5mnt7g4xjgdqkfa80hrk7kdvds6sa4k0vvgjvlj7w8eskffj2n`
```tsx
resolveStakeKeyHash('stake_test1uzw5mnt7g4xjgdqkfa80hrk7kdvds6sa4k0vvgjvlj7w8eskffj2n');
```
## Resolve Rep Id
Resolve Rep Id from scrip hash.
### Resolve Rep Id \[!toc]
Resolve rep id from scrip hash
```tsx
let script: NativeScript = {
type: "all",
scripts: [
{
type: "sig",
keyHash: 'aa048e4cc8a1e67e1d97ffbd4be614388014cbc2b2451527202943b6'
},
],
};
resolveScriptHashDRepId(resolveNativeScriptHash(script));
```
## Resolve Epoch Number
With `resolveEpochNo`, you can get the current epoch with:
```tsx
import { resolveEpochNo } from '@meshsdk/core';
const epoch = resolveEpochNo('preprod');
```
You can also provide date in `milliseconds` to get epoch in the past or the future. For example, get the epoch 1 year from now:
```tsx
import { resolveEpochNo } from '@meshsdk/core';
let oneYearFromNow = new Date();
oneYearFromNow.setFullYear(oneYearFromNow.getFullYear() + 1);
const epoch = resolveEpochNo('preprod', oneYearFromNow.getTime());
```
### Resolve Epoch number \[!toc]
Get the epoch number for the network
**Select network**
`preprod`
```tsx
resolveEpochNo('preprod');
```
### Resolve Epoch number 1 year from now \[!toc]
Get the epoch number for the network 1 year from now
**Select network**
`preprod`
```tsx
let oneYearFromNow = new Date()
oneYearFromNow.setFullYear(oneYearFromNow.getFullYear() + 1);
resolveEpochNo(userInput, oneYearFromNow.getTime());
```
## Resolve Slot Number
With `resolveSlotNo`, you can get the current slot number with:
```tsx
import { resolveSlotNo } from '@meshsdk/core';
const slot = resolveSlotNo('preprod');
```
You can also provide date in `milliseconds` to get slots in the past or the future. For example, get the slot number 1 year from now:
```tsx
import { resolveSlotNo } from '@meshsdk/core';
let oneYearFromNow = new Date();
oneYearFromNow.setFullYear(oneYearFromNow.getFullYear() + 1);
const slot = resolveSlotNo('preprod', oneYearFromNow.getTime());
```
### Resolve Slot number \[!toc]
Get the Slot number for the network
**Select network**
`preprod`
```tsx
resolveSlotNo('preprod');
```
### Resolve Slot number 1 year from now \[!toc]
Get the Slot number for the network 1 year from now
**Select network**
`preprod`
```tsx
let oneYearFromNow = new Date()
oneYearFromNow.setFullYear(oneYearFromNow.getFullYear() + 1);
resolveSlotNo(userInput, oneYearFromNow.getTime());
```
# Serializers
URL: /apis/utilities/serializers
Encode objects into CBOR or bech32 format.
***
title: "Serializers"
description: "Encode objects into CBOR or bech32 format."
icon: ArrowTurnRightDownIcon
----------------------------
import Link from "fumadocs-core/link";
In smart contract manipulations, serialization is a crucial process that encode data structures or objects into a format that can be easily stored or transmitted and later reconstructed. Below are utilities to help serialize various Cardano smart contracts components.
## Serialize Native Script
The function `serializeNativeScript` allows you to provide the `nativeScript` with an option of `networkId` and `stakeCredentialHash`, returns:
* Bech32 address
* Script Cbor
This example demonstrates how to derive the native script from the `pubKeyHash` with the `deserializeAddress` then serialize the native script to a bech32 address and script Cbor. To read more on deserializeAddress.
### Serialize Native Script \[!toc]
Serialize Native script into bech32 address
```tsx
import {
serializeNativeScript,
NativeScript,
deserializeAddress
} from "@meshsdk/core";
const { pubKeyHash: keyHash } = deserializeAddress(
'addr_test1qpvx0sacufuypa2k4sngk7q40zc5c4npl337uusdh64kv0uafhxhu32dys6pvn6wlw8dav6cmp4pmtv7cc3yel9uu0nq93swx9',
);
const nativeScript: NativeScript = {
type: "all",
scripts: [
{
type: "before",
slot: "99999999",
},
{
type: "sig",
keyHash: keyHash,
},
],
};
serializeNativeScript(nativeScript);
```
## Serialize Plutus Script
The function `serializePlutusScript` allows you to provide the `plutusScript` with an option of `networkId` and `stakeCredentialHash`, returns:
* Bech32 address
This example demonstrates how to derive and serialize a plutus script into a bech32 address.
### Serialize Plutus Script \[!toc]
Serialize Plutus script into bech32 address
```tsx
import { PlutusScript, serializePlutusScript } from "@meshsdk/core";
const plutusScript: PlutusScript = {
code: demoPlutusAlwaysSucceedScript,
version: "V2",
};
serializePlutusScript(plutusScript);
```
## Serialize Address Object
Serialize address in Cardano data JSON format into bech32 address with `serializeAddressObj()`.
First you need to create an address object with `pubKeyAddress()` or `scriptAddress()`.
`pubKeyAddress()` accepts the following parameters:
```tsx
pubKeyAddress(
bytes: string,
stakeCredential?: string,
isStakeScriptCredential?: boolean
): PubKeyAddress
```
`scriptAddress()` accepts the following parameters:
```tsx
scriptAddress(
bytes: string,
stakeCredential?: string,
isStakeScriptCredential?: boolean
): ScriptAddress
```
`serializeAddressObj()` accepts the following parameters:
```tsx
serializeAddressObj(
address: PubKeyAddress | ScriptAddress,
networkId?: number
): string
```
### Serialize Address Object \[!toc]
Serialize address in Cardano data JSON format into bech32 address
```tsx
import { pubKeyAddress, serializeAddressObj } from "@meshsdk/core";
const address = pubKeyAddress(
'aa048e4cc8a1e67e1d97ffbd4be614388014cbc2b2451527202943b6',
'9d4dcd7e454d2434164f4efb8edeb358d86a1dad9ec6224cfcbce3e6'
);
serializeAddressObj(address, 1);
```
# Transaction Basics
URL: /apis/txbuilder/basics
Working with transactions and its various options
***
title: "Transaction Basics"
description: "Working with transactions and its various options"
icon: PaperAirplaneIcon
-----------------------
import Link from 'fumadocs-core/link';
In the code snippet, you will find `txBuilder`, which is an instance of `MeshTxBuilder`, with powerful low-level APIs that allow you to build transactions. Here's how to initialize **MeshTxBuilder**.
```tsx
const txBuilder = new MeshTxBuilder({
fetcher: provider, // get a provider https://meshjs.dev/providers
verbose: true,
});
```
The `MeshTxBuilder` is a powerful interface where the higher level `Transaction` class is indeed a pre-built combination of the `MeshTxBuilder` APIs. With these lower level APIs, it builds the object to be passing to the serialization libraries like `cardano-sdk` and `Whisky SDK` to construct transactions.
In this page, we will cover how to initialize the `MeshTxBuilder` and the basic operations of building a transaction.
## Initialize Tx Builder
To start building a customized transaction, you need to first initialize `MeshTxBuilder`:
```tsx
import { BlockfrostProvider, MeshTxBuilder } from "@meshsdk/core";
const provider = new BlockfrostProvider('');
const txBuilder = new MeshTxBuilder({
fetcher: provider,
verbose: true,
});
```
The `MeshTxBuilder` instance has the following signature:
```tsx
{
fetcher?: IFetcher;
submitter?: ISubmitter;
evaluator?: IEvaluator;
serializer?: IMeshTxSerializer;
isHydra?: boolean;
params?: Partial;
verbose?: boolean;
}
```
There are 6 optional fields to pass in when initializing a new instance:
* `serializer`: The default serializer is `CSLSerializer`. You can pass in your own serializer instance.
* `fetcher`: When you build the transaction without sufficient fields as required by the serialization library, we would index the blockchain to fill the information for you. Affected APIs are `txIn`, `txInCollateral`, `spendingTxInReference`.
* `submitter`: It is used if you would like to use the `submitter` submitTx API directly from the instance.
* `evaluator`: It would perform redeemer execution unit optimization, returning error message in case of invalid transaction.
* `isHydra`: Use another set of default protocol parameters for building transactions.
* `params`: You can pass in the protocol parameters directly.
* `verbose`: Set to `true` to enable verbose logging.
## Send Value
Sending value with `MeshTxBuilder` is done using the `.txOut()` endpoint:
```tsx
.txOut(address: string, amount: Asset[])
```
To send value in a transaction, you must first fund it. There are 2 ways:
* Specifying which input to spend
```tsx
.txIn(txHash: string, txIndex: number, amount?: Asset[], address?: string)
```
* Providing an array of UTxOs, and perform auto UTxO selection:
```tsx
.selectUtxosFrom(extraInputs: UTxO[])
```
Since the input and output values might not be the same, we have to specify the address (usually the wallet's own address) to receive the change:
```tsx
.changeAddress(addr: string)
```
The following shows a simple example of building a transaction to send values with UTxO selection:
```tsx
txBuilder
.txOut(address, [{ unit: "lovelace", quantity: amount }])
.changeAddress(changeAddress)
.selectUtxosFrom(utxos)
.complete();
```
### Send Value \[!toc]
Send assests to a recipient
**Address**: `addr_test1vpvx0sacufuypa2k4sngk7q40zc5c4npl337uusdh64kv0c7e4cxr`
**Amount**: `1000000`
```tsx
const utxos = await wallet.getUtxos();
const changeAddress = await wallet.getChangeAddress();
const txBuilder = new MeshTxBuilder({
fetcher: provider, // get a provider https://meshjs.dev/providers
verbose: true,
});
const unsignedTx = await txBuilder
.txOut('addr_test1vpvx0sacufuypa2k4sngk7q40zc5c4npl337uusdh64kv0c7e4cxr', [{ unit: "lovelace", quantity: '1000000' }])
.changeAddress(changeAddress)
.selectUtxosFrom(utxos)
.complete();
const signedTx = await wallet.signTx(unsignedTx);
const txHash = await wallet.submitTx(signedTx);
```
## Multi-signature Transaction
The main idea of a multi-signature (multisig) transaction is to have multiple signatures to authorize a transaction.
```tsx
const txBuilder = new MeshTxBuilder({
fetcher: provider, // get a provider https://meshjs.dev/providers
verbose: true,
});
const unsignedTx = await txBuilder
.mint("1", policyId, stringToHex("MeshToken"))
.mintingScript(forgingScript)
.metadataValue(721, { [policyId]: { [assetName]: demoAssetMetadata } })
.changeAddress(address)
.selectUtxosFrom(utxos)
.complete();
const signedTx = await wallet1.signTx(unsignedTx, true);
const signedTx2 = await mintingWallet.signTx(signedTx, true);
const txHash = await wallet.submitTx(signedTx2);
```
In the above code snippet, we are signing the transaction with the user wallet and then signing the transaction with the minting wallet. The `signTx` function is used to sign the transaction. The second argument is a boolean value that indicates whether the transaction is a multi-signature transaction.
```tsx
await wallet.signTx(unsignedTx, true);
```
### Multi-signature Transaction \[!toc]
Create a multi-signature transaction. In this demo, we will create a transaction with two signatures, where one signature is from the user's wallet and the other is from a minting wallet.
```tsx
const mintingWallet = new MeshWallet({
networkId: 0,
fetcher: provider,
submitter: provider,
key: {
type: "mnemonic",
words: ['your','mnemonic','here'],
},
});
const forgingScript = ForgeScript.withOneSignature(
await mintingWallet.getChangeAddress(),
);
const assetName = "MeshToken";
const policyId = resolveScriptHash(forgingScript);
const usedAddress = await wallet.getUsedAddresses();
const utxos = await wallet.getUtxos();
const address = usedAddress[0]!;
const txBuilder = new MeshTxBuilder({
fetcher: provider, // get a provider https://meshjs.dev/providers
verbose: true,
});
const unsignedTx = await txBuilder
.mint("1", policyId, stringToHex("MeshToken"))
.mintingScript(forgingScript)
.metadataValue(721, { [policyId]: { [assetName]: demoAssetMetadata } })
.changeAddress(address)
.selectUtxosFrom(utxos)
.complete();
const signedTx = await wallet.signTx(unsignedTx, true);
const signedTx2 = await mintingWallet.signTx(signedTx, true);
const txHash = await wallet.submitTx(signedTx2);
```
## Multi-signature Transaction with Native Script
Here is an example of creating a multi-signature (multisig) transaction with a native script, where you need to spend from a script address.
**Create native script**
First, we need to create a native script. In this example, we will create a native script with two signatures. That means we need to get the key hashes of the two wallets.
```tsx
const { pubKeyHash: keyHash1 } = deserializeAddress(walletAddress1);
const { pubKeyHash: keyHash2 } = deserializeAddress(walletAddress2);
```
Next, we will create a native script object with the two key hashes. The native script object will be used to create a multi-signature transaction.
```tsx
const nativeScript: NativeScript = {
type: "all",
scripts: [
{
type: "sig",
keyHash: keyHash1,
},
{
type: "sig",
keyHash: keyHash2,
},
],
};
```
The native script object is then serialized into a CBOR object and an address.
```tsx
const { address: scriptAddress, scriptCbor } =
serializeNativeScript(nativeScript);
```
**Create transaction**
Now that we have the native script, we can create a transaction with the script. We first need to get the UTXO from the script address.
```tsx
// get utxo from script
const utxos = await provider.fetchAddressUTxOs(scriptAddress);
const utxo = utxos[0];
// create tx
const txBuilder = new MeshTxBuilder({
fetcher: provider, // get a provider https://meshjs.dev/providers
verbose: true,
});
const unsignedTx = await txBuilder
.txIn(
utxo.input.txHash,
utxo.input.outputIndex,
utxo.output.amount,
utxo.output.address,
)
.txInScript(scriptCbor)
.txOut(
"addr_test1vpvx0sacufuypa2k4sngk7q40zc5c4npl337uusdh64kv0c7e4cxr",
[{ unit: "lovelace", quantity: "2000000" }],
)
.changeAddress(scriptAddress)
.selectUtxosFrom(utxos)
.complete();
```
Finally, we sign the transaction with the two wallets and submit the transaction.
```tsx
const signedTx1 = await wallet1.signTx(unsignedTx, true);
const signedTx2 = await wallet2.signTx(signedTx1, true);
const txHash = await wallet.submitTx(signedTx2);
```
## Build with Object
One alternative to use the lower level APIs is to build the transaction with JSON.
The following shows a simple example of building a transaction to send values to a recipient:
```tsx
const meshTxBody: Partial = {
outputs: [
{
address: address,
amount: [{ unit: "lovelace", quantity: amount }],
},
],
changeAddress: changeAddress,
extraInputs: utxos,
selectionConfig: {
threshold: "5000000",
strategy: "largestFirst",
includeTxFees: true,
},
};
const unsignedTx = await txBuilder.complete(meshTxBody);
```
## Coin selection
You can select UTxOs from a list of UTxOs using the `selectUtxosFrom` method. This method allows you to specify the conditions for selecting UTxOs. The method signature is as follows:
```tsx
selectUtxosFrom(
extraInputs: UTxO[]
strategy?: UtxoSelectionStrategy
threshold?: string
includeTxFees?: boolean
)
```
The second parameter of `selectUtxosFrom` is the strategy to be used for selecting UTxOs. There are 4 strategies (`UtxoSelectionStrategy`) available for selecting UTxOs:
* experimental
* keepRelevant
* largestFirst
* largestFirstMultiAsset
We may introduce more strategies in the future. Check the Mesh Docs for more details.
The `threshold` parameter is used to specify the minimum amount of lovelace to be selected. You may specify a larger amount too if the transactions requires it.
The last parameter is `includeTxFees` which is a boolean value to include transaction fees in the selection.
## Set Metadata - Transaction message
Add messages / comments / memos as transaction metadata. This is useful for attaching additional information to a transaction. This is an example of setting a metadata with transaction message.
```tsx
txBuilder
.metadataValue(label, metadata)
```
The specification for individual strings follows the general JSON metadata design, which is currently used on the Cardano blockchain. The used metadatum label is `674`: this number was chosen because it is the T9 encoding of the string `msg`. The message content has the key `msg`: and consists of an array of individual message-strings. The number of theses message-strings must be at least one for a single message, more for multiple messages/lines. Each of theses individual message-strings array entries must be at most 64 bytes when UTF-8 encoded.
### Transaction message \[!toc]
Add messages/comments/memos as transaction metadata
**Message (breakline for new line)**
```
Invoice-No: 1234567890
Customer-No: 555-1234
```
```tsx
const utxos = await wallet.getUtxos();
const changeAddress = await wallet.getChangeAddress();
const label = 674;
const metadata = {
msg: [
'Invoice-No: 1234567890',
'Customer-No: 555-1234',
],
});
const txBuilder = new MeshTxBuilder({
fetcher: provider, // get a provider https://meshjs.dev/providers
verbose: true,
});
const unsignedTx = await txBuilder
.changeAddress(changeAddress)
.metadataValue(label, metadata)
.selectUtxosFrom(utxos)
.complete();
const signedTx = await wallet.signTx(unsignedTx);
const txHash = await wallet.submitTx(signedTx);
```
## Set Required Signers
Sets the required signers for the transaction. This is useful when you want to include multiple signers, such as in a multi-signature transaction or smart contracts.
```tsx
txBuilder
.requiredSignerHash(pubKeyHash)
```
## Set Start and Expire Time
We can define the time-to-live (TTL) for the transaction. TTL is the time limit for our transaction to be included in a blockchain, if it is not in a blockchain by then the transaction will be cancelled. This time limit is defined as `slot`.
In order to get the `slot` of the time you wish the transaction would expire, you can use `resolveSlotNo`. For example, if you would like the transaction to expire in 5 minutes, you can get the `slot` in the following way:
```tsx
import { resolveSlotNo } from '@meshsdk/core';
let minutes = 5; // add 5 minutes
let nowDateTime = new Date();
let dateTimeAdd5Min = new Date(nowDateTime.getTime() + minutes*60000);
const slot = resolveSlotNo('mainnet', dateTimeAdd5Min.getTime());
```
Next, we set the TTL by calling `invalidHereafter(slot)`. A transaction submitted after this value is invalid:
```tsx
txBuilder
.invalidHereafter(Number(slot));
```
Likewise, we can call `invalidBefore(slot)` to specify the validity start interval. A transaction submitted before this value is invalid:
```tsx
txBuilder
.invalidBefore(Number(slot));
```
## Set Network
Sets the network to use, this is mainly to know the cost models to be used to calculate script integrity hash. You can set the network for the transaction with `setNetwork`.
```tsx
txBuilder.setNetwork(network: Network)
```
The network parameter is a string that can be one of the following:
```tsx
"testnet" | "preview" | "preprod" | "mainnet"
```
## Set Fee
Set the fee for the transaction in lovelace.
```tsx
.setFee(fee: string)
```
The following shows a simple example of building a transaction to send values with UTxO selection:
```tsx
const unsignedTx = await txBuilder
.txOut(...)
.changeAddress(...)
.setFee("0")
.complete();
```
## Custom Protocol Parameter
Custom protocol parameters can be fetched from the provider and passed to the transaction builder. This is useful when the provider does not provide the protocol parameters, or when the user wants to use a custom set of parameters.
```tsx
const pp = await provider.fetchProtocolParameters();
const txBuilder = new MeshTxBuilder({
fetcher: provider,
params: pp,
});
```
# Governance Transactions
URL: /apis/txbuilder/governance
Transactions for participating in Cardano's on-chain governance
***
title: "Governance Transactions"
description: "Transactions for participating in Cardano's on-chain governance"
icon: ScaleIcon
---------------
import Link from 'fumadocs-core/link';
In **CIP-1694**, Cardano's on-chain governance system was proposed to allow the community to vote on proposals and protocol updates. This system is designed to be decentralized and transparent, allowing the community to have a say in the future of the network.
In the code snippet, you will find `txBuilder`, which is an instance of `MeshTxBuilder`, a powerful low-level APIs that allows you to build transactions. Learn how to initialize MeshTxBuilder
```tsx
const txBuilder = new MeshTxBuilder({
fetcher: provider, // get a provider https://meshjs.dev/providers
verbose: true,
});
```
This page list the governance transactions that can be created using the Mesh SDK.
## Vote Delegation
Any wallet can delegate its voting power to another DRep. This is done by creating a vote delegation certificate and submitting it to the blockchain.
First we need to get the wallet information. This includes the UTXOs, the reward address, and the change address.
```tsx
const utxos = await wallet.getUtxos();
const rewardAddresses = await wallet.getRewardAddresses();
const rewardAddress = rewardAddresses[0];
const changeAddress = await wallet.getChangeAddress();
```
Next we need to select the UTXOs to use to pay for the transaction. We will select the UTXOs that have at least 5 ADA. Though the fee is less than 1 ADA.
We can now start building the transaction. We will add the selected UTXOs as inputs to the transaction. We will also add the vote delegation certificate to the transaction. The vote delegation certificate requires the DRep ID of the DRep to delegate to and the reward address of the delegator. Note that we would need to have at least 5 ADA for the certificate delegation, in the `selectUtxosFrom` we will configure 10 ADA as threshold buffer.
```tsx
txBuilder
.voteDelegationCertificate(
{
dRepId: dRepId,
},
rewardAddress,
)
.changeAddress(changeAddress)
.selectUtxosFrom(utxos)
```
Finally we can build, sign the transaction and submit it to the blockchain.
```tsx
const unsignedTx = await txBuilder.complete();
const signedTx = await wallet.signTx(unsignedTx);
const txHash = await wallet.submitTx(signedTx);
```
The transaction will be submitted to the blockchain and the DRep will be registered. The deposit will be taken from the DRep owner and the DRep will be added to the list of registered DReps.
## DRep Vote Delegation \[!toc]
Delegate your voting power to another DRep
**DRep ID**
`drep1yv4uesaj92wk8ljlsh4p7jzndnzrflchaz5fzug3zxg4naqkpeas3`
```tsx
const utxos = await wallet.getUtxos();
const rewardAddresses = await wallet.getRewardAddresses();
const rewardAddress = rewardAddresses[0];
const changeAddress = await wallet.getChangeAddress();
const txBuilder = new MeshTxBuilder({
fetcher: provider, // get a provider https://meshjs.dev/providers
verbose: true,
});
txBuilder
.voteDelegationCertificate(
{
dRepId: 'drep1yv4uesaj92wk8ljlsh4p7jzndnzrflchaz5fzug3zxg4naqkpeas3',
},
rewardAddress,
)
.changeAddress(changeAddress)
.selectUtxosFrom(utxos)
const unsignedTx = await txBuilder.complete();
const signedTx = await wallet.signTx(unsignedTx);
const txHash = await wallet.submitTx(signedTx);
```
## DRep Registration
In Voltaire, stake credentials can delegate their stake to Decentralized Representatives (DReps) for voting, in addition to the current delegation to stake pools for block production. This DRep delegation will work similarly to the current stake delegation process, using on-chain certificates. Registering as a DRep will also follow the same process as stake registration.
However, registered DReps need to vote regularly to remain active. If a DRep does not vote for a set number of epochs (defined by the new protocol parameter, drepActivity), they are considered inactive and will not count towards the active voting stake. To become active again, DReps need to vote on governance actions or submit a DRep update certificate within the drepActivity period.
A DRep registration certificates include:
* a DRep ID
* a deposit
* an optional anchor
An anchor is a pair of:
* a URL to a JSON payload of metadata
* a hash of the contents of the metadata URL
First we need to get the DRep ID of the DRep we want to register. We can do this by calling `getDRep` method on the wallet. This will return the DRep object which contains the DRep ID.
```tsx
const dRep = await wallet.getDRep();
const dRepId = dRep.dRepIDCip105;
```
Next we need to get the hash of the anchor. We can do this by calling the `getMeshJsonHash` function. This function fetches the anchor from the given URL and returns the hash of the anchor.
```tsx
async function getMeshJsonHash(url: string) {
var drepAnchor = getFile(url);
const anchorObj = JSON.parse(drepAnchor);
return hashDrepAnchor(anchorObj);
}
const anchorUrl = "https://meshjs.dev/governance/meshjs.jsonld";
const anchorHash = await getMeshJsonHash(anchorUrl);
```
We can now build the transaction by adding the DRep registration certificate to the transaction. We also need to add the change address and the selected UTxOs to the transaction. Note that the deposit for registering a DRep is 500 ADA, we would set 505 ADA as UTxO selection threshold.
```tsx
const utxos = await wallet.getUtxos();
const changeAddress = await wallet.getChangeAddress();
const txBuilder = new MeshTxBuilder({
fetcher: provider, // get a provider https://meshjs.dev/providers
verbose: true,
});
txBuilder
.drepRegistrationCertificate(dRepId, {
anchorUrl: anchorUrl,
anchorDataHash: anchorHash,
})
.changeAddress(changeAddress)
.selectUtxosFrom(selectedUtxos);
```
Finally we can sign the transaction and submit it to the blockchain.
```tsx
const unsignedTx = await txBuilder.complete();
const signedTx = await wallet.signTx(unsignedTx);
const txHash = await wallet.submitTx(signedTx);
```
The transaction will be submitted to the blockchain and the DRep will be registered. The deposit will be taken from the DRep owner and the DRep will be added to the list of registered DReps.
### DRep Registration \[!toc]
Register a DRep certificate and pay the deposit
**Anchor Url:** `eg: https://path.to/file-name.jsonld`
```tsx
const dRep = await wallet.getDRep();
const dRepId = dRep.dRepIDCip105;
const anchorUrl = '';
const anchorHash = await getMeshJsonHash(anchorUrl);
// get utxo to pay for the registration
const utxos = await wallet.getUtxos();
const changeAddress = await wallet.getChangeAddress();
const txBuilder = new MeshTxBuilder({
fetcher: provider, // get a provider https://meshjs.dev/providers
verbose: true,
});
txBuilder
.drepRegistrationCertificate(dRepId, {
anchorUrl: anchorUrl,
anchorDataHash: anchorHash,
})
.changeAddress(changeAddress)
.selectUtxosFrom(utxos);
const unsignedTx = await txBuilder.complete();
const signedTx = await wallet.signTx(unsignedTx);
const txHash = await wallet.submitTx(signedTx);
```
## DRep Update
Updating a DRep is similar to registering.
We build the transaction by adding the DRep update certificate to the transaction, providing the change address and the UTxOs needed for the transaction's fees.
```tsx
const utxos = await wallet.getUtxos();
const changeAddress = await wallet.getChangeAddress();
const txBuilder = new MeshTxBuilder({
fetcher: provider, // get a provider https://meshjs.dev/providers
verbose: true,
});
txBuilder
.drepUpdateCertificate(dRepId, {
anchorUrl: anchorUrl,
anchorDataHash: anchorHash,
})
.changeAddress(utxos)
.selectUtxosFrom(selectedUtxos);
```
This transaction is an example of a successful DRep update for DRep ID.
### DRep Update \[!toc]
Update DRep metadata
**Anchor Url:** `eg: https://path.to/file-name.jsonld`
```tsx
const dRep = await wallet.getDRep();
const dRepId = dRep.dRepIDCip105;
const anchorUrl = '';
const anchorHash = await getMeshJsonHash(anchorUrl);
const utxos = await wallet.getUtxos();
const changeAddress = await wallet.getChangeAddress();
const txBuilder = new MeshTxBuilder({
fetcher: provider, // get a provider https://meshjs.dev/providers
verbose: true,
});
txBuilder
.drepUpdateCertificate(dRepId, {
anchorUrl: anchorUrl,
anchorDataHash: anchorHash,
})
.changeAddress(changeAddress)
.selectUtxosFrom(utxos);
const unsignedTx = await txBuilder.complete();
const signedTx = await wallet.signTx(unsignedTx);
const txHash = await wallet.submitTx(signedTx);
```
## DRep Retirement
A DRep is retired right away when the blockchain accepts a retirement certificate. The deposit is refunded immediately as part of the transaction that submits the retirement certificate, just like how deposits are returned when a stake credential is unregistered.
First we need to get the DRep ID of the DRep we want to retire. We can do this by calling `getDRep` method on the wallet. This will return the DRep object which contains the DRep ID.
```tsx
const dRep = await wallet.getDRep();
const dRepId = dRep.dRepIDCip105;
```
We then need to initialize the transaction builder by creating a new instance of `MeshTxBuilder`. We need to pass the blockchain provider to the constructor.
```tsx
const changeAddress = await wallet.getChangeAddress();
const utxos = await wallet.getUtxos();
const provider = new BlockfrostProvider('');
```
We can now build the transaction by adding the UTxOs as inputs to the transaction and adding the DRep deregistration certificate to the transaction.
```tsx
const txBuilder = new MeshTxBuilder({
fetcher: provider, // get a provider https://meshjs.dev/providers
verbose: true,
});
txBuilder
.drepDeregistrationCertificate(dRepId)
.selectUtxosFrom(selectedUtxos)
.changeAddress(changeAddress);
const unsignedTx = await txBuilder.complete();
```
Finally we can sign the transaction and submit it to the blockchain.
```tsx
const signedTx = await wallet.signTx(unsignedTx);
const txHash = await wallet.submitTx(signedTx);
```
The transaction will be submitted to the blockchain and the DRep will be retired. The deposit will be refunded to the DRep owner.
### DRep Retirement \[!toc]
Retire a DRep certificate and return the deposit
```tsx
const dRep = await wallet.getDRep();
const dRepId = dRep.dRepIDCip105;
const utxos = await wallet.getUtxos();
const changeAddress = await wallet.getChangeAddress();
const txBuilder = new MeshTxBuilder({
fetcher: provider, // get a provider https://meshjs.dev/providers
verbose: true,
});
txBuilder
.drepDeregistrationCertificate(dRepId)
.selectUtxosFrom(utxos)
.changeAddress(changeAddress);
const unsignedTx = await txBuilder.complete();
const signedTx = await wallet.signTx(unsignedTx);
const txHash = await wallet.submitTx(signedTx);
```
## Vote
Each vote transaction consists of the following:
* a governance action ID
* a role - constitutional committee member, DRep, or SPO
* a governance credential witness for the role
* an optional anchor (as defined above) for information that is relevant to the vote
* a 'Yes'/'No'/'Abstain' vote
First, we get the DRep ID from the wallet, the DRep ID voting for this governance action.
```tsx
const dRep = await wallet.getDRep();
const dRepId = dRep.dRepIDCip105;
```
Then we get the utxos and the change address from the wallet.
```tsx
const utxos = await wallet.getUtxos();
const changeAddress = await wallet.getChangeAddress();
```
We then create the vote transaction using the `vote()` function.
```tsx
txBuilder
.vote(
{
type: "DRep",
drepId: dRepId,
},
{
txHash: 'aff2909f8175ee02a8c1bf96ff516685d25bf0c6b95aac91f4dfd53a5c0867cc',
txIndex: 0,
},
{
voteKind: "Yes",
},
)
.selectUtxosFrom(utxos)
.changeAddress(changeAddress);
```
The `vote()` takes 3 parameters:
* `voter` - The voter, can be a Constitutional Commitee, a DRep or a StakePool
* `govActionId` - The transaction hash and transaction id of the governance action
* `votingProcedure` - The voting kind (Yes, No, Abstain) with an optional anchor
Check the full documentation or the source code for more details.
Finally, we sign the transaction and submit it to the blockchain.
```tsx
const unsignedTx = await txBuilder.complete();
const signedTx = await wallet.signTx(unsignedTx);
const txHash = await wallet.submitTx(signedTx);
```
You can check here a successful vote transaction for this governance action.
Here is another example of a vote transaction:
```tsx
txBuilder
.changeAddress(
"addr_test1qpsmz8q2xj43wg597pnpp0ffnlvr8fpfydff0wcsyzqyrxguk5v6wzdvfjyy8q5ysrh8wdxg9h0u4ncse4cxhd7qhqjqk8pse6",
)
.txIn(
"2cb57168ee66b68bd04a0d595060b546edf30c04ae1031b883c9ac797967dd85",
3,
[
{
unit: "lovelace",
quantity: "9891607895",
},
],
"addr_test1vru4e2un2tq50q4rv6qzk7t8w34gjdtw3y2uzuqxzj0ldrqqactxh",
)
.vote(
{
type: "DRep",
drepId: "drep1j6257gz2swty9ut46lspyvujkt02pd82am2zq97p7p9pv2euzs7",
},
{
txHash:
"2cb57168ee66b68bd04a0d595060b546edf30c04ae1031b883c9ac797967dd85",
txIndex: 3,
},
{
voteKind: "Yes",
anchor: {
anchorUrl: "https://path-to.jsonld",
anchorDataHash:
"2aef51273a566e529a2d5958d981d7f0b3c7224fc2853b6c4922e019657b5060",
},
},
)
```
And another example of a vote transaction with a Plutus script and a redeemer:
```tsx
txBuilder
.changeAddress(
"addr_test1qpsmz8q2xj43wg597pnpp0ffnlvr8fpfydff0wcsyzqyrxguk5v6wzdvfjyy8q5ysrh8wdxg9h0u4ncse4cxhd7qhqjqk8pse6",
)
.txIn(
"2cb57168ee66b68bd04a0d595060b546edf30c04ae1031b883c9ac797967dd85",
3,
[
{
unit: "lovelace",
quantity: "9891607895",
},
],
"addr_test1vru4e2un2tq50q4rv6qzk7t8w34gjdtw3y2uzuqxzj0ldrqqactxh",
)
.txInCollateral(
"2cb57168ee66b68bd04a0d595060b546edf30c04ae1031b883c9ac797967dd85",
3,
[
{
unit: "lovelace",
quantity: "9891607895",
},
],
"addr_test1vru4e2un2tq50q4rv6qzk7t8w34gjdtw3y2uzuqxzj0ldrqqactxh",
)
.votePlutusScriptV3()
.vote(
{
type: "DRep",
drepId: resolveScriptHashDRepId(
resolveScriptHash(
applyCborEncoding(
"5834010100323232322533300232323232324a260106012004600e002600e004600a00260066ea8004526136565734aae795d0aba201",
),
"V3",
),
),
},
{
txHash:
"2cb57168ee66b68bd04a0d595060b546edf30c04ae1031b883c9ac797967dd85",
txIndex: 3,
},
{
voteKind: "Yes",
anchor: {
anchorUrl: "https://path-to.jsonld",
anchorDataHash:
"2aef51273a566e529a2d5958d981d7f0b3c7224fc2853b6c4922e019657b5060",
},
},
)
.voteScript(
applyCborEncoding(
"5834010100323232322533300232323232324a260106012004600e002600e004600a00260066ea8004526136565734aae795d0aba201",
),
)
.voteRedeemerValue("")
```
### Vote \[!toc]
Vote on a governance action
```tsx
const dRep = await wallet.getDRep();
const dRepId = dRep.dRepIDCip105;
const utxos = await wallet.getUtxos();
const changeAddress = await wallet.getChangeAddress();
const txBuilder = new MeshTxBuilder({
fetcher: provider, // get a provider https://meshjs.dev/providers
verbose: true,
});
txBuilder
.vote(
{
type: "DRep",
drepId: dRepId,
},
{
txHash: 'aff2909f8175ee02a8c1bf96ff516685d25bf0c6b95aac91f4dfd53a5c0867cc',
txIndex: 0,
},
{
voteKind: "Yes",
},
)
.selectUtxosFrom(utxos)
.changeAddress(changeAddress);
const unsignedTx = await txBuilder.complete();
const signedTx = await wallet.signTx(unsignedTx);
const txHash = await wallet.submitTx(signedTx);
```
# Transaction Builder
URL: /apis/txbuilder
Build transactions with Cardano-CLI like APIs
***
title: "Transaction Builder"
description: "Build transactions with Cardano-CLI like APIs"
icon: BanknotesIcon
-------------------
import {linksTxbuilder} from "@/data/links-txbuilders";
import Link from "next/link";
import {
Card,
CardDescription,
CardTitle,
} from "@/components/ui/card";
# Mint and Burn Assets
URL: /apis/txbuilder/minting
Minting and burning assets with Native Script and Plutus Script
***
title: "Mint and Burn Assets"
description: "Minting and burning assets with Native Script and Plutus Script"
icon: FireIcon
--------------
import Link from "fumadocs-core/link";
Minting and burning assets with Native Script and Plutus Script
Minting and burning assets is a common operation in blockchain applications. In the Cardano ecosystem, minting and burning are achieved through Native Scripts and Plutus Scripts.
To view a video demonstration of this feature of the MeshSDK, navigate to the video guide Mint an NFT Collection.
In the code snippet, you will find `txBuilder`, which is an instance of `MeshTxBuilder`, with powerful low-level APIs that allow you to build transactions. Here's how to initialize **MeshTxBuilder**.
```tsx
const txBuilder = new MeshTxBuilder({
fetcher: provider, // get a provider https://meshjs.dev/providers
verbose: true,
});
```
In this page, you will find the APIs to create transactions for minting and burning assets.
## Minting with One Signature
In this section, we will see how to mint native assets with a `MeshTxBuilder`. For minting assets with a smart contract visit [this documentation](/apis/txbuilder/smart-contracts#minting-assets-with-plutus-script).
Firstly, we need to define the `forgingScript` with `ForgeScript`. We use the first wallet address as the "minting address" (you can use other addresses).
```tsx
const changeAddress = await wallet.getChangeAddress();
const forgingScript = ForgeScript.withOneSignature(changeAddress);
```
Then, we define the metadata.
```tsx
const demoAssetMetadata = {
name: "Mesh Token",
image: "ipfs://QmRzicpReutwCkM6aotuKjErFCUD213DpwPq6ByuzMJaua",
mediaType: "image/jpg",
description: "This NFT was minted by Mesh (https://meshjs.dev/).",
};
const policyId = resolveScriptHash(forgingScript);
const tokenName = "MeshToken";
const tokenNameHex = stringToHex(tokenName);
const metadata = { [policyId]: { [tokenName]: { ...demoAssetMetadata } } };
```
Finally, we create a transaction and mint the asset with the `MeshTxBuilder` lower level APIs.
```tsx
const txBuilder = new MeshTxBuilder({
fetcher: provider, // get a provider https://meshjs.dev/providers
verbose: true,
});
const unsignedTx = await txBuilder
.txIn(utxo.input.txHash, utxo.input.outputIndex)
.mint("1", policyId, tokenName)
.mintingScript(forgingScript)
.changeAddress(changeAddress)
.complete();
```
### Mint Asset
Mint an asset with a native script
```tsx
import { MeshTxBuilder, ForgeScript, resolveScriptHash, stringToHex } from '@meshsdk/core';
import type { Asset } from '@meshsdk/core';
// See https://meshjs.dev/apis/wallets/meshwallet for how to create a new wallet instance
const utxos = await wallet.getUtxos();
const changeAddress = await wallet.getChangeAddress();
const forgingScript = ForgeScript.withOneSignature(changeAddress);
const demoAssetMetadata = {
name: "Mesh Token",
image: "ipfs://QmRzicpReutwCkM6aotuKjErFCUD213DpwPq6ByuzMJaua",
mediaType: "image/jpg",
description: "This NFT was minted by Mesh (https://meshjs.dev/).",
};
const policyId = resolveScriptHash(forgingScript);
const tokenName = "MeshToken";
const tokenNameHex = stringToHex(tokenName);
const metadata = { [policyId]: { [tokenName]: { ...demoAssetMetadata } } };
const txBuilder = new MeshTxBuilder({
fetcher: provider, // get a provider https://meshjs.dev/providers
verbose: true,
});
const unsignedTx = await txBuilder
.mint("1", policyId, tokenNameHex)
.mintingScript(forgingScript)
.metadataValue(721, metadata)
.changeAddress(changeAddress)
.selectUtxosFrom(utxos)
.complete();
const signedTx = await wallet.signTx(unsignedTx);
const txHash = await wallet.submitTx(signedTx);
```
## Minting Multiple Assets
Minting multiple assets with a single transaction is a common operation in blockchain applications. Like minting single assets, you can mint multiple assets by calling `mint()` and `mintingScript` multiple times.
```tsx
const metadata = {};
metadata[policyId] = {};
for (let i = 1; i < 3; i++) {
const tokenName = `MeshToken${i}`;
const tokenNameHex = stringToHex(tokenName);
metadata[policyId][tokenName] = {
...demoAssetMetadata,
name: tokenName,
};
txBuilder.mint("1", policyId, tokenNameHex);
txBuilder.mintingScript(forgingScript);
}
```
You add the metadata object by calling the `metadataValue()` method.
```tsx
const txBuilder = new MeshTxBuilder({
fetcher: provider, // get a provider https://meshjs.dev/providers
verbose: true,
});
txBuilder
.metadataValue(721, metadata)
.changeAddress(changeAddress)
.selectUtxosFrom(utxos);
const unsignedTx = await txBuilder.complete();
const signedTx = await wallet.signTx(unsignedTx);
const txHash = await wallet.submitTx(signedTx);
```
### Mint Multiple Assets \[!toc]
Mint multiple assets with a single transaction
```tsx
import { MeshTxBuilder, ForgeScript, resolveScriptHash, stringToHex } from '@meshsdk/core';
import type { Asset } from '@meshsdk/core';
import { useWallet } from "@meshsdk/react";
const { wallet, connected } = useWallet();
const utxos = await wallet.getUtxos();
const changeAddress = await wallet.getChangeAddress();
const forgingScript = ForgeScript.withOneSignature(changeAddress);
const policyId = resolveScriptHash(forgingScript);
const txBuilder = new MeshTxBuilder({
fetcher: provider, // get a provider https://meshjs.dev/providers
verbose: true,
});
const metadata = {};
metadata[policyId] = {};
for (let i = 1; i < 3; i++) {
const tokenName = `MeshToken${i}`;
const tokenNameHex = stringToHex(tokenName);
metadata[policyId][tokenName] = {
...demoAssetMetadata,
name: tokenName,
};
txBuilder.mint("1", policyId, tokenNameHex);
txBuilder.mintingScript(forgingScript);
}
txBuilder
.metadataValue(721, metadata)
.changeAddress(changeAddress)
.selectUtxosFrom(utxos);
const unsignedTx = await txBuilder.complete();
const signedTx = await wallet.signTx(unsignedTx);
const txHash = await wallet.submitTx(signedTx);
```
## Burning assets
Like minting assets, we need to define the `forgingScript` with `ForgeScript`. We use the first wallet address as the "minting address". Note that, assets can only be burned by its minting address.
```tsx
const usedAddress = await wallet.getUsedAddresses();
const address = usedAddress[0];
const forgingScript = ForgeScript.withOneSignature(address);
```
Then, we resolve the policy ID and hex of the token name by calling `txBuilder.mint("-1", policyId, tokenNameHex)`
```tsx
const policyId = resolveScriptHash(forgingScript);
const tokenNameHex = stringToHex("MeshToken");
```
Finally, we create a transaction and burn the asset with the lower level APIs.
```tsx
const txBuilder = new MeshTxBuilder({
fetcher: provider, // get a provider https://meshjs.dev/providers
verbose: true,
});
const unsignedTx = await txBuilder
.mint("-1", policyId, tokenNameHex)
.mintingScript(forgingScript)
.changeAddress(changeAddress)
.selectUtxosFrom(utxos)
.complete();
```
### Burn Native Assets \[!toc]
Burn native assets
**Asset Unit**
`d9312da562da182b02322fd8acb536f37eb9d29fba7c49dc172555274d657368546f6b656e`
```tsx
import { ForgeScript, resolveScriptHash, stringToHex } from "@meshsdk/core";
import { useWallet } from "@meshsdk/react";
const { wallet, connected } = useWallet();
const utxos = await wallet.getUtxos();
const changeAddress = await wallet.getChangeAddress();
const forgingScript = ForgeScript.withOneSignature(changeAddress);
const policyId = resolveScriptHash(forgingScript);
const tokenNameHex = stringToHex("MeshToken");
const txBuilder = new MeshTxBuilder({
fetcher: provider, // get a provider https://meshjs.dev/providers
verbose: true,
});
const unsignedTx = await txBuilder
.mint("-1", policyId, tokenNameHex)
.mintingScript(forgingScript)
.changeAddress(changeAddress)
.selectUtxosFrom(utxos)
.complete();
const signedTx = await wallet.signTx(unsignedTx);
const txHash = await wallet.submitTx(signedTx);
```
## Minting Assets with Native Script
The minting and burning examples above demonstrate using a one-signature native script. Here we explain the underlying logic for native script minting.
With `MeshTxBuilder`, you just need to call `.mint()` and provide a script to mint or burn native script tokens:
```tsx
txBuilder
.mint("1", policyId, tokenNameHex)
.mintingScript(forgingScript)
```
On top of these two core steps, you can attach metadata with .metadataValue() and then construct the transaction as needed.
### Mint Assets with Native Script \[!toc]
Mint native assets with Native Script
```tsx
const utxos = await wallet.getUtxos();
const changeAddress = await wallet.getChangeAddress();
const { pubKeyHash: keyHash } = deserializeAddress(changeAddress);
const nativeScript: NativeScript = {
type: "all",
scripts: [
{
type: "before",
slot: "99999999",
},
{
type: "sig",
keyHash: keyHash,
},
],
};
const forgingScript = ForgeScript.fromNativeScript(nativeScript);
const policyId = resolveScriptHash(forgingScript);
const tokenName = "MeshToken";
const tokenNameHex = stringToHex(tokenName);
const metadata = { [policyId]: { [tokenName]: { ...demoAssetMetadata } } };
const txBuilder = new MeshTxBuilder({
fetcher: provider, // get a provider https://meshjs.dev/providers
verbose: true,
});
const unsignedTx = await txBuilder
.mint("1", policyId, tokenNameHex)
.mintingScript(forgingScript)
.metadataValue(721, metadata)
.changeAddress(changeAddress)
.invalidHereafter(99999999)
.selectUtxosFrom(utxos)
.complete();
const signedTx = await wallet.signTx(unsignedTx);
const txHash = await wallet.submitTx(signedTx);
```
## Minting Assets with Plutus Script
Plutus script minting with `MeshTxBuilder` starts with any of the below script version indicators:
```tsx
.mintPlutusScriptV1()
.mintPlutusScriptV2()
.mintPlutusScriptV3()
```
Followed by specifying the minting information:
```tsx
.mint(quantity: string, policy: string, name: string)
```
Similar to unlocking, minting or burning tokens, the Plutus script requires providing a redeemer and the script itself. However, no datum information is needed in minting or burning.
**Providing a Script**
The actual script can be either provided through `mintTxInReference` method by attaching an on-chain UTxO reference, or by providing a Cbor encoded script.
* (i) Reference script
```tsx
.mintTxInReference(txHash: string, txIndex: number)
```
* (ii) Supplying script
```tsx
.mintingScript(scriptCbor: string)
```
**Minting Redeemer**
Redeemer can be provided in different **data types**. If your MeshTxBuilder does not include an `evaluator` instance, you can also provide your budget for the unlock with this redeemer endpoint
```tsx
.mintRedeemerValue(redeemer: Data | object | string, type: "Mesh" | "CBOR" | "JSON", exUnits?: Budget)
```
### Mint Assets with Plutus Script \[!toc]
Mint native assets with Plutus Script. For this example, the Plutus script expects a data field of 'mesh'.
**Redeemer value:** `mesh`
```tsx
const utxos = await wallet.getUtxos();
const collateral: UTxO = (await wallet.getCollateral())[0]!;
const changeAddress = await wallet.getChangeAddress();
const policyId = resolveScriptHash(demoPlutusMintingScript, "V2");
const tokenName = 'mesh';
const tokenNameHex = stringToHex(tokenName);
const metadata = { [policyId]: { [tokenName]: { ...demoAssetMetadata } } };
const txBuilder = new MeshTxBuilder({
fetcher: provider, // get a provider https://meshjs.dev/providers
verbose: true,
});
const unsignedTx = await txBuilder
.mintPlutusScriptV2()
.mint("1", policyId, tokenNameHex)
.mintingScript(demoPlutusMintingScript)
.mintRedeemerValue(mConStr0(['mesh']))
.metadataValue(721, metadata)
.changeAddress(changeAddress)
.selectUtxosFrom(utxos)
.txInCollateral(
collateral.input.txHash,
collateral.input.outputIndex,
collateral.output.amount,
collateral.output.address,
)
.complete();
const signedTx = await wallet.signTx(unsignedTx, true);
const txHash = await wallet.submitTx(signedTx);
```
## Minting Assets with CIP-68 Metadata standard
Minting CIP-68 tokens with `MeshTxBuilder` means 2 consecutive sets of minting APIs. The first is to mint the token with the `100` label, and the second is to mint the token with the `222` label:
```tsx
txBuilder
.mintPlutusScriptV2()
.mint("1", policyId, CIP68_100(tokenNameHex))
.mintingScript(scriptCode)
.mintRedeemerValue(mConStr0([]))
.mintPlutusScriptV2()
.mint("1", policyId, CIP68_222(tokenNameHex))
.mintingScript(scriptCode)
.mintRedeemerValue(mConStr0([]))
```
A side note, Mesh also provides the utility function of `CIP68_100(tokenNameHex: string)` and `CIP68_222(tokenNameHex: string)` to help easily construct the token names as needed. So you dont have to memorize the prefix bytes to correctly mint the CIP68-compliant tokens.
### Mint Assets with CIP68 metadata standard \[!toc]
Mint assets with CIP68 metadata standard where two assets are issued, one referencing the other user token.
**Token Name:** `Test1`
```tsx
const usedAddress = await wallet.getUsedAddresses();
const address = usedAddress[0];
if (address === undefined) {
throw "Address not found";
}
const userTokenMetadata = {
name: userInput,
image: "ipfs://QmRzicpReutwCkM6aotuKjErFCUD213DpwPq6ByuzMJaua",
mediaType: "image/jpg",
description: "Hello world - CIP68",
};
const alawysSucceedPlutusScript: PlutusScript = {
code: demoPlutusAlwaysSucceedScript,
version: "V1",
};
const { address: scriptAddress } = serializePlutusScript(
alawysSucceedPlutusScript,
);
const utxos = await wallet.getUtxos();
if (!utxos || utxos.length <= 0) {
throw "No UTxOs found in wallet";
}
const scriptCode = applyParamsToScript(oneTimeMintingPolicy, [
mTxOutRef(utxos[0]?.input.txHash!, utxos[0]?.input.outputIndex!),
]);
const collateral: UTxO = (await wallet.getCollateral())[0]!;
const changeAddress = await wallet.getChangeAddress();
const policyId = resolveScriptHash(scriptCode, "V2");
const tokenName = 'Test1';
const tokenNameHex = stringToHex(tokenName);
const txBuilder = new MeshTxBuilder({
fetcher: provider, // get a provider https://meshjs.dev/providers
verbose: true,
});
const unsignedTx = await txBuilder
.txIn(
utxos[0]?.input.txHash!,
utxos[0]?.input.outputIndex!,
utxos[0]?.output.amount!,
utxos[0]?.output.address!,
)
.mintPlutusScriptV2()
.mint("1", policyId, CIP68_100(tokenNameHex))
.mintingScript(scriptCode)
.mintRedeemerValue(mConStr0([]))
.mintPlutusScriptV2()
.mint("1", policyId, CIP68_222(tokenNameHex))
.mintingScript(scriptCode)
.mintRedeemerValue(mConStr0([]))
.txOut(scriptAddress, [
{ unit: policyId + CIP68_100(tokenNameHex), quantity: "1" },
])
.txOutInlineDatumValue(metadataToCip68(userTokenMetadata))
.changeAddress(changeAddress)
.selectUtxosFrom(utxos)
.txInCollateral(
collateral.input.txHash,
collateral.input.outputIndex,
collateral.output.amount,
collateral.output.address,
)
.complete();
const signedTx = await wallet.signTx(unsignedTx, true);
const txHash = await wallet.submitTx(signedTx);
```
## Minting Royalty Token
Royalty tokens are a special type of token that allow the creator to collect a royalty fee. This proposed standard will allow for uniform royalty distributions across the secondary market space. Read CIP-27 for more information.
The implementation of royalty tokens is very simple – minting a token with the `777` label, with "rate", and "addr" in the metadata.
Here is the example of the metadata:
```tsx
const assetMetadata = {
rate: '0.2',
addr: 'addr_test1vpvx0sacufuypa2k4sngk7q40zc5c4npl337uusdh64kv0c7e4cxr'
};
```
### Mint Native Assets \[!toc]
Mint native assets with ForgeScript
**Rate:** `0.2`
**Address:** `addr_test1vpvx0sacufuypa2k4sngk7q40zc5c4npl337uusdh64kv0c7e4cxr`
```tsx
const utxos = await wallet.getUtxos();
const usedAddress = await wallet.getUsedAddresses();
const address = usedAddress[0];
if (address === undefined) {
throw "No address found";
}
const forgingScript = ForgeScript.withOneSignature(address);
const policyId = resolveScriptHash(forgingScript);
const assetMetadata: RoyaltiesStandard = {
rate: '0.2',
address: 'addr_test1vpvx0sacufuypa2k4sngk7q40zc5c4npl337uusdh64kv0c7e4cxr',
};
const txBuilder = new MeshTxBuilder({
fetcher: provider, // get a provider https://meshjs.dev/providers
verbose: true,
});
const unsignedTx = await txBuilder
.mint("1", policyId, "")
.mintingScript(forgingScript)
.metadataValue(777, assetMetadata)
.changeAddress(address)
.selectUtxosFrom(utxos)
.complete();
const signedTx = await wallet.signTx(unsignedTx);
const txHash = await wallet.submitTx(signedTx);
```
# Smart Contracts
URL: /apis/txbuilder/smart-contracts
Transactions to work with smart contracts
***
title: "Smart Contracts"
description: "Transactions to work with smart contracts"
icon: NewspaperIcon
-------------------
import Link from "fumadocs-core/link";
In this guide, you will understand how to interact with smart contracts through `MeshTxBuilder`.
In the code snippet, you will find `txBuilder`, which is an instance of `MeshTxBuilder`, with powerful low-level APIs that allow you to build transactions. Here's how to initialize **MeshTxBuilder**.
```tsx
const txBuilder = new MeshTxBuilder({
fetcher: provider, // get a provider https://meshjs.dev/providers
verbose: true,
});
```
In Cardano, whenever you need the nodes' computing power to execute a smart contract, you need to provide collateral to prevent spamming. You will see this is everywhere when script execution is needed in examples below, and here's how you can do so:
```tsx
txBuilder
.txInCollateral(txHash: string, txIndex: number, amount?: Asset[], address?: string)
```
## Lock Assets
Locking assets meaning sending value to a script address with datum.
Same as the `Transaction` demo, we will lock selected assets from your wallet in an always-succeed smart contract. We use one API to represent sending value, another API to represent attaching datum to complete the locking assets process:
```tsx
// For inline datumtxBuilder
.txOut(address, assets)
.txOutInlineDatumValue(data)
```
```tsx
// For datum hashtxBuilder
.txOut(address, assets)
.txOutDatumHashValue(data)
```
The lower level APIs support providing your datum in all Mesh `Data` (default), JSON and CBOR representations. For details and helper utilities, please check Data section.
```tsx
// For inline datum provided in JSONtxBuilder
.txOut(address, assets)
.txOutInlineDatumValue(jsonData, "JSON")
```
### Lock Assets \[!toc]
Lock assets in a Plutus script
**Asset unit**
`d9312da562da182b02322fd8acb536f37eb9d29fba7c49dc172555274d657368546f6b656e`
**Datum:** `meshsecretcode`
```tsx
const utxos = await wallet.getUtxos();
const changeAddress = await wallet.getChangeAddress();
const script: PlutusScript = {
code: demoPlutusAlwaysSucceedScript,
version: "V2",
};
const { address: scriptAddress } = serializePlutusScript(script);
const txBuilder = new MeshTxBuilder({
fetcher: provider, // get a provider https://meshjs.dev/providers
verbose: true,
});
const unsignedTx = await txBuilder
.txOut(scriptAddress, [{ unit: "d9312da562da182b02322fd8acb536f37eb9d29fba7c49dc172555274d657368546f6b656e", quantity: "1" }])
.txOutInlineDatumValue("meshsecretcode")
.changeAddress(changeAddress)
.selectUtxosFrom(utxos)
.complete();
const signedTx = await wallet.signTx(unsignedTx);
const txHash = await wallet.submitTx(signedTx);
```
## Unlock Assets
Unlocking assets from a Plutus script, with `MeshTxBuilder`, starts with any of the following script version indicators:
```tsx
.spendingPlutusScriptV1()
.spendingPlutusScriptV2()
.spendingPlutusScriptV3()
```
Followed by specifying the exact script input to spend with:
```tsx
.txIn(txHash: string, txIndex: number, amount?: Asset[], address?: string)
```
In Cardano, if you want to unlock assets from a script address, you have to provide 3 other necessary information apart from `.txIn()` itself. They are:
* Actual script
* Datum of the input
* Redeemer of the unlock
**Actual script**
The actual script can be either provided by transaction builder or referenced from an UTxO onchain.
* (i) Reference script
```tsx
.spendingTxInReference()
```
* (ii) Supplying script
```tsx
.txInScript(scriptCbor: string)
```
**Datum of the input**
Similar to script, datum can also either be provided by transaction builder or as inline datum.
* (i) Referencing inline datum
```tsx
.txInInlineDatumPresent()
```
* (ii) Supplying datum
```tsx
.txInDatumValue(datum: Data | object | string, type?: "Mesh" | "CBOR" | "JSON")
```
**Redeemer of the unlock**
Redeemer can be provided in different data types. If your MeshTxBuilder does not include an `evaluator` instance, you can also provide your budget for the unlock with this redeemer endpoint
```tsx
.txInRedeemerValue(redeemer: Data | object | string, type: "Mesh" | "CBOR" | "JSON", exUnits?: Budget)
```
An example of complete set of endpoints to unlock assets from a script address:
```tsx
const txBuilder = new MeshTxBuilder({
fetcher: provider, // get a provider https://meshjs.dev/providers
verbose: true,
});
txBuilder
.spendingPlutusScriptV2()
.txIn(txHash: string, txIndex: number, amount?: Asset[], address?: string)
.txInInlineDatumPresent() // or .txInDatumValue(datum: Data | string | object)
.txInRedeemerValue(redeemer: Data | object | string, type?: string, exUnits?: Budget)
.spendingTxInReference(txHash: string, txIndex: number, spendingScriptHash?: string) // or supplying script
```
### Unlock Assets \[!toc]
Unlock assets in a Plutus script
**Asset unit**
`d9312da562da182b02322fd8acb536f37eb9d29fba7c49dc172555274d657368546f6b656e`
**Datum:** `meshsecretcode`
```tsx
const utxos = await wallet.getUtxos();
const collateral = await wallet.getCollateral();
const changeAddress = await wallet.getChangeAddress();
const script: PlutusScript = {
code: demoPlutusAlwaysSucceedScript,
version: "V2",
};
const { address: scriptAddress } = serializePlutusScript(script);
const assetUtxo = await fetchAssetUtxo({
address: scriptAddress,
asset: userInput,
datum: userInput2,
});
if (assetUtxo === undefined) {
throw "Asset UTXO not found";
}
const txBuilder = new MeshTxBuilder({
fetcher: provider, // get a provider https://meshjs.dev/providers
verbose: true,
});
const unsignedTx = await txBuilder
.spendingPlutusScriptV2()
.txIn(assetUtxo.input.txHash, assetUtxo.input.outputIndex)
.txInInlineDatumPresent()
.txInRedeemerValue(mConStr0([]))
.txInScript(demoPlutusAlwaysSucceedScript)
.changeAddress(changeAddress)
.txInCollateral(
collateral[0]?.input.txHash!,
collateral[0]?.input.outputIndex!,
collateral[0]?.output.amount!,
collateral[0]?.output.address!,
)
.selectUtxosFrom(utxos)
.complete();
const signedTx = await wallet.signTx(unsignedTx);
const txHash = await wallet.submitTx(signedTx);
```
## Minting Assets with Plutus Script
Minting Plutus tokens with `MeshTxBuilder` starts with any of the following script version indicators:
```tsx
.mintPlutusScriptV1()
.mintPlutusScriptV2()
.mintPlutusScriptV3()
```
Followed by specifying the minting information:
```tsx
.mint(quantity: string, policy: string, name: string)
```
Similar to unlocking assets, minting or burning Plutus tokens require providing redeemer and scripts. However, no datum information is needed in minting or burning.
**Script of the token**
The actual script can be either provided by transaction builder or referenced from an UTxO onchain.
* (i) Reference script
```tsx
.mintTxInReference(txHash: string, txIndex: number)
```
* (ii) Supplying script
```tsx
.mintingScript(scriptCbor: string)
```
**Redeemer of the mint**
Redeemer can be provided in different data types. If your MeshTxBuilder does not include an `evaluator` instance, you can also provide your budget for the unlock with this redeemer endpoint
```tsx
.mintRedeemerValue(redeemer: Data | object | string, type: "Mesh" | "CBOR" | "JSON", exUnits?: Budget)
```
### Mint Assets with Plutus Script \[!toc]
Mint native assets with Plutus Script. For this example, the Plutus script expects a data field of 'mesh'.
**Redeemer value:** `mesh`
```tsx
const utxos = await wallet.getUtxos();
const collateral: UTxO = (await wallet.getCollateral())[0]!;
const changeAddress = await wallet.getChangeAddress();
const policyId = resolveScriptHash(demoPlutusMintingScript, "V2");
const tokenName = 'mesh';
const tokenNameHex = stringToHex(tokenName);
const metadata = { [policyId]: { [tokenName]: { ...demoAssetMetadata } } };
const txBuilder = new MeshTxBuilder({
fetcher: provider, // get a provider https://meshjs.dev/providers
verbose: true,
});
const unsignedTx = await txBuilder
.mintPlutusScriptV2()
.mint("1", policyId, tokenNameHex)
.mintingScript(demoPlutusMintingScript)
.mintRedeemerValue(mConStr0(['mesh']))
.metadataValue(721, metadata)
.changeAddress(changeAddress)
.selectUtxosFrom(utxos)
.txInCollateral(
collateral.input.txHash,
collateral.input.outputIndex,
collateral.output.amount,
collateral.output.address,
)
.complete();
const signedTx = await wallet.signTx(unsignedTx, true);
const txHash = await wallet.submitTx(signedTx);
```
## Send Reference Scripts Onchain
For all smart contract executions, you have option to provide script as referencing onchain. To do so, you must send the script onchain first. You can attach the script like attaching datum to a output with this:
```tsx
.txOutReferenceScript(scriptCbor: string, version?: LanguageVersion)
```
### Send Reference Script \[!toc]
Provide script as referencing onchain
```tsx
const utxos = await wallet.getUtxos();
const changeAddress = await wallet.getChangeAddress();
const txBuilder = new MeshTxBuilder({
fetcher: provider, // get a provider https://meshjs.dev/providers
verbose: true,
});
const unsignedTx = await txBuilder
.txOut("addr_test1vpvx0sacufuypa2k4sngk7q40zc5c4npl337uusdh64kv0c7e4cxr", [])
.txOutReferenceScript("4e4d01000033222220051200120011", "V2")
.changeAddress(changeAddress)
.selectUtxosFrom(utxos)
.complete();
const signedTx = await wallet.signTx(unsignedTx);
const txHash = await wallet.submitTx(signedTx);
```
# Staking Transactions
URL: /apis/txbuilder/staking
Transactions for delegating ADA and managing stakepools
***
title: "Staking Transactions"
description: "Transactions for delegating ADA and managing stakepools"
icon: ArrowsPointingInIcon
--------------------------
In the code snippet, you will find `txBuilder`, which is an instance of `MeshTxBuilder`, with powerful low-level APIs that allow you to build transactions. Here's how to initialize **MeshTxBuilder**.
```tsx
const txBuilder = new MeshTxBuilder({
fetcher: provider, // get a provider https://meshjs.dev/providers
verbose: true,
});
```
## Register Stake Address
Same as Transaction, with `MeshTxBuilder`, you have to register a stake address before delegating to stakepools. Here are the 2 APIs you need:
```tsx
txBuilder
.registerStakeCertificate(rewardAddress)
.delegateStakeCertificate(rewardAddress, poolIdHash)
```
Since we need to provide the deserialize hash of pool ID, we can use the following util to get it:
```tsx
const poolIdHash = deserializePoolId(
"pool107k26e3wrqxwghju2py40ngngx2qcu48ppeg7lk0cm35jl2aenx",
);
```
### Register Stake Address \[!toc]
Register a stake address before delegating to a stakepool.
**Pool ID**
`pool107k26e3wrqxwghju2py40ngngx2qcu48ppeg7lk0cm35jl2aenx`
```tsx
const utxos = await wallet.getUtxos();
const address = await wallet.getChangeAddress();
const addresses = await wallet.getRewardAddresses();
const rewardAddress = addresses[0]!;
const poolIdHash = deserializePoolId("pool107k26e3wrqxwghju2py40ngngx2qcu48ppeg7lk0cm35jl2aenx");
if (rewardAddress === undefined) {
throw "No address found";
}
const txBuilder = new MeshTxBuilder({
fetcher: provider, // get a provider https://meshjs.dev/providers
verbose: true,
});
const unsignedTx = await txBuilder
.registerStakeCertificate(rewardAddress)
.delegateStakeCertificate(rewardAddress, poolIdHash)
.selectUtxosFrom(utxos)
.changeAddress(address)
.complete();
const signedTx = await wallet.signTx(unsignedTx);
const txHash = await wallet.submitTx(signedTx);
```
## Delegate Stake
Stake delegation with `MeshTxBuilder` is the same as the first delegate, but without registering the stake key, so only one API call is needed:
```tsx
txBuilder
.delegateStakeCertificate(rewardAddress, poolIdHash)
```
### Delegate Stake \[!toc]
Delegate stake to a stake pool
**Pool ID**
`pool107k26e3wrqxwghju2py40ngngx2qcu48ppeg7lk0cm35jl2aenx`
```tsx
const utxos = await wallet.getUtxos();
const address = await wallet.getChangeAddress();
const addresses = await wallet.getRewardAddresses();
const rewardAddress = addresses[0]!;
const poolIdHash = deserializePoolId("pool107k26e3wrqxwghju2py40ngngx2qcu48ppeg7lk0cm35jl2aenx");
if (rewardAddress === undefined) {
throw "No address found";
}
const txBuilder = new MeshTxBuilder({
fetcher: provider, // get a provider https://meshjs.dev/providers
verbose: true,
});
const unsignedTx = await txBuilder
.delegateStakeCertificate(rewardAddress, poolIdHash)
.selectUtxosFrom(utxos)
.changeAddress(address)
.complete();
const signedTx = await wallet.signTx(unsignedTx);
const txHash = await wallet.submitTx(signedTx);
```
## Withdraw Rewards
Use MeshTxBuilder’s withdrawal method to specify the reward address and amount.
* rewardAddress (string) - the reward address to withdraw from
* lovelace (number) - the amount to withdraw in Lovelace
```tsx
txBuilder
.withdrawal(rewardAddress, lovelace)
```
### Withdraw Rewards \[!toc]
Withdraw staking rewards.
**Amount in lovelace:** `1000000`
```tsx
const utxos = await wallet.getUtxos();
const address = await wallet.getChangeAddress();
const addresses = await wallet.getRewardAddresses();
const rewardAddress = addresses[0]!;
if (rewardAddress === undefined) {
throw "No address found";
}
const txBuilder = new MeshTxBuilder({
fetcher: provider, // get a provider https://meshjs.dev/providers
verbose: true,
});
const unsignedTx = await txBuilder
.withdrawal(rewardAddress, "1000000")
.selectUtxosFrom(utxos)
.changeAddress(address)
.complete();
const signedTx = await wallet.signTx(unsignedTx);
const txHash = await wallet.submitTx(signedTx);
```
## Deregister Stake
To deregister a stake address with MeshTxBuilder, use the following method:
* rewardAddress (string) - the bech32 reward address to deregister
```tsx
txBuilder
.deregisterStakeCertificate(rewardAddress: string)
```
### Deregister Stake \[!toc]
Deregister a stake address.
```tsx
const utxos = await wallet.getUtxos();
const address = await wallet.getChangeAddress();
const addresses = await wallet.getRewardAddresses();
const rewardAddress = addresses[0]!;
if (rewardAddress === undefined) {
throw "No address found";
}
const txBuilder = new MeshTxBuilder({
fetcher: provider, // get a provider https://meshjs.dev/providers
verbose: true,
});
const unsignedTx = await txBuilder
.deregisterStakeCertificate(rewardAddress)
.selectUtxosFrom(utxos)
.changeAddress(address)
.complete();
const signedTx = await wallet.signTx(unsignedTx);
const txHash = await wallet.submitTx(signedTx);
```
## Script Withdrawal - Supporting Withdraw Zero
Withdrawal from a script is supported by `MeshTxBuilder` with this set of APIs:
```tsx
txBuilder
.withdrawalPlutusScriptV2()
.withdrawal(rewardAddress, withdrawalAmount)
.withdrawalScript(stakeScriptCbor)
.withdrawalRedeemerValue(redeemer)
```
**Withdraw Zero**
This is a technique commonly used on Cardano to prove control of a stake key without actually withdrawing any rewards from its withdrawal account. To perform a "withdraw zero", you have to follow these steps:
* Register script stake key
```tsx
txBuilder
.registerStakeCertificate(stakeScriptHash)
```
* Withdraw Zero
```tsx
txBuilder
.withdrawalPlutusScriptV2()
.withdrawal(rewardAddress, "0")
.withdrawalScript(stakeScriptCbor)
.withdrawalRedeemerValue(redeemer)
```
### Register Script Stake Key \[!toc]
One off setup before triggering withdraw zero
```tsx
const utxos = await wallet.getUtxos();
const address = await wallet.getChangeAddress();
const txBuilder = getTxBuilder();
const stakeScriptCbor = alwaysSucceedMintingStakingScriptCbor(
deserializeAddress(address).pubKeyHash,
);
const txBuilder = new MeshTxBuilder({
fetcher: provider, // get a provider https://meshjs.dev/providers
verbose: true,
});
const unsignedTx = await txBuilder
.registerStakeCertificate(resolveScriptHash(stakeScriptCbor, "V2"))
.selectUtxosFrom(utxos)
.changeAddress(address)
.complete();
const signedTx = await wallet.signTx(unsignedTx, true);
const txHash = await wallet.submitTx(signedTx);
```
### Withdraw Zero \[!toc]
Actual withdrawal of zero to trigger script validation
```tsx
const utxos = await wallet.getUtxos();
const collateral = await wallet.getCollateral();
const address = await wallet.getChangeAddress();
const stakeScriptCbor = alwaysSucceedMintingStakingScriptCbor(
deserializeAddress(address).pubKeyHash,
);
const rewardAddress = serializeRewardAddress(
resolveScriptHash(stakeScriptCbor, "V2"),
true,
0,
);
const txBuilder = new MeshTxBuilder({
fetcher: provider, // get a provider https://meshjs.dev/providers
verbose: true,
});
const unsignedTx = await txBuilder
.withdrawalPlutusScriptV2()
.withdrawal(rewardAddress, "0")
.withdrawalScript(stakeScriptCbor)
.withdrawalRedeemerValue("")
.selectUtxosFrom(utxos)
.changeAddress(address)
.txInCollateral(...utxoToTxIn(collateral[0]!))
.complete();
const signedTx = await wallet.signTx(unsignedTx, true);
const txHash = await wallet.submitTx(signedTx);
```
# Browser Wallet
URL: /apis/wallets/browserwallet
For connecting, querying and performing wallet functions in accordance to CIP-30.
***
title: "Browser Wallet"
description: "For connecting, querying and performing wallet functions in accordance to CIP-30."
icon: BanknotesIcon
-------------------
`BrowserWallet` provides APIs for interacting with browser-based wallets in accordance with CIP-30. This standard defines the communication protocol between applications and user wallets, ensuring compatibility and security.
In addition to the CIP-30 APIs, `BrowserWallet` includes utility functions that simplify common tasks such as retrieving wallet balances, signing transactions, and managing UTXOs.
This section allows you to explore and test the available APIs for browser wallets, enabling seamless integration into your applications.
## Get Available Wallets
Returns a list of wallets available on user's device. Each wallet is an object with the following properties:
* A name is provided to display wallet's name on the user interface.
* A version is provided to display wallet's version on the user interface.
* An icon is provided to display wallet's icon on the user interface.
#### Get Available Wallets \[!toc]
Get a list of wallets on user's device
```tsx
import { BrowserWallet } from 'meshsdk/core';
await BrowserWallet.getAvailableWallets()
```
Example response:
```tsx
[
{
"name": "eternl",
"icon": "data:image/png;base64,ICONBASE64HERE",
"version": "0.1.0"
}
]
```
## Connect Wallet
This is the entry point to start communication with the user's wallet. The wallet should request the user's permission to connect the web page to the user's wallet, and if permission has been granted, the wallet will be returned, exposing the full API for the app to use.
Query `BrowserWallet.getAvailableWallets()` to get a list of available wallets, then provide the wallet `name` for which wallet the user would like to connect with.
You can also provide an `extensions` object to enable specific CIPs. For example, to enable CIP95, you would pass:
```tsx
await BrowserWallet.enable('eternl', [95]);
```
#### Connect Wallet \[!toc]
Connect to a CIP30 compatible wallet
```tsx
import { BrowserWallet } from '@meshsdk/core';
const wallet = await BrowserWallet.enable('eternl');
```
## Get Balance
This API retrieves a list of all assets in the connected wallet. Each asset is represented as an object containing the following properties:
* Unit: A unique identifier for the asset, which can be used to display its name in the user interface.
* Quantity: The amount of the asset held in the wallet.
This information is useful for applications that need to display wallet balances or perform operations involving specific assets.
#### Get Balance \[!toc]
Get all assets in the connected wallet
```tsx
await wallet.getBalance();
```
Example response:
```tsx
[
{
"unit": "lovelace",
"quantity": "796105407"
},
{
"unit": "0f5560dbc05282e05507aedb02d823d9d9f0e583cce579b81f9d1cd8",
"quantity": "1"
},
{
"unit": "9c8e9da7f81e3ca90485f32ebefc98137c8ac260a072a00c4aaf142d4d657368546f6b656e",
"quantity": "2"
},
]
```
## Get Change Address
This API returns an address owned by the wallet that should be used as a change address. A change address is where leftover assets from a transaction are returned during its creation. This ensures that any unspent assets are sent back to the connected wallet.
Applications can use this API to manage transaction outputs effectively, ensuring proper handling of change during transactions.
#### Get Change Address \[!toc]
Get address that should be used for transaction's change
```tsx
await wallet.getChangeAddress();
```
## Get Collateral
This API retrieves a list of UTXOs (unspent transaction outputs), controlled by the wallet, that can be used as collateral inputs for transactions involving Plutus scripts. The returned UTXOs must meet or exceed the specified ADA value target.
If the target cannot be met, an error message will be returned explaining the issue. Wallets may return UTXOs with a greater total ADA value than requested, but must never return UTXOs with a smaller total value.
This functionality is essential for applications that need to create transactions requiring collateral inputs.
#### Get Collateral \[!toc]
Get list of UTXOs that used as collateral inputs for transactions with plutus script inputs
```tsx
await wallet.getCollateral();
```
Example response:
```tsx
[
{
"input": {
"outputIndex": 1,
"txHash": "ff8d1e97c60989b4f...02ee937595ad741ff597af1"
},
"output": {
"address": "addr_test1qzm...z0fr8c3grjmysm5e6yx",
"amount": [ { "unit": "lovelace", "quantity": "5000000" } ]
}
}
]
```
## Get Network ID
This API retrieves the network ID of the currently connected account. The network ID indicates the blockchain network the wallet is connected to. For example:
* 0: Testnet
* 1: Mainnet
Other network IDs may be returned by wallets, but these are not governed by CIP-30. The network ID remains consistent unless the connected account changes.
Applications can use this information to ensure compatibility with the connected network.
#### Get Network ID \[!toc]
Get currently connected network
```tsx
await wallet.getNetworkId();
```
## Get Reward Addresses
Returns a list of reward addresses owned by the wallet. A reward address is a stake address that is used to receive rewards from staking, generally starts from `stake` prefix.
#### Get Reward Addresses \[!toc]
Get stake addresses
```tsx
await wallet.getRewardAddresses();
```
Example response:
```tsx
[
"stake_test1uzx0ksy9f4qnj2mzfdncqyjy84sszh64w43853nug5pedjgytgke9"
]
```
## Get Unused Addresses
Returns a list of unused addresses controlled by the wallet.
#### Get Unused Addresses \[!toc]
Get addresses that are unused
```tsx
await wallet.getUnusedAddresses();
```
Example response:
```tsx
[
"addr_test1qzk9x08mtre4jp8f7j8zu8802...r8c3grjmys7fl22c",
"addr_test1qrmf35xyw2petfr0e0p4at0r7...8sc3grjmysm73dk8",
"addr_test1qq6ts58hdaasd2q78fdjj0arm...i8c3grjmys85k8mf",
]
```
## Get Used Addresses
Returns a list of used addresses controlled by the wallet.
#### Get Used Addresses \[!toc]
Get addresses that are used
```tsx
await wallet.getUsedAddresses();
```
Example response:
```tsx
[
"addr_test1qzk9x08mtre4jp8f7j8zu8802...r8c3grjmys7fl88a",
"addr_test1qrmf35xyw2petfr0e0p4at0r7...8sc3grjmysm76gt3",
"addr_test1qq6ts58hdaasd2q78fdjj0arm...i8c3grjmys85dn39",
]
```
## Get UTXOs
Return a list of all UTXOs (unspent transaction outputs) controlled by the wallet.
#### Get UTXOs \[!toc]
Get UTXOs of the connected wallet
```tsx
const utxos = await wallet.getUtxos();
```
Example response:
```tsx
[
{
"input": {
"outputIndex": 0,
"txHash": "16dcbb1f93b4f9d5e...9106c7b121463c210ba"
},
"output": {
"address": "addr_test1qzag7whju08xwrq...z0fr8c3grjmysgaw9y8",
"amount": [
{
"unit": "lovelace",
"quantity": "1314550"
},
{
"unit": "f05c91a850...3d824d657368546f6b656e3032",
"quantity": "1"
}
]
}
}
]
```
## Sign Data
This endpoint uses CIP-8 message signing to sign arbitrary data and verify that the signature comes from the holder of the corresponding private key.
`signData` takes two arguments, the first one is the payload to sign and the second one is the address (optional).
By default, we get the first wallet's address with `wallet.getRewardAddresses()`, alternativelly you can specify the address to use.
#### Sign Data \[!toc]
Define a payload and sign it with wallet.
`Payload: mesh`
```tsx
const signature = await wallet.signData(mesh);
```
Example response:
```tsx
{
"signature": "845846a2012...f9119a18e8977d436385cecb08",
"key": "a4010103272006215...b81a7f6ed4fa29cc7b33186c"
}
```
Check out [this guide](https://meshjs.dev/guides/prove-wallet-ownership#server-verify-signature) to learn how to verify the signature.
## Sign Transaction
Requests user to sign the provided transaction (`tx`). The wallet should ask the user for permission, and if given, try to sign the supplied body and return a signed transaction. `partialSign` should be `true` if the transaction provided requires multiple signatures.
#### Sign Transaction \[!toc]
Create a transaction and sign it
```tsx
const signedTx = await wallet.signTx(tx, partialSign?);
```
Check out [Transaction](https://docs.meshjs.dev/transactions) to learn more on how to use this API.
## Submit Transaction
This API lets applications ask a wallet to submit signed transactions. On success, the wallet returns a transaction ID for tracking. On failure, it returns error details.
#### Submit Transaction \[!toc]
Submit a signed transaction with wallet
```tsx
const txHash = await wallet.submitTx(signedTx);
```
Check out [Transaction](https://docs.meshjs.dev/transactions) to learn more on how to use this API.
## Get Assests
Returns a list of assets in the wallet, excluding lovelace.
#### Get Assets \[!toc]
Get assets in the connected wallet
```tsx
const assets = await wallet.getAssets();
```
Example response:
```tsx
[
{
"unit": "1207329a668cf5c42b80a220a8c85d5e82ac0b6f5ecedda4c07a8acc4d657368486f6e6f72546f6b656e2d3530343935",
"policyId": "1207329a668cf5c42b80a220a8c85d5e82ac0b6f5ecedda4c07a8acc",
"assetName": "Mesh Token Of Appreciation",
"fingerprint": "asset1dw74h0w0meqg9cxkc9sezp8zqcxu8nl93fzfpz",
"quantity": "1"
}
{
"unit": "9c8e9da7f81e3ca90485f32ebefc98137c8ac260a072a00c4aaf142d4d657368546f6b656e",
"policyId": "9c8e9da7f81e3ca90485f32ebefc98137c8ac260a072a00c4aaf142d",
"assetName": "MeshToken",
"fingerprint": "asset177e7535dclmkkph8ewt9fsghllkwmpspa3n98p",
"quantity": "10"
}
]
```
## Get Lovelace
This API retrieves the Lovelace balance in the connected wallet. Lovelace is the smallest denomination of ADA, where 1 ADA equals 1,000,000 Lovelace.
Applications can use this information to display the wallet's balance or perform operations involving ADA.
#### Get Lovelace \[!toc]
Get amount of ADA in the connected wallet
```tsx
await wallet.getLovelace();
```
## Get Policy IDs
This API retrieves a list of policy IDs for all assets in the connected wallet. A policy ID is a unique identifier for a group of assets, often used to manage collections or verify asset ownership.
Applications can use this information to query assets belonging to specific policy IDs or display asset details to the user.
#### Get Policy IDs \[!toc]
Get a list of policy IDs from all assets in wallet
```tsx
await wallet.getPolicyIds();
```
Example response:
```tsx
[
"0f5560dbc05282e05507aedb02d823d9d9f0e583cce579b81f9d1cd8",
"5bed9e89299c69d9a54bbc82d88aa5a86698b2b7b9d0ed030fc4b0ff",
"9c8e9da7f81e3ca90485f32ebefc98137c8ac260a072a00c4aaf142d",
]
```
## Get a Collection of Assets
This API retrieves a list of assets associated with a specific policy ID. If no assets in the wallet belong to the specified policy ID, an empty list is returned.
Applications can use this API to query assets belonging to a particular policy ID, which is useful for managing collections of assets or verifying ownership.
To obtain a list of all policy IDs in the wallet, use `wallet.getPolicyIds()`.
#### Get a Collection of Assets \[!toc]
Get a list of assets belonging to the policy ID
`Policy ID: d9312da562da182b02322fd8acb536f37eb9d29fba7c49dc17255527`
```tsx
await wallet.getPolicyIdAssets('d9312da562da182b02322fd8acb536f37eb9d29fba7c49dc17255527');
```
## Get Supported Extensions
`getSupportedExtensions` is a static function that returns a list of CIPs that are supported by a wallet. You can query this function without connecting to a wallet, by providing the wallet name.
You can get the list of wallet on user's device with `await BrowserWallet.getAvailableWallets()`.
#### Get Supported Extensions \[!toc]
Get a list of CIPs that are supported by a wallet
`Wallet Name: eternl`
```tsx
await wallet.getSupportedExtensions('eternl');
```
## Get Extensions
This API retrieves a list of CIP-30 extensions enabled by the connected wallet. CIP-30 extensions define additional capabilities that wallets can support, enhancing their functionality.
Applications can use this information to determine the features supported by the wallet and adapt their behavior accordingly.
#### Get Extensions \[!toc]
Get a list of CIPs that are supported by the connected wallet
```tsx
await wallet.getExtensions();
```
Example response:
```tsx
[
{
"cip": 30
}
]
```
## Get DRep
This API retrieves the key, hash, and bech32 encoding of the DRep ID associated with the wallet. The DRep ID is a unique identifier used for delegation representation in the Cardano blockchain.
Applications can use this information to interact with delegation-related features or display the DRep ID details to the user.
#### Get DRep ID Key \[!toc]
Get the key, hash, and bech32 address of the DRep ID
```tsx
await wallet.getDRep();
```
Example response:
```tsx
{
"publicKey": "6984e406dd81...39e43d798fe1a89ab",
"publicKeyHash": "9f7f4b78...df83bd227e943e9808450",
"dRepIDCip105": "drep1vz0h7jmc...0axqgg5q4dls5u"
}
```
## Get Registered Pub Stake Keys
Get a list of registered public stake keys.
#### Get Registered Pub Stake Keys \[!toc]
Get a list of registered public stake keys
```tsx
await wallet.getRegisteredPubStakeKeys();
```
Example response:
```tsx
{
"pubStakeKeys": [
"d7eb3004c14647646...40f89c1a4b8a2eb0a3"
],
"pubStakeKeyHashes": [
"8cfb40854d41392b..5575627a467c450396c9"
]
}
```
## Get Unregistered Pub Stake Keys
Get a list of unregistered public stake keys.
#### Get Unregistered Pub Stake Keys \[!toc]
Get a list of unregistered public stake keys
```tsx
await wallet.getUnregisteredPubStakeKeys();
```
# Wallets
URL: /apis/wallets
Wallets APIs for interacting with the blockchain.
***
title: "Wallets"
description: "Wallets APIs for interacting with the blockchain."
icon: WalletIcon
full: true
----------
import {linksWallets} from "@/data/links-wallets";
import Link from "next/link";
import {
Card,
CardDescription,
CardTitle,
} from "@/components/ui/card";
# Mesh Wallet
URL: /apis/wallets/meshwallet
Mesh Wallet provides a set of APIs to interact with the blockchain. This wallet is compatible with Mesh transaction builders.
***
title: "Mesh Wallet"
description: "Mesh Wallet provides a set of APIs to interact with the blockchain. This wallet is compatible with Mesh transaction builders."
icon: WalletIcon
----------------
Whether you are building a minting script, or an application that requires multi-signature, `MeshWallet` is all you need to get started.
## Initialize Wallet
This API enables applications to load and initialize a wallet connection. It provides access to the wallet's capabilities, such as signing transactions, submitting transactions, and querying blockchain data.
The wallet connection is established securely, ensuring that sensitive operations are handled by the wallet and not exposed to the application directly. This is crucial for maintaining security and user trust.
Applications can use this functionality to integrate wallet features seamlessly, enabling blockchain interactions without requiring users to manage private keys manually.
You can initialize Mesh Wallet with:
* Mnemonic Phrases
* Private Keys
* Cardano CLI Generated Keys
* Address (Read Only Wallet)
First, we initialize a new Provider.
```tsx
import { MaestroProvider } from '@meshsdk/core';
const provider = new MaestroProvider({
network: 'Preprod',
apiKey: '', // Get yours by visiting https://docs.gomaestro.org/.
turboSubmit: false
});
```
```tsx
import { BlockfrostProvider } from '@meshsdk/core';
const provider = new BlockfrostProvider('');
```
```tsx
import { KoiosProvider } from '@meshsdk/core';
const provider = new KoiosProvider('', '');
```
```tsx
import { U5CProvider } from "@meshsdk/core";
const provider = new U5CProvider({
url: "http://localhost:5005U5c",
headers: {
"dmtr-api-key": "",
},
});
```
### Mnemonic Phrases
We can load a wallet with mnemonic phrases, and assign our provider to the `fetcher` and `submitter`:
```tsx
import { MeshWallet } from '@meshsdk/core';
const wallet = new MeshWallet({
networkId: 0, // 0: testnet, 1: mainnet
fetcher: provider,
submitter: provider,
key: {
type: 'mnemonic',
words: ["solution","solution","solution","solution","solution","solution","solution","solution","solution","solution","solution","solution","solution","solution","solution","solution","solution","solution","solution","solution","solution","solution","solution","solution"],
},
});
```
With the `wallet` loaded, you can sign transactions, we will see how to do this in the next section, for now lets get the wallet's address:
```tsx
const address = wallet.getChangeAddress();
```
### Private Keys
We can load a wallet with private keys:
```tsx
import { MeshWallet } from '@meshsdk/core';
const wallet = new MeshWallet({
networkId: 0, // 0: testnet, 1: mainnet
fetcher: provider,
submitter: provider,
key: {
type: 'root',
bech32: 'xprv1cqa46gk29plgkg98upclnjv5t425fcpl4rgf9mq2txdxuga7jfq5shk7np6l55nj00sl3m4syzna3uwgrwppdm0azgy9d8zahyf32s62klfyhe0ayyxkc7x92nv4s77fa0v25tufk9tnv7x6dgexe9kdz5gpeqgu',
},
});
```
### Cardano CLI generated skeys
We can load a wallet with CLI-generated keys by providing the `skey` generated by Cardano CLI. There are two files generated by Cardano CLI, by default, it is named `signing.skey` and `stake.skey`. Opening the `signing.skey` file should show:
```tsx
{
"type": "PaymentSigningKeyShelley_ed25519",
"description": "Payment Signing Key",
"cborHex": "5820aaca553a7b95b38b5d9b82a5daa7a27ac8e34f3cf27152a978f4576520dd6503"
}
```
We can get the `cborHex` from the `signing.skey` file, and load wallet with Cardano CLI generated skeys. Stake key is optional, but without it, you cannot sign staking transactions.
```tsx
import { MeshWallet } from '@meshsdk/core';
const wallet = new MeshWallet({
networkId: 0, // 0: testnet, 1: mainnet
fetcher: provider,
submitter: provider,
key: {
type: 'cli',
payment: '5820aaca553a7b95b38b5d9b82a5daa7a27ac8e34f3cf27152a978f4576520dd6503',
stake: '582097c458f19a3111c3b965220b1bef7d548fd75bc140a7f0a4f080e03cce604f0e',
},
});
```
### Address
We can load a wallet with address, this is useful for read-only wallets. A read-only wallet can only query the blockchain, it cannot sign transactions. This is useful for monitoring wallets. We can load wallet with the `address` type:
```tsx
import { MeshWallet } from '@meshsdk/core';
const wallet = new MeshWallet({
networkId: 0, // 0: testnet, 1: mainnet
fetcher: provider,
key: {
type: 'address',
address: 'addr_test1qpvx0sacufuypa2k4sngk7q40zc5c4npl337uusdh64kv0uafhxhu32dys6pvn6wlw8dav6cmp4pmtv7cc3yel9uu0nq93swx9',
},
});
```
### Initialize Wallet
After creating the wallet, we need to initialize it. This will initialize the cryptography library.
```tsx
await wallet.init()
```
With the `wallet` loaded, you can sign transactions, we will see how to do this in the [Sign Transaction](https://meshjs.dev/apis/wallets/meshwallet#sign-transaction) section, for now lets get the wallet's address:
```tsx
const address = wallet.getChangeAddress();
```
## Generate Wallet
You can generate deterministic keys based on the `Bitcoin BIP39`. These mnemonic phrases are essential for recovering your wallet and ensuring secure access to your funds.
```tsx
const mnemonic = MeshWallet.brew();
```
Once you have your mnemonic phrase, you can use it to generate deterministic keys. These keys include a series of private and public keys, which are crucial for managing your cryptocurrencies securely.
Alternatively, you can generate private keys directly by passing `true` to the `brew` function. This approach is useful for scenarios where you need immediate access to private keys without mnemonic phrases.
```tsx
const privatekey = MeshWallet.brew(true);
```
## Get Balance
This API returns a comprehensive list of all assets in the wallet, including lovelace. Each asset is represented as an object with the following properties:
* `unit`: A unique identifier for the asset, often used for display purposes.
* `quantity`: The amount of the asset held in the wallet.
### Get Balance \[!toc]
Get all assets in the connected wallet
```tsx
const balance = await wallet.getBalance();
```
Example response:
```tsx
[
{
"unit": "lovelace",
"quantity": "796105407"
},
{
"unit": "0f5560dbc05282e05507aedb02d823d9d9f0e583cce579b81f9d1cd8",
"quantity": "1"
},
{
"unit": "9c8e9da7f81e3ca90485f32ebefc98137c8ac260a072a00c4aaf142d4d657368546f6b656e",
"quantity": "2"
},
]
```
## Get Change Address
This API returns an address owned by the wallet which is essential during transaction creation to ensure leftover assets are securely returned to the connected wallet.
The change address helps maintain the integrity of transactions by preventing asset loss and ensuring proper allocation of funds.
### Get Change Address \[!toc]
Get address that should be used for transaction's change
```tsx
const changeAddress = await wallet.getChangeAddress();
```
## Get Collateral
This API retrieves a list of UTXOs (unspent transaction outputs) controlled by the wallet that are suitable for use as collateral inputs in transactions involving Plutus script inputs. Collateral UTXOs are pure ADA-only UTXOs required to meet the specified ADA value target.
If the target cannot be met, an error message explaining the issue will be returned. Wallets may return UTXOs exceeding the target value but must never return UTXOs below the specified value.
This API accepts the `addressType` parameter, where you can specify the type of address you want to get. The available options are:
* payment (default)
* enterprise
### Get Collateral \[!toc]
Get list of UTXOs that used as collateral inputs for transactions with plutus script inputs
```tsx
const collateralUtxos = await wallet.getCollateral();
```
Example response:
```tsx
[
{
"input": {
"outputIndex": 1,
"txHash": "ff8d1e97c60989b4f...02ee937595ad741ff597af1"
},
"output": {
"address": "addr_test1qzm...z0fr8c3grjmysm5e6yx",
"amount": [ { "unit": "lovelace", "quantity": "5000000" } ]
}
}
]
```
## Get Network ID
This API returns the network ID of the currently connected account. The network ID indicates the environment in which the wallet is operating:
* `0`: Testnet
* `1`: Mainnet
Other network IDs may be returned by wallets, but these are not governed by CIP-30. The network ID remains consistent unless the connected account changes.
### Get Network ID \[!toc]
Get currently connected network
```tsx
const networkId = wallet.getNetworkId();
```
## Get Reward Addresses
This API retrieves a list of reward addresses owned by the wallet. Reward addresses are stake addresses used to receive rewards from staking activities.
Reward addresses typically start with the `stake` prefix, making them easily identifiable. These addresses are essential for tracking staking rewards and managing staking operations.
### Get Reward Addresses \[!toc]
Get stake addresses
```tsx
const rewardAddresses = wallet.getRewardAddresses();
```
Example response:
```tsx
[
"stake_test1uzx0ksy9f4qnj2mzfdncqyjy84sszh64w43853nug5pedjgytgke9"
]
```
## Get Unused Addresses
This API retrieves a list of unused addresses controlled by the wallet. Unused addresses are wallet-controlled addresses that have not been involved in any transactions.
Unused addresses are important for maintaining privacy and security in transactions. They can be used for new transactions without revealing previous activity.
### Get Unused Addresses \[!toc]
Get addresses that are unused
```tsx
const unusedAddresses = wallet.getUnusedAddresses();
```
Example response:
```tsx
[
"addr_test1qzk9x08mtre4jp8f7j8zu8802...r8c3grjmys7fl22c",
"addr_test1qrmf35xyw2petfr0e0p4at0r7...8sc3grjmysm73dk8",
"addr_test1qq6ts58hdaasd2q78fdjj0arm...i8c3grjmys85k8mf",
]
```
## Get Used Addresses
This API retrieves a list of used addresses controlled by the wallet. Used addresses are wallet-controlled addresses that have been involved in transactions.
Tracking used addresses is essential for analyzing transaction history and managing wallet activity. These addresses provide insights into past transactions.
### Get Used Addresses \[!toc]
Get addresses that are used
```tsx
const usedAddresses = wallet.getUsedAddresses();
```
Example response:
```tsx
[
"addr_test1qzk9x08mtre4jp8f7j8zu8802...r8c3grjmys7fl88a",
"addr_test1qrmf35xyw2petfr0e0p4at0r7...8sc3grjmysm76gt3",
"addr_test1qq6ts58hdaasd2q78fdjj0arm...i8c3grjmys85dn39",
]
```
## Get UTXOs
This API retrieves a list of all UTXOs (unspent transaction outputs) controlled by the wallet. UTXOs are essential for constructing transactions and managing wallet balances.
Each UTXO includes details such as the transaction hash, output index, address, and amount. These details are crucial for identifying and utilizing unspent outputs.
This API accepts the addressType parameter, where you can specify the type of address you want to get. The available options are:
* payment (default)
* enterprise
### Get UTXOs \[!toc]
Get UTXOs of the connected wallet
```tsx
const utxos = await wallet.getUtxos();
```
Example response:
```tsx
[
{
"input": {
"outputIndex": 0,
"txHash": "16dcbb1f93b4f9d5e...9106c7b121463c210ba"
},
"output": {
"address": "addr_test1qzag7whju08xwrq...z0fr8c3grjmysgaw9y8",
"amount": [
{
"unit": "lovelace",
"quantity": "1314550"
},
{
"unit": "f05c91a850...3d824d657368546f6b656e3032",
"quantity": "1"
}
]
}
}
]
```
## Sign Data
This API allows applications to request the signing of arbitrary data using the private keys managed by the connected wallet. This is useful for verifying the authenticity of data or creating cryptographic proofs.
The wallet ensures that the signing process is secure and that private keys are not exposed during the operation. The signed data can be used for various purposes, such as authentication, data integrity checks, or blockchain interactions.
This functionality is essential for applications that require secure and verifiable data signing capabilities.
### Sign Data \[!toc]
Define a payload and sign it with wallet.
`Payload: mesh`
```tsx
const signature = await wallet.signData('mesh');
```
Check out [this guide](https://meshjs.dev/guides/prove-wallet-ownership#server-verify-signature) to learn how to verify the signature.
Example response:
```tsx
{
"signature": "845846a2012...f9119a18e8977d436385cecb08",
"key": "a4010103272006215...b81a7f6ed4fa29cc7b33186c"
}
```
## Sign Transaction
This API enables applications to request the signing of a transaction using the private keys managed by the connected wallet. Signing a transaction is a critical step in ensuring its authenticity and authorization.
The wallet ensures that the transaction is signed securely, preventing unauthorized access to private keys. Once signed, the transaction can be submitted to the blockchain network for processing.
This functionality is vital for applications that need to interact with the blockchain securely, as it delegates sensitive operations to the wallet.
### Sign Transaction \[!toc]
Create a transaction and sign it
Check out [MeshWallet](https://docs.meshjs.dev/wallets/classes/MeshWallet#signTx) documentation to learn more on how to use this API.
```tsx
const signedTx = await wallet.signTx(tx, partialSign?);
```
## Submit Transaction
This API allows applications to request the submission of a signed transaction through the connected wallet. The wallet will attempt to send the transaction to the blockchain network.
If the transaction is successfully submitted, the wallet returns the transaction ID, which can be used by the application to track its status on the blockchain. In case of an error during submission, the wallet provides error messages or failure details.
This functionality is essential for applications that rely on wallet integration to handle transaction submission securely and efficiently.
### Submit Transaction \[!toc]
Submit a signed transaction with wallet
Check out [MeshWallet](https://docs.meshjs.dev/wallets/classes/MeshWallet#submitTx) documentation to learn more on how to use this API.
```tsx
const txHash = await wallet.submitTx(signedTx);
```
## Create Collateral UTXO
Collateral is a monetary guarantee provided by the user to ensure the integrity of smart contracts and compensate nodes in case phase-2 validation fails. It is specified during transaction construction by adding collateral inputs to the transaction.
The total balance in the UTXOs corresponding to these inputs represents the transaction's collateral amount. If the contract executes successfully, the collateral remains safe. This mechanism ensures that contracts are carefully designed and thoroughly tested.
```tsx
const txhash = await wallet.createCollateral();
```
## Get Assets
This API retrieves a list of assets in the wallet, excluding lovelace. Each asset is represented as an object with the following properties:
* `unit`: A unique identifier for the asset.
* `policyId`: The policy ID associated with the asset.
* `assetName`: The name of the asset.
* `fingerprint`: A unique fingerprint for the asset.
* `quantity`: The amount of the asset held in the wallet.
### Get Assets \[!toc]
Get all assets in the connected wallet
```tsx
const assets = await wallet.getAssets();
```
Example response:
```tsx
[
{
"unit": "1207329a668cf5c42b80a220a8c85d5e82ac0b6f5ecedda4c07a8acc4d657368486f6e6f72546f6b656e2d3530343935",
"policyId": "1207329a668cf5c42b80a220a8c85d5e82ac0b6f5ecedda4c07a8acc",
"assetName": "Mesh Token Of Appreciation",
"fingerprint": "asset1dw74h0w0meqg9cxkc9sezp8zqcxu8nl93fzfpz",
"quantity": "1"
}
{
"unit": "9c8e9da7f81e3ca90485f32ebefc98137c8ac260a072a00c4aaf142d4d657368546f6b656e",
"policyId": "9c8e9da7f81e3ca90485f32ebefc98137c8ac260a072a00c4aaf142d",
"assetName": "MeshToken",
"fingerprint": "asset177e7535dclmkkph8ewt9fsghllkwmpspa3n98p",
"quantity": "10"
}
]
```
## Get Lovelace
This API retrieves the lovelace balance in the wallet. Lovelace is the smallest unit of ADA, where 1 ADA equals 1,000,000 lovelace.
Knowing the lovelace balance is essential for managing wallet funds and performing transactions.
### Get Lovelace \[!toc]
Get lovelace balance in the connected wallet
```tsx
const lovelace = await wallet.getLovelace();
```
## Get Policy IDs
This API retrieves a list of policy IDs from all assets in the wallet. A policy ID is a unique identifier that groups assets under a common policy.
Policy IDs are useful for querying assets associated with specific policies. For example, you can use a policy ID to retrieve all assets belonging to that policy.
### Get Policy IDs \[!toc]
Get a list of policy IDs from all assets in wallet
```tsx
const policyIds = await wallet.getPolicyIds();
```
Example response:
```tsx
[
"0f5560dbc05282e05507aedb02d823d9d9f0e583cce579b81f9d1cd8",
"5bed9e89299c69d9a54bbc82d88aa5a86698b2b7b9d0ed030fc4b0ff",
"9c8e9da7f81e3ca90485f32ebefc98137c8ac260a072a00c4aaf142d",
]
```
## Get a Collection of Assets
This API retrieves a list of assets associated with a specific policy ID. A policy ID is a unique identifier that groups assets under a common policy.
If no assets in the wallet belong to the specified policy ID, an empty list is returned. To query for available policy IDs, use `wallet.getPolicyIds()`.
### Get a Collection of Assets \[!toc]
Get a list of assets belonging to the policy ID
`Policy ID: d9312da562da182b02322fd8acb536f37eb9d29fba7c49dc17255527`
```tsx
const assets = await wallet.getPolicyIdAssets('d9312da562da182b02322fd8acb536f37eb9d29fba7c49dc17255527');
```
## Get DRep
The DRep ID is a unique identifier for the user's wallet. It consists of three components:
* `publicKey`: The public key associated with the wallet.
* `publicKeyHash`: A hash of the public key for verification purposes.
* `dRepIDCip105`: The bech32 encoding of the DRep ID.
### Get DRep \[!toc]
Get the key, hash, and bech32 address of the DRep ID
```tsx
await wallet.getDRep();
```
Example response:
```tsx
{
"publicKey": "6984e406dd81...39e43d798fe1a89ab",
"publicKeyHash": "9f7f4b78...df83bd227e943e9808450",
"dRepIDCip105": "drep1vz0h7jmc...0axqgg5q4dls5u"
}
```
# Available Contracts
URL: /midnight/midnight-contracts-wizard/contracts
Explore the smart contract templates available in the Midnight Contracts Wizard
***
title: Available Contracts
description: Explore the smart contract templates available in the Midnight Contracts Wizard
icon: DocumentTextIcon
----------------------
The Midnight Contracts Wizard includes several production-ready smart contract templates. Each contract is designed with privacy and zero-knowledge proofs in mind.
## Tokenization Contract
**7 ZK Circuits**
A complete project tokenization system with zero-knowledge privacy for investments.
### Features
* Private token minting and burning
* Confidential balance management
* Investment tracking with ZK proofs
* Transfer with privacy guarantees
### Use Cases
* Real estate tokenization
* Asset-backed securities
* Private equity tracking
* Confidential fundraising
***
## Staking Contract
**8 ZK Circuits**
A privacy-focused staking system with rewards and configurable lock periods.
### Features
* Private stake amounts
* Confidential reward distribution
* Flexible lock periods
* Slashing mechanisms
### Use Cases
* Network validation
* Governance participation
* Yield generation
* Long-term holding incentives
***
## Identity Contracts
**1 ZK Circuit**
Complete identity management system with cryptographic libraries for privacy-preserving verification.
### Features
* Zero-knowledge identity proofs
* Selective disclosure
* Credential verification
* Privacy-preserving authentication
### Use Cases
* KYC compliance
* Age verification
* Credential validation
* Access control
***
## Oracle Contract
**7 ZK Circuits**
Decentralized oracle system with privacy-preserving data feeds.
### Features
* Confidential data ingestion
* Multi-source aggregation
* Tamper-proof feeds
* Privacy-preserving validation
### Use Cases
* Price feeds
* Weather data
* Sports results
* IoT data streams
***
## Lending & Borrowing Contract
**7 ZK Circuits**
Privacy-preserving decentralized lending protocol.
### Features
* Confidential collateral management
* Private loan amounts
* Interest rate privacy
* Liquidation with ZK proofs
### Use Cases
* DeFi lending platforms
* Peer-to-peer lending
* Collateralized loans
* Credit lines
***
## Contract Selection Tips
### Single Contract Projects
Perfect for focused applications or proof-of-concepts. Select one contract type and build a specialized solution.
### Multi-Contract Projects
Combine multiple contracts for complex dApps. For example:
* **Tokenization + Oracle** - Real-world asset pricing
* **Staking + Identity** - Governance with verified participants
* **Lending + Oracle** - Price-aware DeFi protocols
### All Contracts
Select all contracts to explore the full ecosystem or build a comprehensive platform.
## Technical Details
Each contract includes:
* Complete `.compact` source files
* Compiled TypeScript interfaces
* ZK circuit configurations
* Build and deployment scripts
* Example usage documentation
## Next Steps
Learn about the [Project Structure](/midnight/midnight-contracts-wizard/project-structure) that gets generated for your selected contracts.
# Overview
URL: /midnight/midnight-contracts-wizard
A CLI tool to create new Midnight contracts projects with selected smart contracts
***
title: Overview
description: A CLI tool to create new Midnight contracts projects with selected smart contracts
icon: SparklesIcon
------------------
import {linksMidnightContractsWizard} from "@/data/links-midnight";
import Link from "next/link";
import {
Card,
CardDescription,
CardTitle,
} from "@/components/ui/card";
);
```
## Best Practices
1. **Always handle errors** - Wrap API calls in try-catch blocks
2. **Use TypeScript** - Leverage type safety for better development experience
3. **Validate inputs** - Ensure contract instances and addresses are valid
4. **Monitor state changes** - Listen for contract state updates
5. **Test thoroughly** - Use testnet before deploying to mainnet
6. **Implement retry logic** - Allow users to retry failed operations
7. **Secure key handling** - Never store private keys in localStorage
# Getting Started
URL: /midnight/midnight-setup/getting-started
Install and set up @meshsdk/midnight-setup for building zero-knowledge privacy dApps on Midnight Network
***
title: "Getting Started"
description: "Install and set up @meshsdk/midnight-setup for building zero-knowledge privacy dApps on Midnight Network"
icon: RocketLaunchIcon
----------------------
import Link from "fumadocs-core/link";
This guide will help you get started with building dApps on Midnight Network using the `@meshsdk/midnight-setup` package. Midnight Network is a zero-knowledge privacy network that enables confidential smart contracts and transactions.
## Installation
Install the Midnight setup package using your preferred package manager:
```bash
# Using npm
npm install @meshsdk/midnight-setup
# Using yarn
yarn add @meshsdk/midnight-setup
```
## Quick Start
### Basic Usage
```typescript
import { MidnightSetupAPI } from '@meshsdk/midnight-setup';
// Deploy a new contract
const api = await MidnightSetupAPI.deployContract(providers, contractInstance);
// Join an existing contract
const api = await MidnightSetupAPI.joinContract(providers, contractInstance, contractAddress);
// Get contract state
const state = await api.getContractState();
// Get ledger state
const ledgerState = await api.getLedgerState();
```
## What's Included
This monorepo contains everything you need to build Midnight Network dApps:
Example repository: [midnight-setup](https://github.com/MeshJS/midnight-setup)
* **@meshsdk/midnight-setup** - Main npm package with API and types
* **packages/ui** - Example React application
* **packages/cli** - Command-line tools
* **packages/api** - Core API implementation
* \*\*packages/contract/ - Compact contracts
## Project Structure
```
├── packages/
│ ├── api/ # Core API implementation
│ ├── ui/ # React example app
│ └── cli/ # Command-line tools
│ └── contract/ # Compact contracts
├── compact/ # Smart contract source
└── README.md
```
## Key Features
* **Zero-knowledge privacy** - Built for Midnight Network
* **TypeScript support** - Full type safety
* **React hooks** - Easy integration
* **Wallet integration** - Lace Beta Wallet support
* **CLI tools** - Development utilities
* **Compact contract** - Compact contract integration
## Next Steps
* Learn about the [Core API Methods](/midnight/api)
* Set up [Lace Wallet Integration](/midnight/wallet)
* Explore [Integration Examples](/midnight/examples)
## Resources
* [Midnight Network Documentation](https://docs.midnight.network/)
* [Mesh SDK Documentation](https://midnight.meshjs.dev/en)
* [Lace Beta Wallet](https://chromewebstore.google.com/detail/lace-midnight-preview/hgeekaiplokcnmakghbdfbgnlfheichg)
# Overview
URL: /midnight/midnight-setup
Complete development setup for building Midnight Network dApps
***
title: "Overview"
description: "Complete development setup for building Midnight Network dApps"
icon: Cog6ToothIcon
-------------------
import {linksMidnightSetup} from "@/data/links-midnight";
import Link from "next/link";
import {
Card,
CardDescription,
CardTitle,
} from "@/components/ui/card";
# Lace Wallet Integration
URL: /midnight/midnight-setup/wallet
Complete Lace Beta Wallet integration for Midnight Network dApps
***
title: "Lace Wallet Integration"
description: "Complete Lace Beta Wallet integration for Midnight Network dApps"
icon: WalletIcon
----------------
import Link from "fumadocs-core/link";
This project includes a complete Lace Beta Wallet integration for Midnight Network, enabling seamless wallet connectivity and transaction management.
## Wallet Features
| Feature | Description | Implementation |
| -------------------- | -------------------------------- | ------------------------------------- |
| Connect Wallet | Connect to Lace Beta Wallet | `wallet.enable()` |
| Disconnect Wallet | Disconnect from wallet | `wallet.disconnect()` |
| Get Wallet State | Retrieve wallet address and keys | `wallet.state()` |
| Deploy Contract | Deploy contracts through wallet | `wallet.submitTransaction()` |
| Join Contract | Join existing contracts | `wallet.balanceAndProveTransaction()` |
| Balance Transactions | Balance and prove transactions | Wallet API integration |
## Wallet Provider Setup
### Basic Connection
Connect to Lace Wallet and get wallet state:
```typescript
// Check if Lace wallet is available
const wallet = window.midnight?.mnLace;
if (!wallet) {
throw new Error('Please install Lace Beta Wallet for Midnight Network');
}
// Enable wallet and get state
const walletAPI = await wallet.enable();
const walletState = await walletAPI.state();
const uris = await wallet.serviceUriConfig();
```
### When to Use Each Method
* **`wallet.enable()`** - Use when you need to connect to the wallet for the first time
* **`wallet.state()`** - Use to get current wallet information (address, keys, etc.)
* **`wallet.serviceUriConfig()`** - Use to get network service URLs (indexer, prover, etc.)
* **`wallet.disconnect()`** - Use when user wants to disconnect from the wallet
## React Wallet Hook
### Hook Implementation
Complete implementation of the `useMidnightWallet` hook:
```typescript
import { useState, useCallback } from 'react';
export const useMidnightWallet = () => {
const [walletState, setWalletState] = useState(null);
const [isConnected, setIsConnected] = useState(false);
const [isLoading, setIsLoading] = useState(false);
const [error, setError] = useState(null);
const connectWallet = useCallback(async () => {
setIsLoading(true);
setError(null);
try {
const wallet = window.midnight?.mnLace;
if (!wallet) {
throw new Error('Please install Lace Beta Wallet for Midnight Network');
}
const walletAPI = await wallet.enable();
const state = await walletAPI.state();
const uris = await wallet.serviceUriConfig();
setWalletState({ state, uris, walletAPI });
setIsConnected(true);
} catch (err) {
setError(err.message);
throw err;
} finally {
setIsLoading(false);
}
}, []);
const disconnectWallet = useCallback(async () => {
try {
const wallet = window.midnight?.mnLace;
if (wallet) {
await wallet.disconnect();
setWalletState(null);
setIsConnected(false);
setError(null);
}
} catch (err) {
setError(err.message);
}
}, []);
return {
connectWallet,
disconnectWallet,
walletState,
isConnected,
isLoading,
error
};
};
```
### Using the Hook
```typescript
import { useMidnightWallet } from './hooks/useMidnightWallet';
function App() {
const {
connectWallet,
disconnectWallet,
walletState,
isConnected,
isLoading,
error
} = useMidnightWallet();
return (
{error &&
Error: {error}
}
{isConnected ? (
Connected: {walletState?.state?.address}
) : (
)}
);
}
```
## Provider Setup
### Complete Provider Configuration
Set up all necessary providers for Midnight Network integration:
```typescript
import { FetchZkConfigProvider } from "@midnight-ntwrk/midnight-js-fetch-zk-config-provider";
import { httpClientProofProvider } from "@midnight-ntwrk/midnight-js-http-client-proof-provider";
import { indexerPublicDataProvider } from "@midnight-ntwrk/midnight-js-indexer-public-data-provider";
import { levelPrivateStateProvider } from "@midnight-ntwrk/midnight-js-level-private-state-provider";
import type { MidnightSetupContractProviders } from "@meshsdk/midnight-setup";
export async function setupProviders(): Promise {
const wallet = window.midnight?.mnLace;
if (!wallet) {
throw new Error("Please install Lace Beta Wallet for Midnight Network");
}
const walletAPI = await wallet.enable();
const walletState = await walletAPI.state();
const uris = await wallet.serviceUriConfig();
return {
privateStateProvider: levelPrivateStateProvider({
privateStateStoreName: "my-dapp-state",
}),
zkConfigProvider: new FetchZkConfigProvider(
window.location.origin,
fetch.bind(window),
),
proofProvider: httpClientProofProvider(uris.proverServerUri),
publicDataProvider: indexerPublicDataProvider(
uris.indexerUri,
uris.indexerWsUri,
),
walletProvider: {
coinPublicKey: walletState.coinPublicKey,
encryptionPublicKey: walletState.encryptionPublicKey,
balanceTx: (tx, newCoins) => {
return walletAPI.balanceAndProveTransaction(tx, newCoins);
},
},
midnightProvider: {
submitTx: (tx) => {
return walletAPI.submitTransaction(tx);
},
},
};
}
```
### Provider Explanation
* **`privateStateProvider`** - Manages private state storage
* **`zkConfigProvider`** - Handles zero-knowledge proof configuration
* **`proofProvider`** - Manages proof generation and verification
* **`publicDataProvider`** - Fetches public blockchain data from indexer
* **`walletProvider`** - Integrates with Lace wallet for transactions
* **`midnightProvider`** - Handles transaction submission to Midnight Network
## Basic Usage Example
### Complete Workflow
Here's a complete example showing the full workflow from wallet connection to contract interaction:
```typescript
import { useMidnightWallet } from './hooks/useMidnightWallet';
import { setupProviders } from './lib/providers';
import { MidnightSetupAPI } from '@meshsdk/midnight-setup';
function CompleteExample() {
const { connectWallet, disconnectWallet, walletState, isConnected, isLoading, error } = useMidnightWallet();
const [contractApi, setContractApi] = useState(null);
const [contractState, setContractState] = useState(null);
// Step 1: Connect wallet
const handleConnectWallet = async () => {
try {
await connectWallet();
console.log('✅ Wallet connected successfully');
} catch (error) {
console.error('❌ Wallet connection failed:', error.message);
}
};
// Step 2: Setup providers and deploy contract
const handleDeployContract = async () => {
if (!isConnected) {
alert('Please connect wallet first');
return;
}
try {
console.log('🔄 Setting up providers...');
const providers = await setupProviders();
console.log('🔄 Deploying contract...');
const contractInstance = new MyContract({});
const api = await MidnightSetupAPI.deployContract(providers, contractInstance);
setContractApi(api);
console.log('✅ Contract deployed at:', api.deployedContractAddress);
} catch (error) {
console.error('❌ Contract deployment failed:', error.message);
}
};
// Step 3: Get contract state
const handleGetContractState = async () => {
if (!contractApi) {
alert('Please deploy or join a contract first');
return;
}
try {
console.log('🔄 Getting contract state...');
const state = await contractApi.getContractState();
setContractState(state);
console.log('✅ Contract state:', state);
} catch (error) {
console.error('❌ Failed to get contract state:', error.message);
}
};
// Step 4: Join existing contract
const handleJoinContract = async (contractAddress) => {
if (!isConnected) {
alert('Please connect wallet first');
return;
}
try {
console.log('🔄 Setting up providers...');
const providers = await setupProviders();
console.log('🔄 Joining contract...');
const contractInstance = new MyContract({});
const api = await MidnightSetupAPI.joinContract(providers, contractInstance, contractAddress);
setContractApi(api);
console.log('✅ Joined contract:', contractAddress);
} catch (error) {
console.error('❌ Failed to join contract:', error.message);
}
};
return (
Complete Midnight Network Example
{error && (
Error: {error}
)}
Step 1: Connect Wallet
{!isConnected ? (
) : (
✅ Wallet connected: {walletState?.state?.address}
)}
Step 2: Deploy Contract
Step 3: Join Contract
Step 4: Get Contract State
{contractState && (
Contract State:
{JSON.stringify(contractState, null, 2)}
)}
);
}
export default CompleteExample;
```
### Step-by-Step Breakdown
1. **Connect Wallet** - Use `useMidnightWallet` hook to connect to Lace Beta Wallet
2. **Setup Providers** - Call `setupProviders()` to configure all necessary providers
3. **Deploy Contract** - Use `MidnightSetupAPI.deployContract()` to deploy a new contract
4. **Join Contract** - Use `MidnightSetupAPI.joinContract()` to connect to existing contract
5. **Get State** - Use `api.getContractState()` to retrieve contract information
6. **Handle Errors** - Implement proper error handling throughout the workflow
## Error Handling
### Common Wallet Errors
```typescript
const handleWalletError = (error) => {
switch (error.message) {
case 'Please install Lace Beta Wallet for Midnight Network':
return 'Please install Lace Beta Wallet';
case 'User rejected':
return 'Transaction was rejected by user';
case 'Insufficient funds':
return 'Insufficient funds for transaction';
case 'Wallet is disconnected':
return 'Wallet is disconnected. Please reconnect.';
default:
return 'An unexpected error occurred';
}
};
```
### Error Handling in Components
```typescript
const handleConnect = async () => {
try {
await connectWallet();
console.log('Wallet connected successfully');
} catch (error) {
const errorMessage = handleWalletError(error);
console.error('Connection failed:', errorMessage);
// Show error to user
}
};
```
# Cardano Course
URL: /resources/cardano-course
A comprehensive course for building Cardano applications with Mesh SDK and Aiken smart contracts.
***
title: "Cardano Course"
description: "A comprehensive course for building Cardano applications with Mesh SDK and Aiken smart contracts."
icon: AcademicCapIcon
---------------------
import Link from "fumadocs-core/link";
Welcome to the Cardano Course! This comprehensive course will guide you through building Cardano applications, from basic wallet interactions to advanced smart contract development with Aiken.
## Course Structure
This course is divided into lessons and workshops, covering everything you need to become a proficient Cardano developer.
### Lessons
The course includes 10 detailed lessons covering:
1. **Hello World** - Install Mesh SDK and learn wallet basics
2. **Multi-signature Transactions** - Build multi-sig transactions
3. **Aiken Contracts** - Introduction to Aiken smart contracts
4. **Contract Testing** - Testing strategies for smart contracts
5. **Avoid Redundant Validation** - Smart contract optimization patterns
6. **Interpreting Blueprint** - Understanding Aiken blueprints
7. **Vesting Contract** - Build a token vesting contract
8. **Plutus NFT Contract** - Create NFT minting contracts
9. **Hydra End-to-End** - Layer 2 scaling with Hydra
10. **Web3 Services** - Wallet-as-a-service and transaction sponsorship
### Workshops
Join our online workshops to learn alongside other developers and get hands-on experience with the Mesh SDK.
## Getting Started
Begin with Lesson 1: Hello World to set up your development environment and create your first Cardano transaction.
## Prerequisites
* Basic understanding of TypeScript/JavaScript
* Node.js v20+ installed
* Familiarity with blockchain concepts (helpful but not required)
## What You'll Learn
* Building Cardano dApps with Mesh SDK
* Creating and deploying Aiken smart contracts
* Transaction building and wallet integration
* Smart contract testing and optimization
* NFT minting and token management
* Layer 2 scaling solutions
Start your journey into Cardano development today!
# Hello World
URL: /resources/cardano-course/lessons/01-wallet-send-lovelace
Install Mesh SDK and learn how to send assets using the Mesh wallet.
***
title: "Hello World"
description: "Install Mesh SDK and learn how to send assets using the Mesh wallet."
-----------------------------------------------------------------------------------
import Link from "fumadocs-core/link";
Welcome to the first lesson of the Cardano Application Development Course! In this session, you'll set up the Mesh SDK and learn how to create a wallet using `MeshWallet` and send assets using `MeshTxBuilder`.
## System setup
Before we begin, let's prepare our system for development. We will be using Node.js v24+ in this course. We recommend nvm to manage your node versions.
### Create a package.json file
First, create a new `package.json` file in the root of your project with the following content:
```json
{
"type": "module",
"dependencies": {},
"scripts": {}
}
```
### Install the necessary packages
Open your terminal and run these commands to install the MeshSDK:
```bash
npm install
npm install @meshsdk/core
```
Here's how your `package.json` file should look after installing the package:
```json
{
"type": "module",
"dependencies": {
"@meshsdk/core": "^1.9.0",
},
"scripts": {}
}
```
* `@meshsdk/core`: Core functionality for network interactions, wallets, and transactions.
## Create a wallet
We will use `MeshWallet`. This class provides methods to create a new wallet, generate mnemonic phrases, and get the wallet address.
### Generate mnemonic phrases
To create a new wallet, we need to generate a mnemonic phrase. A mnemonic phrase is a set of words that can be used to recover your wallet. It is important to keep your mnemonic phrase safe and secure, as it can be used to access your funds.
To create a new wallet mnemonic, do the following:
```ts
import { MeshWallet } from "@meshsdk/core";
// Generate new mnemonic phrases for your wallet
const mnemonic = MeshWallet.brew();
console.log("Your mnemonic phrases are:", mnemonic);
```
* Use the `brew` method to generate a new mnemonic phrase.
### Initialize the wallet and get the wallet address
Now that we have generated a mnemonic phrase, we can initialize the wallet with it. The `MeshWallet` class provides a method to create a new wallet using the mnemonic phrase.
```ts
// Initialize the wallet with a mnemonic key
const wallet = new MeshWallet({
networkId: 0, // preprod testnet
key: {
type: "mnemonic",
words: mnemonic as string[],
},
});
// Get the wallet address
const address = await wallet.getChangeAddress();
console.log("Your wallet address is:", address);
```
* `networkId`: Specify the network, 0 for preprod testnet.
* `key`: Specify the key type and mnemonic phrases.
* `getChangeAddress`: Method to get the wallet address.
### Run the code
Here is the source code. Create a new file `mnemonic.ts` and copy the code into it:
```ts
import { MeshWallet } from "@meshsdk/core";
// Generate new mnemonic phrases for your wallet
const mnemonic = MeshWallet.brew();
console.log("Your mnemonic phrases are:", mnemonic);
// Initialize the wallet with a mnemonic key
const wallet = new MeshWallet({
networkId: 0, // preprod testnet
key: {
type: "mnemonic",
words: mnemonic as string[],
},
});
// Get the wallet address
const address = await wallet.getChangeAddress();
console.log("Your wallet address is:", address);
```
Update the `package.json` file to add a script to run the code:
```json
{
"type": "module",
"dependencies": {
"@meshsdk/core": "^1.9.0",
},
"scripts": {
"mnemonic": "node mnemonic.ts"
}
}
```
Run the script:
```bash
npm run mnemonic
```
This will generate a new mnemonic phrase and wallet address for you. The output will look something like this:
```bash
> mnemonic
> node mnemonic.ts
Your mnemonic phrases are: [
'access', 'spawn', 'taxi',
'prefer', 'fortune', 'sword',
'nerve', 'price', 'valid',
'panther', 'sure', 'hello',
'layer', 'try', 'grace',
'seven', 'fossil', 'voice',
'tobacco', 'circle', 'measure',
'solar', 'pride', 'together'
]
Your wallet address is: addr_test1qptwuv6dl863u3k93mjrg0hgs0ahl08lfhsudxrwshcsx59cjxatme29s6cl7drjceknunry049shu9eudnsjvwqq9qsuem66d
```
## Send lovelace
Now that we have a wallet and some lovelace, let's learn how to send lovelace using the Mesh SDK. We will use the `MeshTxBuilder` class to create a transaction and send it to the network.
### Get lovelace from faucet
To get some lovelace for testing, you can use the Cardano Preprod Testnet Faucet. Paste your wallet address and click on the "Request funds" button. You should receive some lovelace in your wallet shortly.
### Get Blockfrost API key
In order to create transactions, we need to use APIs to get UTXOs from the network. For this, we will use Blockfrost to get UTXOs and submit transactions. Sign up for a free account and get your API key here.
You should get the preprod API key, which starts with `preprod`. You can find the API key in the "Projects" section of your Blockfrost account.
### Get wallet information
Now, let's get the wallet information using the `MeshWallet` class.
```ts
// Get wallet data needed for the transaction
const utxos = await wallet.getUtxos();
const changeAddress = await wallet.getChangeAddress();
```
* `getUtxos`: Method to get the UTXOs from the wallet.
* `getChangeAddress`: Method to get the change address.
### Create a transaction to send lovelace
Now, we will create a transaction to send lovelace using the `MeshTxBuilder` class.
```ts
// Create the transaction
const txBuilder = new MeshTxBuilder({
fetcher: provider,
verbose: true, // optional, prints the transaction body
});
const unsignedTx = await txBuilder
.txOut(
"addr_test1qpvx0sacufuypa2k4sngk7q40zc5c4npl337uusdh64kv0uafhxhu32dys6pvn6wlw8dav6cmp4pmtv7cc3yel9uu0nq93swx9",
[{ unit: "lovelace", quantity: "1500000" }]
)
.changeAddress(changeAddress)
.selectUtxosFrom(utxos)
.complete();
```
* `txOut`: Add the recipient address and amount.
* `changeAddress`: Set the change address.
* `selectUtxosFrom`: Provide wallet UTXOs into the transaction as inputs.
* `complete`: Create the transaction.
### Sign and submit the transaction
Now that we have created the transaction, we need to sign it and submit it to the network.
```ts
const signedTx = await wallet.signTx(unsignedTx);
const txHash = await wallet.submitTx(signedTx);
console.log("Transaction hash:", txHash);
```
* `signTx`: Method to sign the transaction, which will return the signed transaction.
* `submitTx`: Method to submit the transaction to the network.
### Run the code
Here is the source code. Create a new file `send-lovelace.ts` and copy the code into it:
```ts
import { BlockfrostProvider, MeshTxBuilder, MeshWallet } from "@meshsdk/core";
// Set up the blockchain provider with your key
const provider = new BlockfrostProvider("YOUR_KEY_HERE");
// Initialize the wallet with a mnemonic key
const wallet = new MeshWallet({
networkId: 0,
fetcher: provider,
submitter: provider,
key: {
type: "mnemonic",
words: ["your", "mnemonic", "...", "here"],
},
});
// Get wallet data needed for the transaction
const utxos = await wallet.getUtxos();
const changeAddress = await wallet.getChangeAddress();
// Create the transaction
const txBuilder = new MeshTxBuilder({
fetcher: provider,
verbose: true, // optional, prints the transaction body
});
const unsignedTx = await txBuilder
.txOut(
"addr_test1qpvx0sacufuypa2k4sngk7q40zc5c4npl337uusdh64kv0uafhxhu32dys6pvn6wlw8dav6cmp4pmtv7cc3yel9uu0nq93swx9",
[{ unit: "lovelace", quantity: "1500000" }]
)
.changeAddress(changeAddress)
.selectUtxosFrom(utxos)
.complete();
const signedTx = await wallet.signTx(unsignedTx);
const txHash = await wallet.submitTx(signedTx);
console.log("Transaction hash:", txHash);
```
Update the `package.json` file to add a script to run the code:
```json
{
"type": "module",
"dependencies": {
"@meshsdk/core": "^1.9.0",
},
"scripts": {
"mnemonic": "node mnemonic.ts",
"send-lovelace": "node send-lovelace.ts"
}
}
```
Run the script:
```bash
npm run send-lovelace
```
This will create a transaction to send lovelace to the recipient address and submit it to the network. The output will look something like this:
```bash
> send-lovelace
> node send-lovelace.ts
txBodyJson - before coin selection {"inputs":[],"outputs":[{"address":"addr_test1qpvx0sacufuypa2k4sngk7q40zc5c4npl337uusdh64kv0uafhxhu32dys6pvn6wlw8dav6cmp4pmtv7cc3yel9uu0nq93swx9","amount":[{"unit":"lovelace","quantity":"1500000"}]}],"fee":"0","collaterals":[],"requiredSignatures":[],"referenceInputs":[],"mints":[],"changeAddress":"addr_test1qp2k7wnshzngpqw0xmy33hvexw4aeg60yr79x3yeeqt3s2uvldqg2n2p8y4kyjm8sqfyg0tpq9042atz0fr8c3grjmysdp6yv3","metadata":{},"validityRange":{},"certificates":[],"withdrawals":[],"votes":[],"signingKey":[],"chainedTxs":[],"inputsForEvaluation":{},"network":"mainnet","expectedNumberKeyWitnesses":0,"expectedByronAddressWitnesses":[]}
txBodyJson - after coin selection {"inputs":[{"type":"PubKey","txIn":{"txHash":"99d859b305ab8021e497fad0dc55373e50fffd3e7026142fa3cf5accfe0d3aab","txIndex":1,"amount":[{"unit":"lovelace","quantity":"9823719"}],"address":"addr_test1qp2k7wnshzngpqw0xmy33hvexw4aeg60yr79x3yeeqt3s2uvldqg2n2p8y4kyjm8sqfyg0tpq9042atz0fr8c3grjmysdp6yv3"}}],"outputs":[{"address":"addr_test1qpvx0sacufuypa2k4sngk7q40zc5c4npl337uusdh64kv0uafhxhu32dys6pvn6wlw8dav6cmp4pmtv7cc3yel9uu0nq93swx9","amount":[{"unit":"lovelace","quantity":"1500000"}]},{"address":"addr_test1qp2k7wnshzngpqw0xmy33hvexw4aeg60yr79x3yeeqt3s2uvldqg2n2p8y4kyjm8sqfyg0tpq9042atz0fr8c3grjmysdp6yv3","amount":[{"unit":"lovelace","quantity":"8153730"}]}],"fee":"169989","collaterals":[],"requiredSignatures":[],"referenceInputs":[],"mints":[],"changeAddress":"addr_test1qp2k7wnshzngpqw0xmy33hvexw4aeg60yr79x3yeeqt3s2uvldqg2n2p8y4kyjm8sqfyg0tpq9042atz0fr8c3grjmysdp6yv3","metadata":{},"validityRange":{},"certificates":[],"withdrawals":[],"votes":[],"signingKey":[],"chainedTxs":[],"inputsForEvaluation":{"99d859b305ab8021e497fad0dc55373e50fffd3e7026142fa3cf5accfe0d3aab1":{"input":{"outputIndex":1,"txHash":"99d859b305ab8021e497fad0dc55373e50fffd3e7026142fa3cf5accfe0d3aab"},"output":{"address":"addr_test1qp2k7wnshzngpqw0xmy33hvexw4aeg60yr79x3yeeqt3s2uvldqg2n2p8y4kyjm8sqfyg0tpq9042atz0fr8c3grjmysdp6yv3","amount":[{"unit":"lovelace","quantity":"9823719"}]}}},"network":"mainnet","expectedNumberKeyWitnesses":0,"expectedByronAddressWitnesses":[]}
Transaction hash: 62a825c607e4ca5766325c2fccd7ee98313ff81b7e8a4af67eac421b0f0866ff
```
You should see the transaction hash in the output.
Note, in the `MeshTxBuilder` class, we have set `verbose: true`, which will print the transaction body before and after coin selection. This is useful for debugging and understanding how the transaction is built.
## Source code
The source code for this lesson is available on GitHub.
## Challenge
Create a transaction that sends multiple assets to multiple addresses. Explore the Mesh SDK docs for more!
# Multi-signature Transactions
URL: /resources/cardano-course/lessons/02-multisig
Learn to build multi-signature transactions on Cardano.
***
title: "Multi-signature Transactions"
description: "Learn to build multi-signature transactions on Cardano."
----------------------------------------------------------------------
import Link from "fumadocs-core/link";
A multi-signature (multi-sig) transaction requires more than one user to sign a transaction before it is broadcast on the blockchain. Think of it like a joint savings account where both parties must approve spending. Multi-sig transactions can include two or more required signers, which can be wallets or scripts.
In this lesson, you'll learn how to:
* Build multi-signature transactions to mint a token.
* Set up a NextJS app with a simple web interface to interact with the Cardano blockchain.
## System setup
### Download CIP30 Wallet Extension
To interact with the blockchain, you'll need a wallet extension that supports the CIP30 standard. Choose and download one here.
After downloading the wallet, restore it using the seed phrase you created in the previous lesson.
### Set Up NextJS and Mesh
Open your terminal and run the following command to create a new NextJS application:
```bash
npx create-next-app@latest --typescript mesh-multisig
```
Follow the prompts:
```bash
Need to install the following packages:
Ok to proceed? (y)
✔ Would you like to use ESLint? … Yes
✔ Would you like to use Tailwind CSS? … Yes
✔ Would you like your code inside a `src/` directory? … Yes
✔ Would you like to use App Router? … No
✔ Would you like to use Turbopack for next dev? … No
✔ Would you like to customize the import alias (@/* by default)? … No
```
Navigate to the newly created folder:
```bash
cd mesh-multisig
```
Install the latest version of Mesh:
```bash
npm install @meshsdk/core @meshsdk/react
```
### Add MeshProvider
To use Mesh React, wrap your application with the `MeshProvider` component. Open the `src/app/layout.tsx` file and add:
```ts
import "@/styles/globals.css";
import type { AppProps } from "next/app";
import "@meshsdk/react/styles.css";
import { MeshProvider } from "@meshsdk/react";
export default function App({ Component, pageProps }: AppProps) {
return (
);
}
```
### Add CardanoWallet Component
Add a wallet React component to connect to the wallet and interact with the blockchain. Open the `src/pages/index.tsx` file, delete the existing code, and replace it with:
```ts
import { CardanoWallet, useWallet } from "@meshsdk/react";
export default function Home() {
const { wallet, connected } = useWallet();
return (
);
}
```
Start the development server:
```bash
npm run dev
```
Visit [http://localhost:3000](http://localhost:3000) to view your application. Press **CTRL+C** to stop the server.
You should see a "Connect Wallet" component. Try connecting to your wallet.
## Minting Script
In this section, you'll create a minting script to mint a token using a multi-signature transaction.
### Define the Minting Script
Set up constants for the minting script:
```ts
const provider = new BlockfrostProvider("YOUR_KEY_HERE");
const demoAssetMetadata = {
name: "Mesh Token",
image: "ipfs://QmRzicpReutwCkM6aotuKjErFCUD213DpwPq6ByuzMJaua",
mediaType: "image/jpg",
description: "This NFT was minted by Mesh (https://meshjs.dev/).",
};
const mintingWallet = ["your", "mnemonic", "...", "here"];
```
* Replace `YOUR_KEY_HERE` with your Blockfrost API key.
* Define asset metadata in `demoAssetMetadata`.
* Use a mnemonic for the minting wallet.
### Create Minting Application Wallet
Create a function to build the minting transaction:
```ts
async function buildMintTx(inputs: UTxO[], changeAddress: string) {
const wallet = new MeshWallet({
networkId: 0,
key: {
type: "mnemonic",
words: mintingWallet,
},
});
const { pubKeyHash: keyHash } = deserializeAddress(
await wallet.getChangeAddress()
);
}
```
* `inputs`: UTxOs from your wallet to pay minting fees.
* Initialize the wallet with the mnemonic.
* Derive the `pubKeyHash` for the minting script.
### Create Native Script
Define the native script:
```ts
const nativeScript: NativeScript = {
type: "all",
scripts: [
{
type: "before",
slot: "99999999",
},
{
type: "sig",
keyHash: keyHash,
},
],
};
const forgingScript = ForgeScript.fromNativeScript(nativeScript);
```
* `nativeScript`: Parameters for the script.
* `ForgeScript.fromNativeScript`: Create the forging script.
### Define Asset Metadata
Set up asset metadata:
```ts
const policyId = resolveScriptHash(forgingScript);
const tokenName = "MeshToken";
const tokenNameHex = stringToHex(tokenName);
const metadata = { [policyId]: { [tokenName]: { ...demoAssetMetadata } } };
```
* `policyId`: Derived from the forging script.
* `tokenName`: Name of the token.
* `metadata`: Asset metadata.
### Create Transaction
Build the minting transaction:
```ts
const txBuilder = new MeshTxBuilder({
fetcher: provider,
verbose: true,
});
const unsignedTx = await txBuilder
.mint("1", policyId, tokenNameHex)
.mintingScript(forgingScript)
.metadataValue(721, metadata)
.changeAddress(changeAddress)
.invalidHereafter(99999999)
.requiredSignerHash(keyHash)
.selectUtxosFrom(inputs)
.complete();
```
* `mint`: Add token details.
* `mintingScript`: Attach the minting script.
* `metadataValue`: Add asset metadata.
* `changeAddress`: Specify the change address.
* `invalidHereafter`: Set transaction expiry.
* `selectUtxosFrom`: Use UTxOs for fees.
* `requiredSignerHash` to declare that the minter wallet pub key hash is required.
* `complete`: Finalize the transaction.
### Sign the Transaction
Sign the transaction with the minting wallet:
```ts
const signedTx = await wallet.signTx(unsignedTx, true);
```
### Source code
Here is the complete code for building the minting transaction:
```ts
async function buildMintTx(inputs: UTxO[], changeAddress: string) {
// minting wallet
const wallet = new MeshWallet({
networkId: 0,
key: {
type: "mnemonic",
words: mintingWallet,
},
});
const { pubKeyHash: keyHash } = deserializeAddress(
await wallet.getChangeAddress()
);
// create minting script
const nativeScript: NativeScript = {
type: "all",
scripts: [
{
type: "before",
slot: "99999999",
},
{
type: "sig",
keyHash: keyHash,
},
],
};
const forgingScript = ForgeScript.fromNativeScript(nativeScript);
// create metadata
const policyId = resolveScriptHash(forgingScript);
const tokenName = "MeshToken";
const tokenNameHex = stringToHex(tokenName);
const metadata = { [policyId]: { [tokenName]: { ...demoAssetMetadata } } };
// create transaction
const txBuilder = new MeshTxBuilder({
fetcher: provider,
verbose: true,
});
const unsignedTx = await txBuilder
.mint("1", policyId, tokenNameHex)
.mintingScript(forgingScript)
.metadataValue(721, metadata)
.changeAddress(changeAddress)
.invalidHereafter(99999999)
.requiredSignerHash(keyHash)
.selectUtxosFrom(inputs)
.complete();
const signedTx = await wallet.signTx(unsignedTx, true);
return signedTx;
}
```
## Execute the transaction
Now that we have the minting transaction, we can execute it.
```ts
async function mint() {
if (connected) {
const inputs = await wallet.getUtxos();
const changeAddress = await wallet.getChangeAddress();
const tx = await buildMintTx(inputs, changeAddress);
const signedTx = await wallet.signTx(tx, true);
const txHash = await wallet.submitTx(signedTx);
console.log("Transaction hash:", txHash);
}
}
```
* Check wallet connection.
* Get UTxOs and change address.
* Build, sign, and submit the transaction.
## Source code
The source code for this lesson is available on GitHub.
## Challenge
Create a multi-signature wallet requiring 2 out of 3 signers to approve a transaction. Build and sign a transaction with two signers, submit it, and verify success.
# Aiken Contracts
URL: /resources/cardano-course/lessons/03-aiken-contracts
Building Aiken smart contracts.
***
title: "Aiken Contracts"
description: "Building Aiken smart contracts."
----------------------------------------------
import Link from "fumadocs-core/link";
From lesson 3 to lesson 6, we will explore the core concepts of building Aiken smart contracts. Some materials are abstracted from Andamio's AikenPBL.
### Overview
* **Hello Cardano Course**: Explains selected vital concepts of Aiken smart contract development.
* **AikenPBL**: A complete end-to-end project-based learning course covering essential and basic concepts.
Aiken smart contract development is a specialized field. To dive deeper and start a career as a Cardano on-chain developer, we recommend completing both courses.
## System Setup
Before we begin, let's prepare our system for development. We will use Aiken for this course. Follow one of these guides to set up your system:
1. Aiken Official Installation Guide
2. Andamio's AikenPBL Setup Guide
### Set Up an Empty Aiken Project
Run the following command to create a new Aiken project using Mesh's template:
```bash
npx meshjs 03-aiken-contracts
```
Select the `Aiken` template when prompted.

After installation, a new folder `03-aiken-contracts` will be created with the following structure:
```
03-aiken-contracts
├── aiken-workspace // Main Aiken project folder used in lessons
└── mesh // Folder for equivalent Mesh off-chain code (not used in lessons)
```
### Optional: Install Cardano-Bar
If you use VSCode as your IDE, install the Cardano-Bar extension for code snippets to follow the course more easily.

## Understanding Transaction Context
Cardano contracts are not like traditional smart contracts on other blockchains. They are more like a set of rules governing how transactions are validated. **Validator** is a better term to describe Cardano contracts.
To build Cardano validators, we need to understand how transactions work. Refer to the Aiken documentation for details on the `Transaction` structure.

### Inputs & Outputs
All Cardano transactions must have inputs and outputs:
* **Inputs**: UTXOs being spent in the transaction.
* **Outputs**: UTXOs being created in the transaction.
Refer to Aiken documentation for types:


Key concepts:
* An input references an output of a previous transaction, identified by `output_reference`.
* Validators can check:
* If an input spends from a specific address.
* If an input spends a specific asset.
* If an output sends to a specific address.
* If an output sends a specific asset.
* If input/output datum contains specific information.
### Reference Inputs
`reference_inputs` in `Transaction` are inputs not spent but referenced in the validator. Useful for reading datum from a UTXO without spending it.
### Mint
`mint` in `Transaction` lists assets being minted or burned. Useful for creating or burning tokens.
### Signatures
`extra_signatories` in `Transaction` lists public key hashes required to sign the transaction. Useful for enforcing specific users to sign.
### Time
`validity_range` in `Transaction` specifies the range of slots the transaction is valid for. Useful for enforcing time locks.
## Types of Scripts
Refer to Aiken documentation for types of scripts in Cardano. Common types:
* **Minting**
* **Spending**
* **Withdrawing**

### Minting Script
Minting script validation logic is triggered when assets are minted or burned under the script's policy.
Example: `/aiken-workspace/validators/mint.ak`:
```rs
use cardano/assets.{PolicyId}
use cardano/transaction.{Transaction, placeholder}
validator always_succeed {
mint(_redeemer: Data, _policy_id: PolicyId, _tx: Transaction) {
True
}
else(_) {
fail @"unsupported purpose"
}
}
test test_always_succeed_minting_policy() {
let data = Void
always_succeed.mint(data, #"", placeholder)
}
```
This script compiles into a script with hash `def68337867cb4f1f95b6b811fedbfcdd7780d10a95cc072077088ea`, also called `policy Id`. It validates transactions minting or burning assets under this policy.
#### Parameters
Upgrade the script to allow minting/burning only when signed by a specific key:
```rs
validator minting_policy(owner_vkey: VerificationKeyHash) {
mint(_redeemer: Data, _policy_id: PolicyId, tx: Transaction) {
key_signed(tx.extra_signatories, owner_vkey)
}
else(_) {
fail @"unsupported purpose"
}
}
```
* `owner_vkey`: Public key hash of the owner allowed to mint/burn assets.
* Use `key_signed` from vodka for validation.
#### Redeemer
Extend the policy to include a redeemer specifying the transaction action (minting or burning):
```rs
pub type MyRedeemer {
MintToken
BurnToken
}
validator minting_policy(
owner_vkey: VerificationKeyHash,
minting_deadline: Int,
) {
mint(redeemer: MyRedeemer, policy_id: PolicyId, tx: Transaction) {
when redeemer is {
MintToken -> {
let before_deadline = valid_before(tx.validity_range, minting_deadline)
let is_owner_signed = key_signed(tx.extra_signatories, owner_vkey)
before_deadline? && is_owner_signed?
}
BurnToken -> check_policy_only_burn(tx.mint, policy_id)
}
}
else(_) {
fail @"unsupported purpose"
}
}
```
### Spending Script
Spending script validation is triggered when a UTXO is spent in the transaction.
Example: `/aiken-workspace/validators/spend.ak`:
```rs
pub type Datum {
oracle_nft: PolicyId,
}
validator hello_world {
spend(
datum_opt: Option,
_redeemer: Data,
_input: OutputReference,
tx: Transaction,
) {
when datum_opt is {
Some(datum) ->
when inputs_with_policy(tx.reference_inputs, datum.oracle_nft) is {
[_ref_input] -> True
_ -> False
}
None -> False
}
}
else(_) {
fail @"unsupported purpose"
}
}
```
#### Datum
* `Datum`: Data attached to UTXOs at script addresses.
* Common design pattern: Use an oracle NFT (state thread token) to ensure UTXO uniqueness.
### Withdrawing Script
Withdrawal script validation is triggered when withdrawing from a reward account.
Example: `/aiken-workspace/validators/withdraw.ak`:
```rs
use aiken/crypto.{VerificationKeyHash}
use cardano/address.{Credential, Script}
use cardano/certificate.{Certificate}
use cardano/transaction.{Transaction, placeholder}
validator always_succeed(_key_hash: VerificationKeyHash) {
withdraw(_redeemer: Data, _credential: Credential, _tx: Transaction) {
True
}
publish(_redeemer: Data, _certificate: Certificate, _tx: Transaction) {
True
}
else(_) {
fail @"unsupported purpose"
}
}
test test_always_succeed_withdrawal_policy() {
let data = Void
always_succeed.withdraw("", data, Script(#""), placeholder)
}
```
#### Handling Publishing
All withdrawal scripts must be registered on-chain before they can be used. This is done by publishing a registration certificate with the script hash as the stake credential. The publishing of the script is also validated by the `publish` function in the withdrawal script, which is triggered whenever the current withdrawal script is being registered or deregistered.
#### When withdrawal script is used?
For most Cardano users, we would just use a normal payment key to stake and withdraw rewards. However, it is very popular for Cardano DApps to build withdrawal scripts to enhance the efficiency of validation. We will cover this trick in lesson 5.
# Contract Testing
URL: /resources/cardano-course/lessons/04-contract-testing
Testing Aiken smart contracts.
***
title: "Contract Testing"
description: "Testing Aiken smart contracts."
---------------------------------------------
import Link from "fumadocs-core/link";
Testing Aiken contracts is crucial to ensure they behave as expected. In this lesson, we will cover:
* Preparing a complex contract for testing
* Building mock transactions in Aiken and running tests
## Preparing a Complex Contract
We will enhance the withdrawal contract from the previous lesson to include two user actions: `ContinueCounting` or `StopCounting`.
1. **ContinueCounting**:
* Verify the transaction is signed by the app owner.
* Ensure the app is not expired (using a POSIX timestamp).
* Carry forward the state thread token to the output.
* Increment the count in the state thread token's datum by 1.
2. **StopCounting**:
* Verify the transaction is signed by the app owner.
* Ensure the state thread token is burned (not carried forward to any output).
### Contract Code
```rs
use aiken/crypto.{VerificationKeyHash}
use cardano/address.{Address, Credential}
use cardano/assets.{PolicyId}
use cardano/certificate.{Certificate}
use cardano/transaction.{Transaction}
use cocktail.{input_inline_datum, inputs_with_policy, key_signed, valid_before}
pub type OracleDatum {
app_owner: VerificationKeyHash,
app_expiry: Int,
spending_validator_address: Address,
state_thread_token_policy_id: PolicyId,
}
pub type MyRedeemer {
ContinueCounting
StopCounting
}
validator complex_withdrawal_contract(oracle_nft: PolicyId) {
withdraw(redeemer: MyRedeemer, _credential: Credential, tx: Transaction) {
let Transaction {
reference_inputs,
mint,
extra_signatories,
validity_range,
..
} = tx
expect [oracle_ref_input] = inputs_with_policy(reference_inputs, oracle_nft)
expect OracleDatum {
app_owner,
app_expiry,
..
} = input_inline_datum(oracle_ref_input)
let is_app_owner_signed = key_signed(extra_signatories, app_owner)
when redeemer is {
ContinueCounting -> {
let is_app_not_expired = valid_before(validity_range, app_expiry)
let is_nothing_minted = mint == assets.zero
is_app_owner_signed? && is_app_not_expired? && is_nothing_minted?
}
StopCounting -> todo
}
}
publish(_redeemer: Data, _credential: Certificate, _tx: Transaction) {
True
}
else(_) {
fail @"unsupported purpose"
}
}
```
In this setup, we define 2 potential user action with `MyRedeemer`, either to `ContinueCounting` or `StopCounting`. We built the partial logics for `ContinueCounting` action, which we put all the logics we have learnt from lesson 3.
### `expect`
Notice we touch on the syntax of `expect` the first time here. `expect` is used to enforce the exact pattern for a variable. In above example, `inputs_with_policy(reference_inputs, oracle_nft)` returns `List`. However, since in this application we are confident that there is always one item in the list, perhaps since `oracle_nft` is unique, it is impossible to obtain two inputs with `oracle_nft` in value. So that we can use `expect` here.
### `?` operator
In the last line of `ContinueCounting` branch, you may notice the use of `?` operator. This operator is a tracing operator that helps to trace which condition fails when the validator fails. For example, if `is_app_owner_signed` is false, then the validator will fail with message `is_app_owner_signed?` which helps to identify the root cause of failure.
## Validating Input & Output
We complete the contract by validating inputs and outputs:
```rs
use aiken/crypto.{VerificationKeyHash}
use cardano/address.{Address, Credential}
use cardano/assets.{PolicyId, without_lovelace}
use cardano/certificate.{Certificate}
use cardano/transaction.{Transaction}
use cocktail.{
input_inline_datum, inputs_at_with_policy, inputs_with_policy, key_signed,
output_inline_datum, outputs_at_with_policy, valid_before,
}
pub type OracleDatum {
app_owner: VerificationKeyHash,
app_expiry: Int,
spending_validator_address: Address,
state_thread_token_policy_id: PolicyId,
}
pub type SpendingValidatorDatum {
count: Int,
}
pub type MyRedeemer {
ContinueCounting
StopCounting
}
validator complex_withdrawal_contract(oracle_nft: PolicyId) {
withdraw(redeemer: MyRedeemer, _credential: Credential, tx: Transaction) {
let Transaction {
reference_inputs,
inputs,
outputs,
mint,
extra_signatories,
validity_range,
..
} = tx
expect [oracle_ref_input] = inputs_with_policy(reference_inputs, oracle_nft)
expect OracleDatum {
app_owner,
app_expiry,
spending_validator_address,
state_thread_token_policy_id,
} = input_inline_datum(oracle_ref_input)
expect [state_thread_input] =
inputs_at_with_policy(
inputs,
spending_validator_address,
state_thread_token_policy_id,
)
let is_app_owner_signed = key_signed(extra_signatories, app_owner)
when redeemer is {
ContinueCounting -> {
expect [state_thread_output] =
outputs_at_with_policy(
outputs,
spending_validator_address,
state_thread_token_policy_id,
)
expect input_datum: SpendingValidatorDatum =
input_inline_datum(state_thread_input)
expect output_datum: SpendingValidatorDatum =
output_inline_datum(state_thread_output)
let is_app_not_expired = valid_before(validity_range, app_expiry)
let is_count_added = input_datum.count + 1 == output_datum.count
let is_nothing_minted = mint == assets.zero
is_app_owner_signed? && is_app_not_expired? && is_count_added && is_nothing_minted?
}
StopCounting -> {
let state_thread_value =
state_thread_input.output.value |> without_lovelace()
let is_thread_token_burned = mint == assets.negate(state_thread_value)
is_app_owner_signed? && is_thread_token_burned?
}
}
}
publish(_redeemer: Data, _credential: Certificate, _tx: Transaction) {
True
}
else(_) {
fail @"unsupported purpose"
}
}
```
We have used some new techniques here. We have extracted the inline datum of the state thread token input and output using `input_inline_datum` and `output_inline_datum`. We have also used `inputs_at_with_policy` and `outputs_at_with_policy` to filter the inputs and outputs at a specific address with a specific policy ID. With that, we can compare the datum of input and output to ensure the count is incremented by 1.
In `StopCounting` case, we ensure the state thread token is burned by checking the `mint` field of the transaction. We use `without_lovelace` to ignore the lovelace part of the value when comparing.
## Build mock transaction in Aiken
All Aiken contracts can be interpreted as simple functions, which takes in a few parameters and returns a boolean value. This makes it easy to test the contract by providing mock data.
In Aiken, we can build testing functions with `test` keyword, followed by running `aiken check` in project root to execute the tests.
The vanilla example:
```rs
test always_true() {
True
}
```
With `aiken check`, we will see:

### Testing always succeed and always fail cases
In our complex withdrawal contract, we have a `publish` function that always returns `True`. We can write a test for it:
```rs
use mocktail.{complete, mock_utxo_ref, mocktail_tx}
test test_publish() {
let data = Void
complex_withdrawal_contract.publish(
"",
data,
RegisterCredential(Script(#""), Never),
mocktail_tx() |> complete(),
)
}
```
In this test, we call the `publish` function of our contract with mock parameters. We use `mocktail_tx()` to create a mock transaction and `complete()` to provide an empty `Transaction`.
For the rest of script purposes, it will fallback to the `else` branch which always fails. We can write a test for it:
```rs
test test_else() fail {
complex_withdrawal_contract.else(
"",
ScriptContext(
mocktail_tx() |> complete(),
Void,
Spending(mock_utxo_ref(0, 0), None),
),
)
}
```
Note that the test is not returning a `False`, but the programme breaks with `fail`. We can indicate that the test is expected to fail by adding `fail` after the test name.
Running `aiken check` will show:

### Testing `withdraw` function
You will notice the `withdraw` function is validated the `Transaction` mostly, therefore, we should craft the `Transaction` carefully. However, crafting it with mock data is a bit tricky especially when we have to deal with all the Aiken types. `vodka` library comes to rescue.
In `vodka`, the `mocktail` module provides a set of functions to create mock data for testing Aiken contracts. We can use `mocktail_tx()` to create a mock `Transaction` and then use various functions to modify the transaction to fit our test case.
```rs
const mock_oracle_nft = mock_policy_id(0)
const mock_oracle_address = mock_script_address(0, None)
const mock_oracle_value =
assets.from_asset(mock_oracle_nft, "", 1) |> assets.add("", "", 2_000_000)
const mock_app_owner = mock_pub_key_hash(0)
const mock_spending_validator_address = mock_script_address(1, None)
const mock_state_thread_token_policy_id = mock_policy_id(1)
const mock_state_thread_value =
assets.from_asset(mock_state_thread_token_policy_id, "", 1)
|> assets.add("", "", 2_000_000)
const mock_oracle_datum =
OracleDatum {
app_owner: mock_app_owner,
app_expiry: 1000,
spending_validator_address: mock_spending_validator_address,
state_thread_token_policy_id: mock_state_thread_token_policy_id,
}
fn mock_datum(count: Int) -> SpendingValidatorDatum {
SpendingValidatorDatum { count }
}
fn mock_continue_counting_tx() -> Transaction {
mocktail_tx()
|> ref_tx_in(
True,
mock_tx_hash(0),
0,
mock_oracle_value,
mock_oracle_address,
)
|> ref_tx_in_inline_datum(True, mock_oracle_datum)
|> tx_in(
True,
mock_tx_hash(1),
0,
mock_state_thread_value,
mock_spending_validator_address,
)
|> tx_in_inline_datum(True, mock_datum(0))
|> tx_out(True, mock_spending_validator_address, mock_state_thread_value)
|> tx_out_inline_datum(True, mock_datum(1))
|> required_signer_hash(True, mock_app_owner)
|> invalid_hereafter(True, 999)
|> complete()
}
```
We can import all the `mock_...` functions from `mocktail` module to build up the types we need. In above example, we create a mock transaction for `ContinueCounting` action. We create the oracle NFT input with inline datum, the state thread token input with inline datum, the state thread token output with inline datum, the required signer and the validity range.
Now we can write a test for `ContinueCounting` action:
```rs
test success_continue_counting() {
complex_withdrawal_contract.withdraw(
mock_oracle_nft,
ContinueCounting,
Credential.Script(#""),
mock_continue_counting_tx(),
)
}
```
### Dynamically Testing Failure Cases
In the mocktail transaction building methods, we can pass a boolean parameter to indicate whether we want the field to be present or not. This allows us to dynamically create failure cases by omitting certain fields.
```rs
type ContinueCountingTest {
is_ref_input_presented: Bool,
is_thread_input_presented: Bool,
is_thread_output_presented: Bool,
is_count_added: Bool,
is_app_owner_signed: Bool,
is_tx_not_expired: Bool,
}
fn mock_continue_counting_tx(test_case: ContinueCountingTest) -> Transaction {
let ContinueCountingTest {
is_ref_input_presented,
is_thread_input_presented,
is_thread_output_presented,
is_count_added,
is_app_owner_signed,
is_tx_not_expired,
} = test_case
let output_datum =
if is_count_added {
mock_datum(1)
} else {
mock_datum(0)
}
mocktail_tx()
|> ref_tx_in(
is_ref_input_presented,
mock_tx_hash(0),
0,
mock_oracle_value,
mock_oracle_address,
)
|> ref_tx_in_inline_datum(is_ref_input_presented, mock_oracle_datum)
|> tx_in(
is_thread_input_presented,
mock_tx_hash(1),
0,
mock_state_thread_value,
mock_spending_validator_address,
)
|> tx_in_inline_datum(is_thread_input_presented, mock_datum(0))
|> tx_out(
is_thread_output_presented,
mock_spending_validator_address,
mock_state_thread_value,
)
|> tx_out_inline_datum(is_thread_output_presented, output_datum)
|> required_signer_hash(is_app_owner_signed, mock_app_owner)
|> invalid_hereafter(is_tx_not_expired, 999)
|> complete()
}
```
And we update the successful test accordingly:
```rs
test success_continue_counting() {
let test_case =
ContinueCountingTest {
is_ref_input_presented: True,
is_thread_input_presented: True,
is_thread_output_presented: True,
is_count_added: True,
is_app_owner_signed: True,
is_tx_not_expired: True,
}
complex_withdrawal_contract.withdraw(
mock_oracle_nft,
ContinueCounting,
Credential.Script(#""),
mock_continue_counting_tx(test_case),
)
}
```
And we can populate the failure cases at ease:
```rs
test fail_continue_counting_no_ref_input() fail {
let test_case =
ContinueCountingTest {
is_ref_input_presented: False,
is_thread_input_presented: True,
is_thread_output_presented: True,
is_count_added: True,
is_app_owner_signed: True,
is_tx_not_expired: True,
}
complex_withdrawal_contract.withdraw(
mock_oracle_nft,
ContinueCounting,
Credential.Script(#""),
mock_continue_counting_tx(test_case),
)
}
test fail_continue_counting_no_thread_input() fail {
let test_case =
ContinueCountingTest {
is_ref_input_presented: True,
is_thread_input_presented: False,
is_thread_output_presented: True,
is_count_added: True,
is_app_owner_signed: True,
is_tx_not_expired: True,
}
complex_withdrawal_contract.withdraw(
mock_oracle_nft,
ContinueCounting,
Credential.Script(#""),
mock_continue_counting_tx(test_case),
)
}
test fail_continue_counting_no_thread_output() fail {
let test_case =
ContinueCountingTest {
is_ref_input_presented: True,
is_thread_input_presented: True,
is_thread_output_presented: False,
is_count_added: True,
is_app_owner_signed: True,
is_tx_not_expired: True,
}
complex_withdrawal_contract.withdraw(
mock_oracle_nft,
ContinueCounting,
Credential.Script(#""),
mock_continue_counting_tx(test_case),
)
}
test fail_continue_counting_incorrect_count() {
let test_case =
ContinueCountingTest {
is_ref_input_presented: True,
is_thread_input_presented: True,
is_thread_output_presented: True,
is_count_added: False,
is_app_owner_signed: True,
is_tx_not_expired: True,
}
!complex_withdrawal_contract.withdraw(
mock_oracle_nft,
ContinueCounting,
Credential.Script(#""),
mock_continue_counting_tx(test_case),
)
}
test fail_continue_counting_not_signed_by_owner() {
let test_case =
ContinueCountingTest {
is_ref_input_presented: True,
is_thread_input_presented: True,
is_thread_output_presented: True,
is_count_added: True,
is_app_owner_signed: False,
is_tx_not_expired: True,
}
!complex_withdrawal_contract.withdraw(
mock_oracle_nft,
ContinueCounting,
Credential.Script(#""),
mock_continue_counting_tx(test_case),
)
}
test fail_continue_counting_app_expired() {
let test_case =
ContinueCountingTest {
is_ref_input_presented: True,
is_thread_input_presented: True,
is_thread_output_presented: True,
is_count_added: True,
is_app_owner_signed: True,
is_tx_not_expired: False,
}
!complex_withdrawal_contract.withdraw(
mock_oracle_nft,
ContinueCounting,
Credential.Script(#""),
mock_continue_counting_tx(test_case),
)
}
```
Running `aiken check` will show:

### Exercise
Write tests for `StopCounting` action. Refer to `ContinueCounting` tests for guidance. Suggested answers are in the code example.
# Avoid Redundant Validation
URL: /resources/cardano-course/lessons/05-avoid-redundant-validation
Key contract best practice - reduce redundant validation logics being run onchain.
***
title: "Avoid Redundant Validation"
description: "Key contract best practice - reduce redundant validation logics being run onchain."
-------------------------------------------------------------------------------------------------
import Link from "fumadocs-core/link";
Do you have a question about the previous lessons - why have we performed even minting and state update in spending validators with withdrawal script? We know that every time we spend a UTxO from a spending validator would trigger checks, why can't I validate the counter update in the spending validator directly?
## A Transaction with Multiple Script Validation
Imagine there is a complex transaction that involves multiple script validations. For example, a transaction that mints tokens, unlocking multiple script UTxOs, and withdraws funds. Each of these actions may require its own set of checks and validations.
```mermaid
graph TB
%% Layout subgraph for labels at top with horizontal alignment
subgraph Checks[" Common Validations "]
direction LR
C1["C1: Check if owner signature exists"] ~~~ C2["C2: Check if not expired"] ~~~ C3["C3: Any other common checks"]
end
%% Remove the connecting lines between checks
linkStyle 0 stroke-width:0px
linkStyle 1 stroke-width:0px
%% Connect checks to components with dotted lines
Checks -.-> A1
Checks -.-> A2
Checks -.-> A3
Checks -.-> M
Checks -.-> W
%% Inputs on left
A1[Script Input 1] --> TX
A2[Script Input 2] --> TX
A3[Script Input 3] --> TX
%% Center transaction
TX((Transaction))
%% Mint on top
M[Token Minting] --> TX
%% Withdraw at bottom
W[Withdrawal Script] --> TX
%% Clear styling with bright colors and black text
style TX fill:#FFA07A,stroke:#333,stroke-width:2px,color:#000
style M fill:#87CEEB,stroke:#333,stroke-width:2px,color:#000
style W fill:#DDA0DD,stroke:#333,stroke-width:2px,color:#000
style A1 fill:#E0E0E0,stroke:#333,stroke-width:2px,color:#000
style A2 fill:#E0E0E0,stroke:#333,stroke-width:2px,color:#000
style A3 fill:#E0E0E0,stroke:#333,stroke-width:2px,color:#000
style C1 fill:#FFFFFF,stroke:#333,stroke-width:1px,color:#000
style C2 fill:#FFFFFF,stroke:#333,stroke-width:1px,color:#000
style C3 fill:#FFFFFF,stroke:#333,stroke-width:1px,color:#000
%% Positioning
classDef default text-align:center
```
If we enforced all the common checks in each of the scripts, we would end up with redundant validations that are executed multiple times, leading to inefficiencies and increased transaction costs.
## How can we do better?
We can avoid redundant validations by centralizing the common checks in a single script, which is executed only once. This way, we can ensure that all the necessary validations are performed without duplicating the logic across multiple scripts.
```mermaid
graph TB
%% Layout subgraph for labels at top with horizontal alignment
subgraph Checks[" Common Validations "]
direction LR
C1["C1: Check if owner signature exists"] ~~~ C2["C2: Check if not expired"] ~~~ C3["C3: Any other common checks"]
end
%% Add spacing
WithdrawalCheck[" Check for Withdrawal Script Validating "]
%% Organize layout with invisible connections for spacing
Checks ~~~ WithdrawalCheck
%% Connect validation flows
Checks -.-> W
WithdrawalCheck -.-> A1
WithdrawalCheck -.-> A2
WithdrawalCheck -.-> A3
WithdrawalCheck -.-> M
%% Inputs on left with consistent arrows
A1[Script Input 1] --> TX
A2[Script Input 2] --> TX
A3[Script Input 3] --> TX
%% Transaction and other components
TX((Transaction))
M[Token Minting] --> TX
W[Withdrawal Script] --> TX
%% Styling
style TX fill:#FFA07A,stroke:#333,stroke-width:2px,color:#000
style M fill:#87CEEB,stroke:#333,stroke-width:2px,color:#000
style W fill:#DDA0DD,stroke:#333,stroke-width:2px,color:#000
style A1 fill:#E0E0E0,stroke:#333,stroke-width:2px,color:#000
style A2 fill:#E0E0E0,stroke:#333,stroke-width:2px,color:#000
style A3 fill:#E0E0E0,stroke:#333,stroke-width:2px,color:#000
style C1 fill:#FFFFFF,stroke:#333,stroke-width:1px,color:#000
style C2 fill:#FFFFFF,stroke:#333,stroke-width:1px,color:#000
style C3 fill:#FFFFFF,stroke:#333,stroke-width:1px,color:#000
style WithdrawalCheck fill:#FFFFFF,stroke:#333,stroke-width:1px,color:#000
%% Remove visible connections between check boxes
linkStyle 0 stroke-width:0px
linkStyle 1 stroke-width:0px
linkStyle 2 stroke-width:0px
```
In the architecture above, we have a single `WithdrawalCheck` script that performs the common validations. This script is executed once, and it checks the conditions for all the other scripts involved in the transaction.
## Example: Continue from Lesson 4
Let's assume we have all the common logics checked in the lesson 4's withdrawal script. Rather than copy pasting all checks from withdrawal script to the spending and minting validators, we can do this instead to avoid redundant validations:
### Spending
```rs
use aiken/crypto.{ScriptHash}
use cardano/transaction.{OutputReference, Transaction}
use cocktail.{withdrawal_script_validated}
validator spending_logics_delegated(
delegated_withdrawal_script_hash: ScriptHash,
) {
spend(
_datum_opt: Option,
_redeemer: Data,
_input: OutputReference,
tx: Transaction,
) {
withdrawal_script_validated(
tx.withdrawals,
delegated_withdrawal_script_hash,
)
}
else(_) {
fail @"unsupported purpose"
}
}
```
### Minting
```rs
use aiken/crypto.{ScriptHash}
use cardano/assets.{PolicyId}
use cardano/transaction.{Transaction}
use cocktail.{withdrawal_script_validated}
validator minting_logics_delegated(
delegated_withdrawal_script_hash: ScriptHash,
) {
mint(_redeemer: Data, _policy_id: PolicyId, tx: Transaction) {
withdrawal_script_validated(
tx.withdrawals,
delegated_withdrawal_script_hash,
)
}
else(_) {
fail @"unsupported purpose"
}
}
```
## Why delegate to withdrawal script?
You might notice that we are delegating the validation to the withdrawal script. This is a common pattern in Cardano smart contracts, where a withdrawal script is used to perform common validations for multiple scripts.
However, validation delegation can happen in different ways. For example, you can delegate all checks to a spending or minting validator as well, why would we prefer withdrawal script most of the time?
### Clean trigger
Recall that spending validation is triggered when a UTxO is spent, and minting validation is triggered when a token is minted. By delegating to a withdrawal script, we can ensure that the common validations are performed only once, regardless of how many scripts are involved in the transaction.
And the withdrawal script can be triggered by withdrawing 0 lovelace, aka the community call it [`withdraw 0 trick`](https://aiken-lang.org/fundamentals/common-design-patterns#forwarding-validation--other-withdrawal-tricks). It is a clean way to trigger the validation without affecting the transaction's logic or state.
## Simplified Explanation
### Why Avoid Redundant Validation?
When multiple scripts are involved in a transaction, repeating the same checks in each script leads to inefficiencies and higher costs. Instead, centralizing common checks in a single script ensures that validations are performed only once, saving resources and simplifying logic.
### Centralized Validation
By using a single script, such as a withdrawal script, we can delegate common checks to it. This script acts as a central validator for all other scripts in the transaction.
### Example Flow
Imagine a transaction with multiple scripts:
* **Minting Script**: Handles token creation.
* **Spending Script**: Manages UTxO spending.
* **Withdrawal Script**: Performs common checks.
Instead of duplicating checks in each script, the withdrawal script validates all common conditions, ensuring efficiency.
### Delegation in Practice
Here’s how delegation works:
* **Spending Validator**: Delegates validation to the withdrawal script.
* **Minting Validator**: Also delegates validation to the withdrawal script.
This approach reduces redundancy and keeps the logic clean and maintainable.
### Clean Trigger with Withdrawal Script
The withdrawal script can be triggered using the `withdraw 0 trick`, which allows validation without affecting the transaction state. This method is widely used for its simplicity and effectiveness.
### Key Benefits
* **Efficiency**: Reduces redundant checks.
* **Cost-Effective**: Lowers transaction fees.
* **Maintainability**: Simplifies script logic.
By following this pattern, developers can create smarter and more efficient Cardano contracts.
# Interpreting Blueprint
URL: /resources/cardano-course/lessons/06-interpreting-blueprint
Understanding, interpreting, and translating Aiken blueprint into offchain code.
***
title: "Interpreting Blueprint"
description: "Understanding, interpreting, and translating Aiken blueprint into offchain code."
-----------------------------------------------------------------------------------------------
import Link from "fumadocs-core/link";
In this lesson, we will explore how to interpret the blueprint generated from onchain code development and translate it into offchain code. This blueprint serves as a bridge between the onchain and offchain worlds, enabling seamless interaction with smart contracts.
## What is a Blueprint?
A blueprint is a standardized JSON file introduced by CIP57. It is the ultimate output of Cardano smart contract development and contains essential information about the contract. Regardless of the development method, the blueprint includes:
* **`preamble`**: Meta-information about the contract.
* **`validators`**: Named validators with type definitions and compiled code.
* **`definitions`**: A registry of reusable definitions across the specification.
### Generating a Blueprint
To generate a blueprint using Aiken, follow these steps:
1. Build your contracts by running:
```sh
aiken build
```
2. Locate the blueprint in the `plutus.json` file at the root of your project.
## Understanding the Blueprint
### `preamble`
The `preamble` section contains meta-information about the contract, such as its name, description, version, and Plutus version. The Plutus version is particularly important for preparing offchain code.
Example:
```json
{
"preamble": {
"title": "meshsdk/aiken-template",
"description": "Aiken contracts for project 'meshsdk/aiken-template'",
"version": "0.0.0",
"plutusVersion": "v3", // Key information for offchain code
"compiler": {
"name": "Aiken",
"version": "v1.1.16+23061c0"
},
"license": "Apache-2.0"
}
}
```
### `validators`
The `validators` section includes type information for `datum`, `redeemer`, and `parameters`, along with the compiled validator code. These definitions may reference reusable types in the `definitions` section.
Example:
```json
{
"title": "spend.spending_logics_delegated.spend",
"datum": {
"title": "_datum_opt",
"schema": {
"$ref": "#/definitions/Data"
}
},
"redeemer": {
"title": "_redeemer",
"schema": {
"$ref": "#/definitions/Data"
}
},
"parameters": [
{
"title": "delegated_withdrawal_script_hash",
"schema": {
"$ref": "#/definitions/aiken~1crypto~1ScriptHash"
}
}
],
"compiledCode": "58ac010100229800aba2aba1aba0aab9faab9eaab9dab9a9bae0024888888896600264646644b30013370e900118039baa001899914c004c03400a601a601c0052259800800c528456600266ebc00cc02cc03c00629462660040046020002805100d2444660020026eacc040c044c044c044c044c044c044c034dd518080048c020dd500099ba548008cc028dd4802a5eb822c8030c024004c024c028004c024004c010dd5004c52689b2b200401",
"hash": "9c9666ddc12fc42f0151cd029c150c7d410ede9fe3885c248c8c26a0"
}
```
Notice the `spend.spending_logics_delegated.else` compiles to the same hash as the `spend.spending_logics_delegated.spend` function. This is because the `else` branch is not executed in this case, but it is still part of the validator code. So when we are building multiple purposes validators, they will compile to the same hash, i.e. same script, which can be utilitized in certain architectures.
```json
{
"title": "spend.spending_logics_delegated.else",
"redeemer": {
"schema": {}
},
"parameters": [
{
"title": "delegated_withdrawal_script_hash",
"schema": {
"$ref": "#/definitions/aiken~1crypto~1ScriptHash"
}
}
],
"compiledCode": "58ac010100229800aba2aba1aba0aab9faab9eaab9dab9a9bae0024888888896600264646644b30013370e900118039baa001899914c004c03400a601a601c0052259800800c528456600266ebc00cc02cc03c00629462660040046020002805100d2444660020026eacc040c044c044c044c044c044c044c034dd518080048c020dd500099ba548008cc028dd4802a5eb822c8030c024004c024c028004c024004c010dd5004c52689b2b200401",
"hash": "9c9666ddc12fc42f0151cd029c150c7d410ede9fe3885c248c8c26a0"
}
```
### `definitions`
The `definitions` section provides reusable type definitions referenced in the `validators` section. This is where you can find schemas for types used in the contract.
Example:
```json
{
"definitions": {
"Data": {
"title": "Data",
"description": "Any Plutus data."
},
"aiken/crypto/ScriptHash": {
"title": "ScriptHash",
"dataType": "bytes"
},
"cardano/assets/PolicyId": {
"title": "PolicyId",
"dataType": "bytes"
},
"withdraw/MyRedeemer": {
"title": "MyRedeemer",
"anyOf": [
{
"title": "ContinueCounting",
"dataType": "constructor",
"index": 0,
"fields": []
},
{
"title": "StopCounting",
"dataType": "constructor",
"index": 1,
"fields": []
}
]
}
}
}
```
## Automating Offchain Code Generation
Translating the blueprint into offchain code manually can be time-consuming. Fortunately, the Mesh community has developed a tool in the `Cardano Bar VSCode Extension` to automate this process.
In Mesh community, we have developed a tool in `Cardano Bar VSCode Extension` that can automate this process. By running the following below steps, you can generate the offchain code that corresponds to the blueprint:
1. Create a new TypeScript file, e.g., `offchain.ts`.
2. Open the command palette in VSCode (Ctrl+Shift+P or Cmd+Shift+P).
3. Type `Parse blueprint to Typescript - Mesh` and select it.

4. Select the `plutus.json` file that contains the blueprint.

The generated `offchain.ts` file will include all necessary functions to interact with the onchain code, such as spending, minting, and querying the contract. For more details, refer to the Mesh SDK documentation.
## Conclusion
Understanding and interpreting the blueprint is a vital skill for Cardano developers. With tools like the Mesh `Blueprint` class, you can streamline the process and focus on building robust applications.
# Vesting Contract
URL: /resources/cardano-course/lessons/07-vesting
Vesting smart contract that locks up funds and allows the beneficiary to withdraw the funds after the lockup period.
***
title: "Vesting Contract"
description: "Vesting smart contract that locks up funds and allows the beneficiary to withdraw the funds after the lockup period."
-----------------------------------------------------------------------------------------------------------------------------------
import Link from "fumadocs-core/link";
Vesting contracts are a type of smart contract designed to lock funds for a specified period, ensuring that only the designated beneficiary can withdraw them after the lockup period ends. This lesson will guide you through the process of understanding, implementing, and interacting with a vesting contract on Cardano.
## Overview
### What is a Vesting Contract?
A vesting contract locks funds and allows the beneficiary to withdraw them after a specified lockup period. It ensures security and control over fund distribution.
### Key Features:
* **Lockup Period**: Funds are locked until a specific timestamp.
* **Owner and Beneficiary**: The owner deposits funds, and the beneficiary withdraws them after the lockup period.
## Smart Contract Details
### Datum Definition
The datum serves as the configuration for the vesting contract. It includes:
* **`lock_until`**: The timestamp until which funds are locked.
* **`owner`**: Credentials of the fund owner.
* **`beneficiary`**: Credentials of the beneficiary.
First, we define the datum's shape, as this datum serves as configuration and contains the different parameters of our vesting operation.
```
pub type VestingDatum {
/// POSIX time in milliseconds, e.g. 1672843961000
lock_until: Int,
/// Owner's credentials
owner: ByteArray,
/// Beneficiary's credentials
beneficiary: ByteArray,
}
```
This datum can be found in `aiken-vesting/aiken-workspace/lib/vesting/types.ak`.
Next, we define the spend validator.
```
validator vesting {
spend(
datum_opt: Option,
_redeemer: Data,
_input: OutputReference,
tx: Transaction,
) {
// In principle, scripts can be used for different purpose (e.g. minting
// assets). Here we make sure it's only used when 'spending' from a eUTxO
expect Some(datum) = datum_opt
or {
key_signed(tx.extra_signatories, datum.owner),
and {
key_signed(tx.extra_signatories, datum.beneficiary),
valid_after(tx.validity_range, datum.lock_until),
},
}
}
else(_) {
fail
}
}
```
In this example, we define a `vesting` validator that ensures the following conditions are met:
* The transaction must be signed by owner
Or:
* The transaction must be signed by beneficiary
* The transaction must be valid after the lockup period
### How it works
The owner of the funds deposits the funds into the vesting contract. The funds are locked up until the lockup period expires.
Transactions can include validity intervals that specify when the transaction is valid, both from and until a certain time. The ledger verifies these validity bounds before executing a script and will only proceed if they are legitimate.
This approach allows scripts to incorporate a sense of time while maintaining determinism within the script's context. For instance, if a transaction has a lower bound `A`, we can infer that the current time is at least `A`.
It's important to note that since we don't control the upper bound, a transaction might be executed even 30 years after the vesting delay. However, from the script's perspective, this is entirely acceptable.
The beneficiary can withdraw the funds after the lockup period expires. The beneficiary can also be different from the owner of the funds.
### Testing
To test the vesting contract, we have provided the a comphrehensive test script,you can run tests with `aiken check`.
The test script includes the following test cases:
* success unlocking
* success unlocking with only owner signature
* success unlocking with beneficiary signature and time passed
* fail unlocking with only beneficiary signature
* fail unlocking with only time passed
We recommend you to check out `vesting.ak` to learn more.
### Compile and build script
To compile the script, run the following command:
```sh
aiken build
```
This command will generate a CIP-0057 Plutus blueprint, which you can find in `plutus.json`.
## Deposit funds
First, the owner can deposit funds into the vesting contract. The owner can specify the lockup period.
```ts
const assets: Asset[] = [
{
unit: "lovelace",
quantity: "10000000",
},
];
const lockUntilTimeStamp = new Date();
lockUntilTimeStamp.setMinutes(lockUntilTimeStamp.getMinutes() + 1);
```
In this example, we deposit 10 ADA into the vesting contract. The funds are locked up for 1 minute, and the beneficiary is specified.
```ts
// app wallet
const wallet = new MeshWallet({
networkId: 0,
key: {
type: "mnemonic",
words: appWallet,
},
fetcher: provider,
submitter: provider,
});
const utxos = await wallet.getUtxos();
const changeAddress = await wallet.getChangeAddress();
const { pubKeyHash: ownerPubKeyHash } = deserializeAddress(changeAddress);
const { pubKeyHash: beneficiaryPubKeyHash } =
deserializeAddress(beneficiaryAddress);
```
For this tutorial, we use another wallet to fund the deposit. We get the UTXOs from the app wallet and the change address.
We also need both the owner and beneficiary's public key hashes. We can get the public key hash from the address using `deserializeAddress`.
```ts
const txBuilder = new MeshTxBuilder({
fetcher: provider,
verbose: true,
});
const unsignedTx = await txBuilder
.txOut(script.address, amount)
.txOutInlineDatumValue(
mConStr0([lockUntilTimeStampMs, ownerPubKeyHash, beneficiaryPubKeyHash])
)
.changeAddress(changeAddress)
.selectUtxosFrom(utxos)
.complete();
```
We construct the transaction to deposit the funds into the vesting contract. We specify the script address of the vesting contract, the amount to deposit, and the lockup period, owner, and beneficiary of the funds.
Finally, we sign and submit the transaction.
```ts
const signedTx = await wallet.signTx(unsignedTx);
const txHash = await wallet.submitTx(signedTx);
```
Upon successful execution, you will receive a transaction hash. Save this transaction hash for withdrawing the funds.
Example of a successful deposit transaction.
## Withdraw funds
After the lockup period expires, the beneficiary can withdraw the funds from the vesting contract. The owner can also withdraw the funds from the vesting contract.
First, let's look for the UTxOs containing the funds locked in the vesting contract.
```ts
const txHashFromDesposit =
"556f2bfcd447e146509996343178c046b1b9ad4ac091a7a32f85ae206345e925";
const utxos = await provider.fetchUTxOs(txHash);
const vestingUtxo = utxos[0];
```
We fetch the UTxOs containing the funds locked in the vesting contract. We specify the transaction hash of the deposit transaction.
Like before, we prepare a few variables to be used in the transaction. We get the wallet address and the UTXOs of the wallet. We also get the script address of the vesting contract, to send the funds to the script address. We also get the owner and beneficiary public key hashes.
Next, we prepare the datum and the slot number to set the transaction valid interval to be valid only after the slot.
```ts
const datum = deserializeDatum(vestingUtxo.output.plutusData!);
const invalidBefore =
unixTimeToEnclosingSlot(
Math.min(datum.fields[0].int as number, Date.now() - 15000),
SLOT_CONFIG_NETWORK.preprod
) + 1;
```
We prepare the datum and the slot number to set the transaction valid interval to be valid only after the slot. We get the lockup period from the datum and set the transaction valid interval to be valid only after the lockup period.
Next, we construct the transaction to withdraw the funds from the vesting contract.
```ts
const txBuilder = new MeshTxBuilder({
fetcher: provider,
verbose: true,
});
const unsignedTx = await txBuilder
.spendingPlutusScript("V3")
.txIn(
vestingUtxo.input.txHash,
vestingUtxo.input.outputIndex,
vestingUtxo.output.amount,
script.address
)
.spendingReferenceTxInInlineDatumPresent()
.spendingReferenceTxInRedeemerValue("")
.txInScript(script.cbor)
.txOut(walletAddress, [])
.txInCollateral(
collateralInput.txHash,
collateralInput.outputIndex,
collateralOutput.amount,
collateralOutput.address
)
.invalidBefore(invalidBefore)
.requiredSignerHash(pubKeyHash)
.changeAddress(walletAddress)
.selectUtxosFrom(inputUtxos)
.complete();
```
we construct the transaction to withdraw the funds from the vesting contract. We specify the UTxO containing the funds locked in the vesting contract, the script address of the vesting contract, the wallet address to send the funds to, and the transaction valid interval.
Finally, we sign and submit the transaction.
Example of a successful withdraw transaction.
## Source code
The source code for this lesson is available on GitHub.
## Challenge
Change the vesting contract to gradual vesting schedule where instead of a single unlock date, implement gradual vesting where funds are released on a schedule. Or add a cliff feature where the beneficiary must wait for a minimum period before any tokens become available.
# Plutus NFT Contract
URL: /resources/cardano-course/lessons/08-plutus-nft
Plutus NFT smart contract enforces non-fungibility and uniqueness of the NFT under the same policy.
***
title: "Plutus NFT Contract"
description: "Plutus NFT smart contract enforces non-fungibility and uniqueness of the NFT under the same policy."
------------------------------------------------------------------------------------------------------------------
import Link from "fumadocs-core/link";
After the simple vesting contract, let's level up to a more complex contract with multiple validators interacting with each other. This lesson will guide you step-by-step through the process of creating a Plutus NFT contract, ensuring clarity and simplicity.
## Overview
This lesson focuses on creating a smart contract for minting NFTs with an automatically incremented index. The contract ensures non-fungibility and uniqueness of the NFTs under the same policy. To achieve this, we will:
1. Set up a one-time minting policy to create an oracle token.
2. Use the oracle token to maintain the state and index of NFTs.
3. Increment the token index with each new NFT minted.
## Step 1: Oracle NFT
The oracle NFT acts as the single source of truth for the system. It uses a state thread token to ensure consistency. We will implement a one-time minting policy for the oracle NFT.
### Code Explanation
The following code defines the minting policy for the oracle NFT:
```rs
pub type MintPolarity {
RMint
RBurn
}
validator oracle_nft(utxo_ref: OutputReference) {
mint(redeemer: MintPolarity, policy_id: PolicyId, tx: Transaction) {
when redeemer is {
RMint -> {
let Transaction { inputs, .. } = tx
let hash_equal =
fn(input: Input) {
let hash = input.output_reference
utxo_ref == hash
}
let target_input_exist = list.find(inputs, hash_equal)
when target_input_exist is {
Some(_) -> True
None -> False
}
}
RBurn -> check_policy_only_burn(tx.mint, policy_id)
}
}
else(_) {
fail
}
}
```
**Key Points:**
* `RMint` ensures the token is minted only once.
* `RBurn` allows the token to be burned but prevents reminting.
## Step 2: Oracle Validator
The oracle validator holds the current state of the NFT index. It defines the datum and redeemer types for state changes.
### Datum Definition
```rs
pub type OracleDatum {
count: Int,
lovelace_price: Int,
fee_address: Address,
}
```
### Redeemer Types
```rs
pub type OracleRedeemer {
MintPlutusNFT
StopOracle
}
```
### Validator Logic
The validator ensures the state changes are valid:
```rs
validator oracle {
spend(
datum_opt: Option,
redeemer: OracleRedeemer,
input: OutputReference,
tx: Transaction,
) {
let Transaction { mint, inputs, outputs, extra_signatories, .. } = tx
expect Some(OracleDatum { count, lovelace_price, fee_address }) = datum_opt
expect Some(own_input) = find_input(inputs, input)
expect [(oracle_nft_policy, _, _)] =
list.filter(flatten(own_input.output.value), fn(x) { x.1st != "" })
todo
}
else(_) {
fail
}
}
```
In this setup, we identified the own input with `find_input` function, which is a utility function that finds the input with the given output reference. We also expect the oracle NFT policy to be present in the own input's value.
We know that for state change, we will have exactly one input from current address, and one output to the same address. We can then perform below pattern matching:
```rs
let own_address = own_input.output.address
when
(
redeemer,
inputs_at_with_policy(inputs, own_address, oracle_nft_policy),
outputs_at_with_policy(outputs, own_address, oracle_nft_policy),
)
is {
(MintPlutusNFT, [_], [only_output]) -> {
todo
}
_ -> False
}
```
Add in core checks for `MintPlutusNFT`:
```rs
let is_output_value_clean = list.length(flatten(only_output.value)) == 2
let is_count_updated =
only_output.datum == InlineDatum(
OracleDatum { count: count + 1, lovelace_price, fee_address },
)
let is_fee_paid =
get_all_value_to(outputs, fee_address)
|> value_geq(from_lovelace(lovelace_price))
is_output_value_clean? && is_count_updated? && is_fee_paid?
```
Notice there is a `is_output_value_clean` check here, which ensures the changed state UTxO only contains the state thread token and ADA, i.e. no other assets are present in the output value. This is to prevent a common vulnerability of `Unbounded Value`, where people can attach infinitely amount of assets to the output to make it unspendable by overflowing the transaction size.
Complete with `StopOracle` logics:
```rs
(StopOracle, [_], _) -> {
let is_oracle_nft_burnt =
only_minted_token(mint, oracle_nft_policy, "", -1)
let owner_key = address_payment_key(fee_address)
let is_owner_signed = key_signed(extra_signatories, owner_key)
is_oracle_nft_burnt? && is_owner_signed?
}
```
A complete oracle validator looks like this:
```rs
validator oracle {
spend(
datum_opt: Option,
redeemer: OracleRedeemer,
input: OutputReference,
tx: Transaction,
) {
let Transaction { mint, inputs, outputs, extra_signatories, .. } = tx
expect Some(OracleDatum { count, lovelace_price, fee_address }) = datum_opt
expect Some(own_input) = find_input(inputs, input)
expect [(oracle_nft_policy, _, _)] =
list.filter(flatten(own_input.output.value), fn(x) { x.1st != "" })
let own_address = own_input.output.address
when
(
redeemer,
inputs_at_with_policy(inputs, own_address, oracle_nft_policy),
outputs_at_with_policy(outputs, own_address, oracle_nft_policy),
)
is {
(MintPlutusNFT, [_], [only_output]) -> {
let is_output_value_clean = list.length(flatten(only_output.value)) == 2
let is_count_updated =
only_output.datum == InlineDatum(
OracleDatum { count: count + 1, lovelace_price, fee_address },
)
let is_fee_paid =
get_all_value_to(outputs, fee_address)
|> value_geq(from_lovelace(lovelace_price))
is_output_value_clean? && is_count_updated? && is_fee_paid?
}
(StopOracle, [_], _) -> {
let is_oracle_nft_burnt =
only_minted_token(mint, oracle_nft_policy, "", -1)
let owner_key = address_payment_key(fee_address)
let is_owner_signed = key_signed(extra_signatories, owner_key)
is_oracle_nft_burnt? && is_owner_signed?
}
_ -> False
}
}
else(_) {
fail
}
}
```
**Key Points:**
* `MintPlutusNFT` increments the NFT index and ensures fees are paid.
* `StopOracle` burns the oracle NFT and requires owner authorization.
## Step 3: Plutus NFT Minting Validator
The Plutus NFT minting validator ensures the NFT is unique and non-fungible.
### Code Explanation
```rs
pub type MintPolarity {
RMint
RBurn
}
validator plutus_nft(collection_name: ByteArray, oracle_nft: PolicyId) {
mint(redeemer: MintPolarity, policy_id: PolicyId, tx: Transaction) {
when redeemer is {
RMint -> {
let Transaction { inputs, mint, .. } = tx
expect [auth_input] = inputs_with_policy(inputs, oracle_nft)
expect InlineDatum(input_datum) = auth_input.output.datum
expect OracleDatum { count, .. }: OracleDatum = input_datum
let asset_name =
collection_name
|> concat(" (")
|> concat(convert_int_to_bytes(count))
|> concat(")")
only_minted_token(mint, policy_id, asset_name, 1)
}
RBurn -> check_policy_only_burn(tx.mint, policy_id)
}
}
else(_) {
fail
}
}
```
**Key Points:**
* Ensures the NFT name includes the incremented index.
* Validates the minting and burning process.
The code example above is presented in Mesh repository, you can find the equivalent tests there.
### Compile and build script
1. Compile the script using:
```sh
aiken build
```
This command will generate a CIP-0057 Plutus blueprint, which you can find in `plutus.json`.
## Setup Oracle
To set up the oracle, we need to mint the oracle NFT first and lock it in the oracle validator. This is a one-time operation, and we can do it with the following code:
We prepare the wallet and tx-builder similar to previous lessons, and get some static information:
```ts
const compiledCode = ;
const utxos = await wallet?.getUtxos();
const collateral = (await wallet.getCollateral())[0]!;
const walletAddress = await wallet.getChangeAddress()
const paramUtxo = utxos[0]!;
const param: Data = mOutputReference(
paramUtxo.input.txHash,
paramUtxo.input.outputIndex,
);
const paramScript = applyParamsToScript(compiledCode, [param]);
const policyId = resolveScriptHash(paramScript, "V3");
const tokenName = "";
const { pubKeyHash, stakeCredentialHash } =
deserializeAddress(walletAddress);
```
Then we can perform the setup:
```ts
const txHex = await txBuilder
.txIn(
paramUtxo.input.txHash,
paramUtxo.input.outputIndex,
paramUtxo.output.amount,
paramUtxo.output.address,
)
.mintPlutusScriptV3()
.mint("1", policyId, tokenName)
.mintingScript(paramScript)
.mintRedeemerValue(mConStr0([]))
.txOut(oracleAddress, [{ unit: policyId, quantity: "1" }])
.txOutInlineDatumValue(
mConStr0([
0,
lovelacePrice,
mPubKeyAddress(pubKeyHash, stakeCredentialHash),
]),
)
.txInCollateral(
collateral.input.txHash,
collateral.input.outputIndex,
collateral.output.amount,
collateral.output.address,
)
.changeAddress(walletAddress)
.selectUtxosFrom(utxos)
.complete();
```
Important, we need to save the `paramUtxo` information for later use:
## Mint Plutus NFT
To mint the Plutus NFT, first we need to define static info:
```ts
type OracleDatum = ConStr0<[Integer, Integer, PubKeyAddress]>;
const oracleCompileCode = ;
const oracleNftCbor = applyParamsToScript(blueprint.validators[2]!.compiledCode, [
mOutputReference(paramUtxo.txHash, paramUtxo.outputIndex),
])
const oracleNftPolicyId = resolveScriptHash(oracleNftCbor, "V3");
const oracleCbor = applyCborEncoding()
const oracleAddress = serializePlutusScript(
{
code: oracleCbor,
version: "V3",
},
"", // the stake credential, we can supply if we have one
"preprod",
).address
const getAddressUtxosWithToken = async (
walletAddress: string,
assetHex: string,
) => {
let utxos = await fetcher.fetchAddressUTxOs(walletAddress);
return utxos.filter((u) => {
const assetAmount = u.output.amount.find(
(a: any) => a.unit === assetHex,
)?.quantity;
return Number(assetAmount) >= 1;
});
};
```
And a helper method to get the existing oracle information:
```ts
const getOracleData = async () => {
const oracleUtxo = (
await getAddressUtxosWithToken(oracleAddress, oracleNftPolicyId)
)[0]!;
const oracleDatum: OracleDatum = parseDatumCbor(
oracleUtxo!.output.plutusData!,
);
const nftIndex = oracleDatum.fields[0].int;
const lovelacePrice = oracleDatum.fields[1].int;
const feeCollectorAddressObj = oracleDatum.fields[2];
const feeCollectorAddress = serializeAddressObj(
feeCollectorAddressObj,
"preprod",
);
const policyId = resolveScriptHash(oracleNftCbor, "V3");
return {
nftIndex,
policyId,
lovelacePrice,
oracleUtxo,
oracleNftPolicyId,
feeCollectorAddress,
feeCollectorAddressObj,
};
};
```
Then we can build the core logic to mint the Plutus NFT:
```ts
const utxos = await wallet?.getUtxos();
const collateral = (await wallet.getCollateral())[0]!;
const walletAddress = await wallet.getChangeAddress()
const collectionName = "MyNFTCollection";
const nftCbor = applyParamsToScript(, [
stringToHex(collectionName),
oracleNftPolicyId,
]);
const {
nftIndex,
policyId,
lovelacePrice,
oracleUtxo,
oracleNftPolicyId,
feeCollectorAddress,
feeCollectorAddressObj,
} = await getOracleData();
const tokenName = `${collectionName} (${nftIndex})`;
const tokenNameHex = stringToHex(tokenName);
const updatedOracleDatum: OracleDatum = conStr0([
integer((nftIndex as number) + 1),
integer(lovelacePrice),
feeCollectorAddressObj,
]);
const tx = txBuilder
.spendingPlutusScriptV3()
.txIn(
oracleUtxo.input.txHash,
oracleUtxo.input.outputIndex,
oracleUtxo.output.amount,
oracleUtxo.output.address,
0
)
.txInRedeemerValue(mConStr0([]))
.txInScript(oracleCbor)
.txInInlineDatumPresent()
.txOut(oracleAddress, [{ unit: oracleNftPolicyId, quantity: "1" }])
.txOutInlineDatumValue(updatedOracleDatum, "JSON")
.mintPlutusScriptV3()
.mint("1", policyId, tokenNameHex)
.mintingScript(nftCbor);
const assetMetadata = {
name: `MyNFTCollection (${nftIndex})`,
image: "ipfs://QmRzicpReutwCkM6aotuKjErFCUD213DpwPq6ByuzMJaua",
mediaType: "image/jpg",
description: "This NFT was minted by Mesh (https://meshjs.dev/).",
};
const metadata = { [policyId]: { [tokenName]: { ...assetMetadata } } };
tx.metadataValue(721, metadata);
tx.mintRedeemerValue(mConStr0([]))
.txOut(feeCollectorAddress, [
{ unit: "lovelace", quantity: lovelacePrice.toString() },
])
.txInCollateral(
collateral.input.txHash,
collateral.input.outputIndex,
collateral.output.amount,
collateral.output.address,
)
.changeAddress(walletAddress)
.selectUtxosFrom(utxos);
const txHex = await tx.complete();
```
## Packaged functions
The Plutus NFT contract has been implemented in `@meshsdk/contract` package, you can find further explanation at the Mesh documentation and more details about entire stack source code at Mesh repository.
# End-to-End Hydra Happy Flow
URL: /resources/cardano-course/lessons/09-hydra
Layer 2 scaling solution for Cardano, an end-to-end tutorial for state channel between two participants using the Hydra Head protocol.
***
title: "End-to-End Hydra Happy Flow"
description: "Layer 2 scaling solution for Cardano, an end-to-end tutorial for state channel between two participants using the Hydra Head protocol."
-----------------------------------------------------------------------------------------------------------------------------------------------------
import Link from "fumadocs-core/link";
> **Note:** Work in progress, come back later.
# Web3 Services
URL: /resources/cardano-course/lessons/10-web3-services
Onboard seamlessly with non-custodial wallet-as-a-service and transaction sponsorship.
***
title: "Web3 Services"
description: "Onboard seamlessly with non-custodial wallet-as-a-service and transaction sponsorship."
-----------------------------------------------------------------------------------------------------
import Link from "fumadocs-core/link";
## Wallet as a Service
wallet-as-a-service (WaaS) solution provide a seamless way for users to transact on-chain. Developers can integrate social logins and other familiar experiences into their applications, making onboarding fast and effortless. Users can create non-custodial wallets (the user owns the key and have full control over their digital assets) instantly without needing to manage private keys. Users can also recover their wallets and export their private keys at any time.
Wallet key management system uses Shamir's Secret Sharing to split the private key into multiple parts. The parts are stored in different locations, such as the user's device and encrypted in the server. Neither UTXOS nor the developer's application has access to the user's keys. The private key is reconstructed only on the user's device during transaction signing, in an isolated iframe, which persists in-memory and is destroyed after the transaction is signed.
Overall, the integration with a wallet-as-a-service solution provides a self-custody wallet to end users and accelerates the time-to-market for developers.
Visit UTXOS wallet documentation for the latest tutorial on how to integrate UTXOS wallet into your application.
## Transaction Sponsorship
Network fees are the costs required to execute transactions, compensating network validators for processing and securing the blockchain. These fees are paid in the network's native token, such as ADA on Cardano. While essential for incentivizing validators and maintaining network security, network fees can pose a challenge for end users, as they must hold tokens to cover these costs when interacting with applications.
Sponsorship enables developers to create seamless user experiences by eliminating the need for end-users to hold tokens in their wallets for transactions. Instead, transactions inputs and network fees are deducted from the developer's wallet, solving one of the most significant challenges in blockchain application development and enabling frictionless onboarding and interaction for end-users.
Visit UTXOS sponsorship documentation for the latest tutorial on how to integrate UTXOS wallet into your application.
# Course Lessons
URL: /resources/cardano-course/lessons
Step-by-step lessons for mastering Cardano development with Mesh SDK and Aiken.
***
title: "Course Lessons"
description: "Step-by-step lessons for mastering Cardano development with Mesh SDK and Aiken."
icon: "DocumentTextIcon"
------------------------
import Link from "fumadocs-core/link";
Master Cardano development through our comprehensive lesson series. Each lesson builds upon the previous one, taking you from basic concepts to advanced smart contract development.
## Lesson Overview
### Getting Started
* Lesson 1: Hello World - Set up Mesh SDK and send your first transaction
* Lesson 2: Multi-signature Transactions - Build transactions requiring multiple signatures
### Smart Contract Development
* Lesson 3: Aiken Contracts - Introduction to Aiken smart contract development
* Lesson 4: Contract Testing - Testing strategies and best practices
* Lesson 5: Avoid Redundant Validation - Optimization patterns for efficient contracts
* Lesson 6: Interpreting Blueprint - Understanding and using Aiken blueprints
### Advanced Contracts
* Lesson 7: Vesting Contract - Build a token vesting smart contract
* Lesson 8: Plutus NFT Contract - Create NFT minting contracts with auto-increment
### Scaling & Services
* Lesson 9: Hydra End-to-End - Layer 2 scaling with Hydra Head protocol
* Lesson 10: Web3 Services - Wallet-as-a-service and transaction sponsorship
## Learning Path
We recommend following the lessons in order, as each builds upon concepts introduced in previous lessons. However, if you're already familiar with certain topics, feel free to jump to specific lessons that interest you.
## Support
If you have questions or need help with any lesson, join our community channels or check out the Developer Resources page for additional support options.
# Online Workshops
URL: /resources/cardano-course/workshops
Join our online workshops to learn Mesh SDK alongside other Cardano developers.
***
title: "Online Workshops"
description: "Join our online workshops to learn Mesh SDK alongside other Cardano developers."
icon: "UserGroupIcon"
---------------------
import Link from "fumadocs-core/link";
Join our community-driven workshops to learn Mesh SDK and Cardano development with other builders. These sessions provide hands-on experience, live demonstrations, and Q\&A opportunities with the Mesh team and community experts.
## Workshop Sessions
### Online Session 1
**May 28, 2025** | 24 Attendees
Introduction to MeshJS and the Mesh SDK, covering architecture overview and getting started with building on Cardano. Hosted with Blazar Labs.
### Online Session 2
**May 28, 2025** | 35 Attendees
Deep dive into the Mesh SDK features, wallet generation, transaction building, and introduction to the Web3 SDK. Hosted with Cardano India.
## What to Expect
Our workshops typically cover:
* **Live Demonstrations** - See Mesh SDK in action with real-world examples
* **Hands-on Coding** - Build along with the instructors
* **Q\&A Sessions** - Get your questions answered by experts
* **Community Networking** - Connect with other Cardano builders
* **Latest Features** - Learn about new Mesh SDK capabilities
## Stay Updated
To receive notifications about upcoming workshops:
* Join our Discord community
* Follow @meshsdk on Twitter
* Star our GitHub repository
## Past Workshop Resources
All workshop recordings and slide decks are available in the individual session pages. These resources are valuable for self-paced learning and reference.
## Suggest a Topic
Have an idea for a workshop topic? We'd love to hear from you! Share your suggestions in our Discord community or open a discussion on GitHub.
# Online Session 1
URL: /resources/cardano-course/workshops/online-1
Online workshop for Cardano Application Development Course.
***
title: "Online Session 1"
description: "Online workshop for Cardano Application Development Course."
--------------------------------------------------------------------------
import Link from "fumadocs-core/link";
### May 28, 2025
Attendees: 24
This was the first workshop on the second milestone of our funded proposal at Cardano Project Catalyst Fund13 which enables us to provide online meetups and materials to support builders in the Cardano ecosystem.
This Workshop was hosted with our friends at Blazar Labs joined by Jingles, the founder of Mesh, introducing MeshJS and the Mesh SDK to newcomers as well as experienced builders in the Cardano Ecosystem.
We introduced MeshJS and our open source tools which help developers in their builder journey on Cardano. From a high level overview (presenting general architecture) to specific details with an open Q\&A at the end of the session to respond to questions from the audience.
The recording of the online workshop can be found at:
[https://www.youtube.com/watch?v=Spz8iAggFns](https://www.youtube.com/watch?v=Spz8iAggFns)
The respective slide deck can be found at:
[https://docs.google.com/presentation/d/18PkDiQ3dLnRSHwmjwbGEbWxcqc8j8aQ3Pm6ZbsEpf8Y/edit?usp=sharing](https://docs.google.com/presentation/d/18PkDiQ3dLnRSHwmjwbGEbWxcqc8j8aQ3Pm6ZbsEpf8Y/edit?usp=sharing)
# Online Session 2
URL: /resources/cardano-course/workshops/online-2
Online workshop for Cardano Application Development Course.
***
title: "Online Session 2"
description: "Online workshop for Cardano Application Development Course."
--------------------------------------------------------------------------
import Link from "fumadocs-core/link";
### May 28, 2025
Attendees: 35
This was the second workshop on the second milestone of our funded proposal at Cardano Project Catalyst Fund13 which enables us to provide online meetups and materials to support builders in the Cardano ecosystem.
Hosted with our friends at Cardano India. Introducing MeshJS and the Mesh SDK to newcomers as well as experienced builders in the Cardano Ecosystem.
We discussed the development of the Mesh SDK, an open-source library for TypeScript. We highlighted its features, such as being production-ready, feature-complete, and mainnet-ready. We also explained the two flavors of the SDK: pure TypeScript and WebAssembly. The SDK is designed to be easy to use and has a comprehensive documentation system with live demos. We demonstrated how to get started with the SDK, including how to generate a wallet and build transactions. I also discussed the concept of change addresses and how to handle multiple assets and addresses in transactions. We then introduced the Web3 SDK, a tool for onboarding users and businesses to Web3. We demonstrated how it works, emphasizing its self-custody and security features. We also mentioned the roadmap for the SDK, including transaction sponsorship and integration with Free Tokens. Finally, We addressed some questions about the SDK and its use cases.
Recording at:
[https://www.zoom.us/clips/share/-BE\_B7KMS6CfZ\_52A6xnDg](https://www.zoom.us/clips/share/-BE_B7KMS6CfZ_52A6xnDg)
The respective slide deck can be found at:
[https://docs.google.com/presentation/d/18PkDiQ3dLnRSHwmjwbGEbWxcqc8j8aQ3Pm6ZbsEpf8Y/edit?usp=sharing](https://docs.google.com/presentation/d/18PkDiQ3dLnRSHwmjwbGEbWxcqc8j8aQ3Pm6ZbsEpf8Y/edit?usp=sharing)
 # Write a Smart Contract
URL: /aiken/first-script
Learn how to write your first Aiken script, with a simple redeemer
***
title: "Write a Smart Contract"
description: "Learn how to write your first Aiken script, with a simple redeemer"
---------------------------------------------------------------------------------
import Link from "fumadocs-core/link";
## Write your first smart contract in Aiken
In this section, we will walk you through the process of writing a simple smart contract in Aiken.
We will use the Visual Studio Code editor for this tutorial. You can use any other editor of your choice, but we recommend using Visual Studio Code for its rich feature set and support for Aiken.
First, we create a new Aiken project within this project folder:
```bash
$ aiken new meshjs/hello_world
$ cd hello_world
$ aiken check
```
Remember to check your Aiken project by running `aiken check` after creating a new project and as you develop the contract.
### Write the smart contract \[!toc]
Let's create file for our validator, `validators/hello_world.ak`:
```tsx
use aiken/hash.{Blake2b_224, Hash}
use aiken/list
use aiken/transaction.{ScriptContext}
use aiken/transaction/credential.{VerificationKey}
type Datum {
owner: Hash
# Write a Smart Contract
URL: /aiken/first-script
Learn how to write your first Aiken script, with a simple redeemer
***
title: "Write a Smart Contract"
description: "Learn how to write your first Aiken script, with a simple redeemer"
---------------------------------------------------------------------------------
import Link from "fumadocs-core/link";
## Write your first smart contract in Aiken
In this section, we will walk you through the process of writing a simple smart contract in Aiken.
We will use the Visual Studio Code editor for this tutorial. You can use any other editor of your choice, but we recommend using Visual Studio Code for its rich feature set and support for Aiken.
First, we create a new Aiken project within this project folder:
```bash
$ aiken new meshjs/hello_world
$ cd hello_world
$ aiken check
```
Remember to check your Aiken project by running `aiken check` after creating a new project and as you develop the contract.
### Write the smart contract \[!toc]
Let's create file for our validator, `validators/hello_world.ak`:
```tsx
use aiken/hash.{Blake2b_224, Hash}
use aiken/list
use aiken/transaction.{ScriptContext}
use aiken/transaction/credential.{VerificationKey}
type Datum {
owner: Hash